

What this destination does
This page covers Databricks as a destination — data flowing out of Zeotap CDP into your Databricks workspace. Databricks is a cloud-based data platform that unifies data engineering, data science, and analytics on a single collaborative workspace, built around Apache Spark. It enables organisations to process large-scale data, build machine learning models, and perform advanced analytics efficiently. Integrated with Zeotap, you can push an audience created in Zeotap CDP to your Databricks instance. Delivery runs in two hops. Zeotap CDP writes the audience as a JSON file into a Google Cloud Storage (GCS) bucket that you own, and Databricks Autoloader picks that file up from the bucket and loads the records into Delta tables, at the catalog, schema, and table you nominate.Databricks works in both directions. This page covers the destination side. To pull data the other way — from a Databricks table into Zeotap CDP — see Databricks source overview.
Prerequisites
Before you create a Databricks destination in Zeotap CDP, have the following ready. The section below shows where each value lives.
- Databricks Host — your Databricks workspace URL.
- Databricks access token — a personal access token used to authenticate API calls.
- Cluster ID — the ID of the Databricks cluster the job runs on.
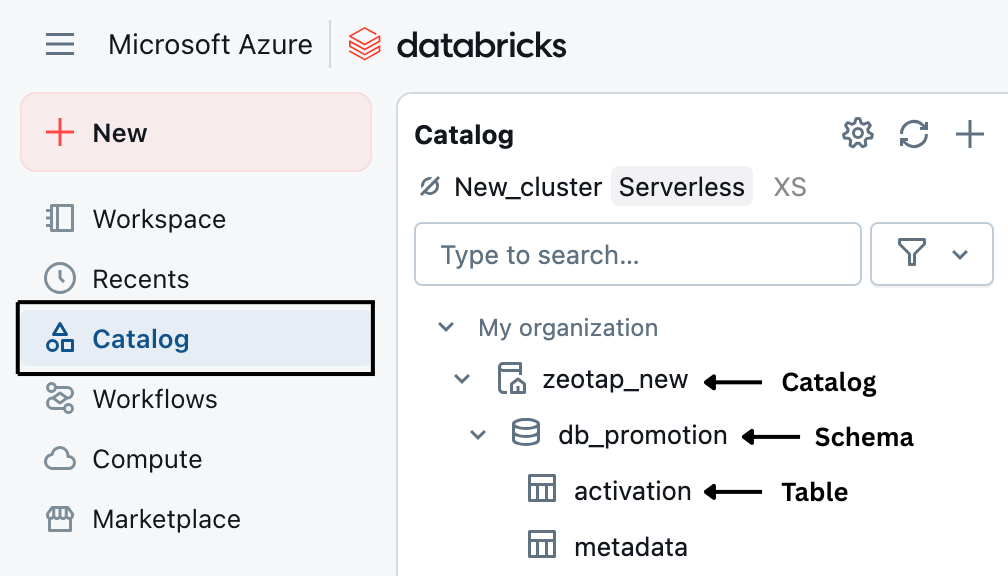
- Catalog — the catalog name within Unity Catalog or the Databricks metastore (for example,
zeotap_new). - Schema — the schema name where the table exists or will be created (for example,
db_promotion). - Table — the target table name for loading the data (for example,
activation). - GCP bucket — the Google Cloud Storage bucket where the exported data is delivered. This is your own bucket; the data lands there before Databricks Autoloader picks it up into Delta tables.
- GCP project ID — the project that owns that GCS bucket.
- Service account — either a Client Service Account JSON that you supply, or the Zeotap Service Account. See Choose the service account.
Catalog is not Catalogue. On this page, Catalog keeps Databricks’ own spelling because it refers to a Unity Catalog (or metastore) catalog — the top level of the
catalog.schema.table identifier inside your workspace. It is not the Zeotap CDP Catalogue, which is where your ingested fields are mapped to customer attributes before activation.Supported identifiers and actions
You can send any identifier or attribute of your choice from Zeotap CDP to Databricks using this integration.Sending of event data is not supported currently.
Find the Databricks and Google Cloud values
Databricks Host
The host is in the URL for your Databricks account.
Databricks access token
Access tokens are managed under Settings → User Settings → Developer → Generate new token.
Cluster ID
The cluster ID is found under Compute → cluster name → automatically added tags.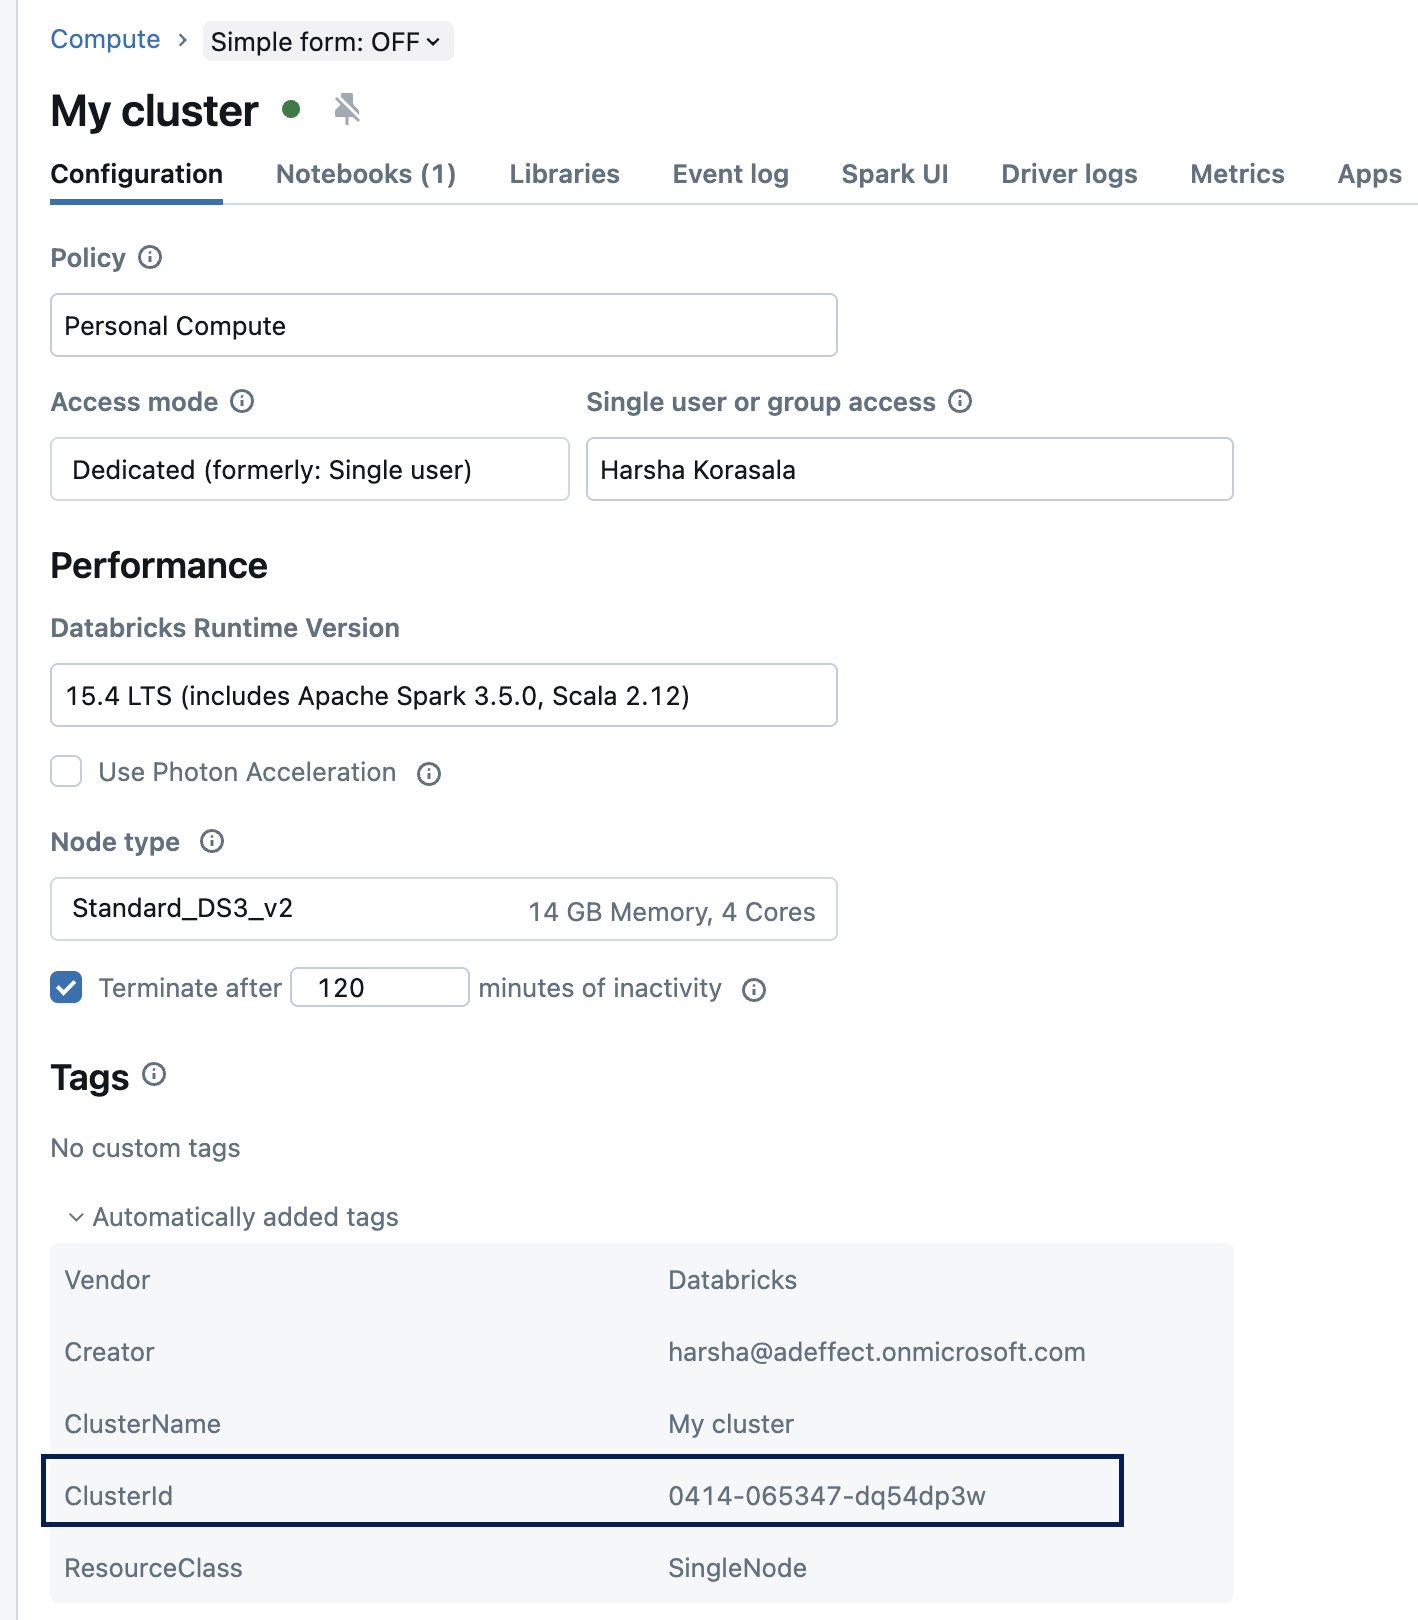
Catalog, Schema, and Table
Together these three values form the destination table in Databricks:- Catalog — the catalog name within Unity Catalog or the Databricks metastore, for example
zeotap_new. - Schema — the schema name where the table exists or will be created, for example
db_promotion. - Table — the target table name for loading the data, for example
activation.
GCP bucket and project ID
The GCP bucket is the name of the Google Cloud Storage bucket where the exported data is delivered. This is your own bucket — the data is placed there before being picked up by Databricks Autoloader into Delta tables. The GCP project ID is the project that owns that bucket.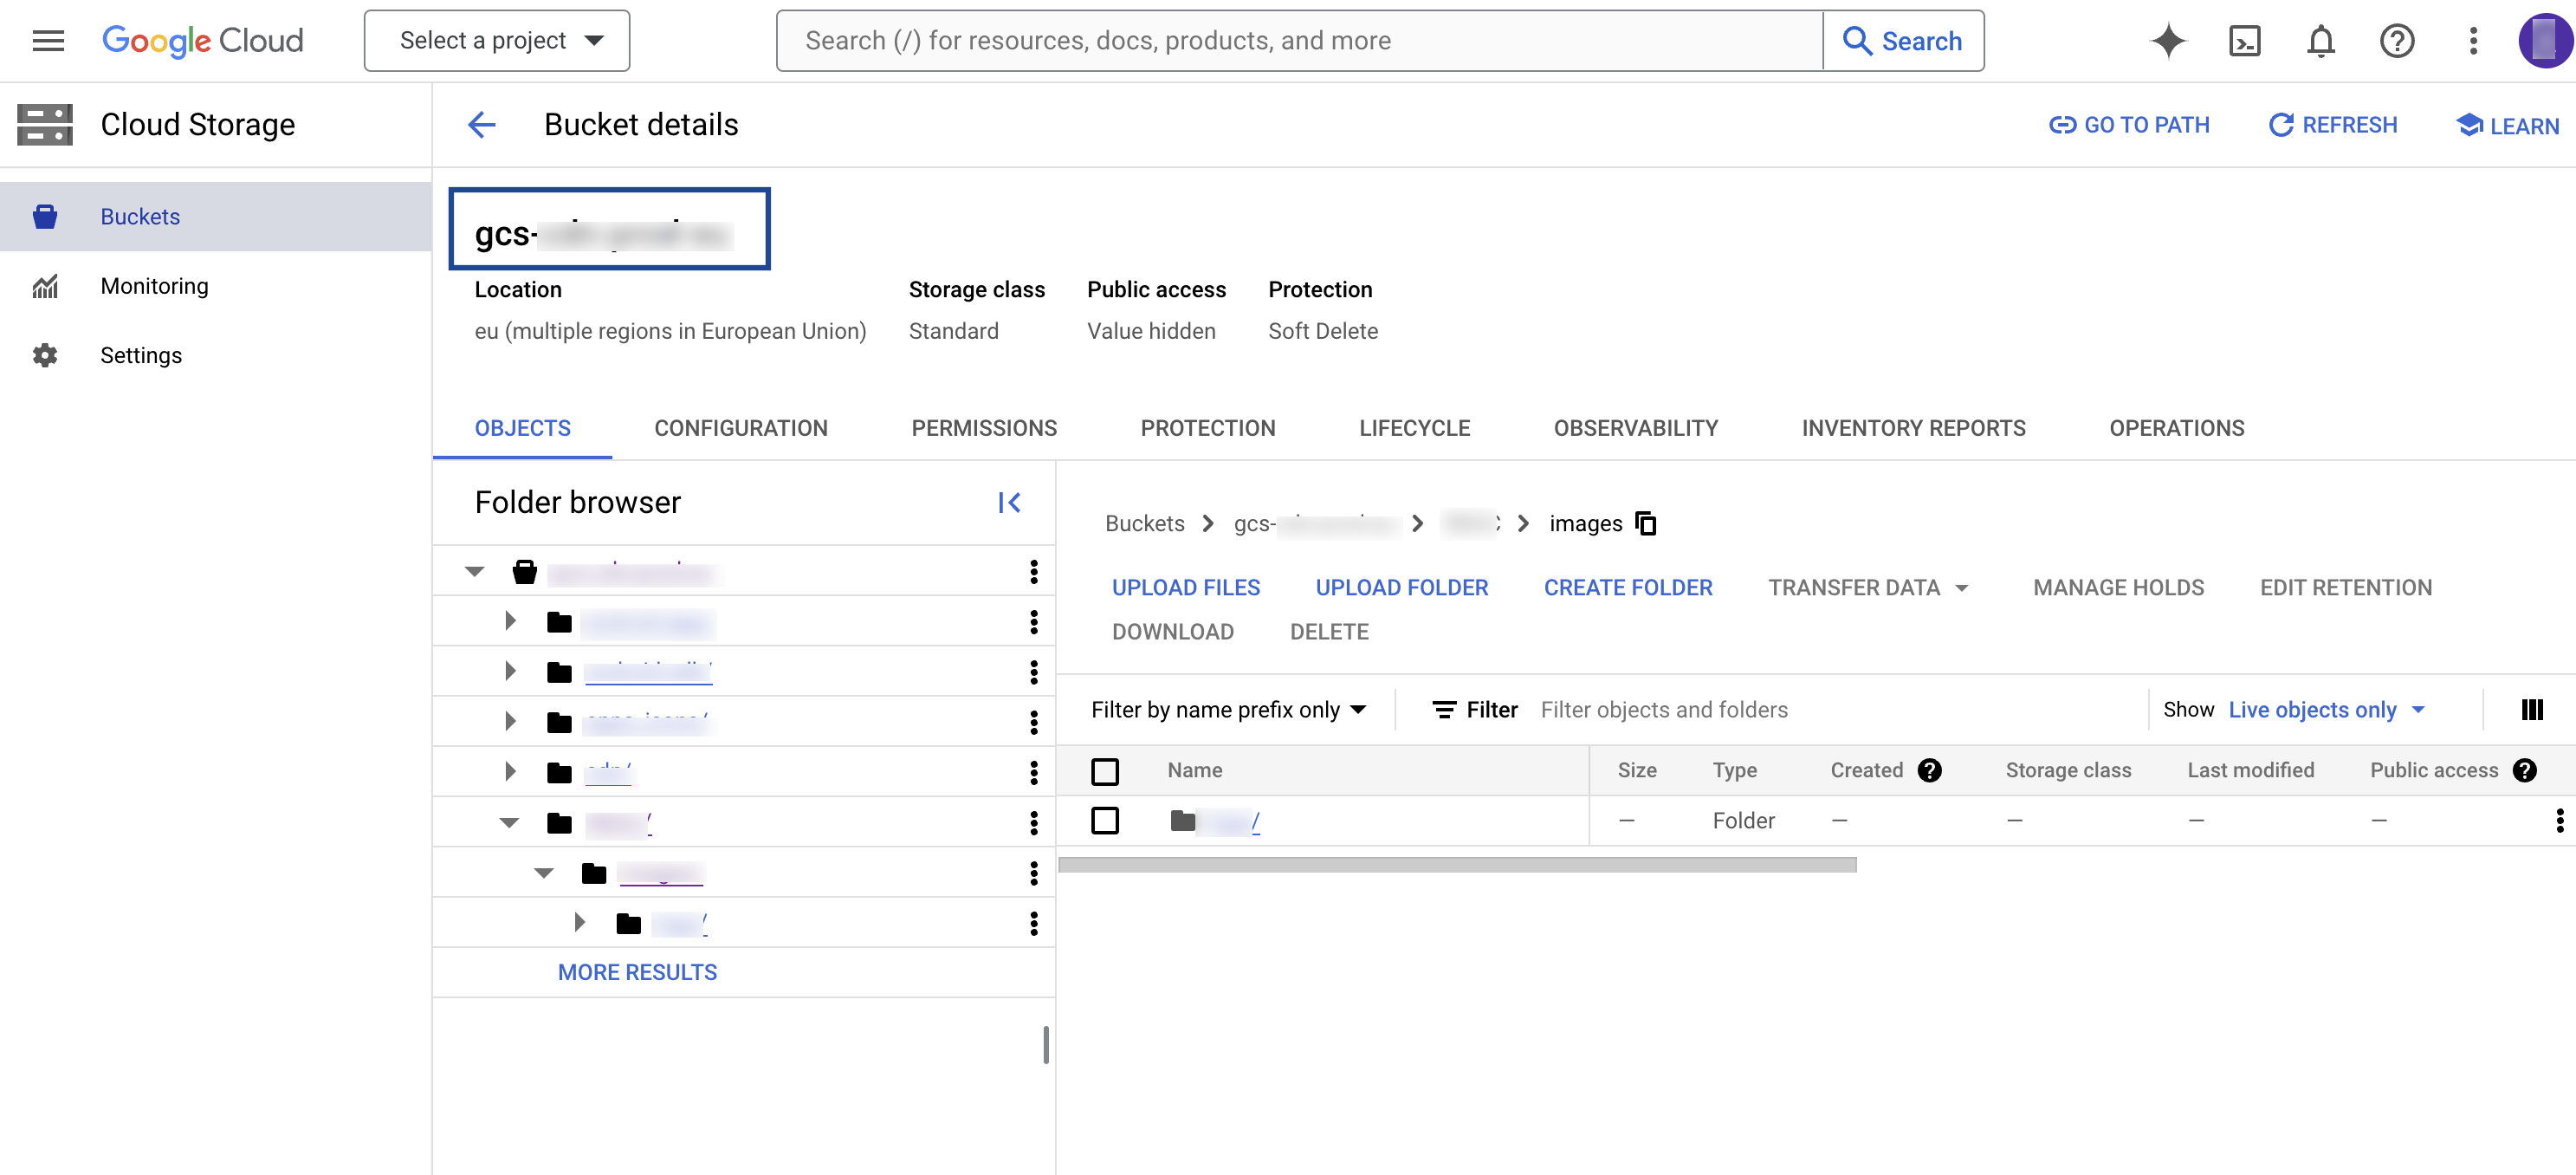
Choose the service account
Zeotap CDP needs to write the audience file into your GCS bucket. Pick one of the two authentication options:- Client Service Account JSON — a service account that you provide. Zeotap CDP uses it to upload the transformed audience (segment) data into your GCS bucket. The uploaded data is then picked up automatically by Databricks Autoloader for further processing and loading into Databricks tables.
- Zeotap Service Account — the service account Zeotap uses to access the Google Cloud Storage account. Whitelist it on your bucket so audiences (segments) can be pushed from Zeotap CDP to Google Cloud Storage.
Create the Databricks destination in Zeotap CDP
1
Open the Destinations application
Log into the Zeotap CDP App and go to the DESTINATIONS application.
2
Start a new destination
Click + Create Destination..png?fit=max&auto=format&n=99ae7Xt83Dkoy1LQ&q=85&s=8af304a0fb2280e517f24a4a2ad84e21)
3
Find Databricks under All Destinations
Under the All Destinations section, search for Databricks..png?fit=max&auto=format&n=99ae7Xt83Dkoy1LQ&q=85&s=f6ada97715a2a4a0469fef53698ac3b9)
4
Enter the connection details
Click Databricks. A screen appears with details about the destination on the left, and on the right the fields required to establish the integration. Provide the following:a. Enter a name for the Destination.b. Enter the Destination Instance Name.c. In the Databricks Host field, enter your Databricks workspace URL.d. In the Databricks Access token field, provide the Databricks personal access token for API authentication.e. In the Cluster ID field, enter the Databricks cluster ID where the job should run.f. In the Catalog field, enter the Unity Catalog name used for table registration in Databricks.g. In the Schema field, enter the schema (or database) name in the Databricks metastore.h. In the Table field, enter the table name where the data should be written in Databricks.i. In the Upload Type drop-down, choose the upload type that defines the kind of connection or location you want to push your data to. Currently only GCP upload type is supported.j. In the Bucket field, enter the name of the Google Cloud Storage bucket where input files are stored.k. In the Project Id field, enter the Google Cloud project ID associated with your GCS bucket.l. Under Account, choose either Zeotap Service Account or Client Service Account Json from the drop-down, based on the type of authentication you need:
- If you choose Zeotap Service Account, whitelist the service account provided by Zeotap CDP so audiences (segments) can be pushed from Zeotap CDP to Google Cloud Storage. The service account information auto-populates under Service Account to be Whitelisted.
- If you choose Client Service Account Json, upload the JSON file carrying the required authentication information using the + Select File option, so that Zeotap CDP can push the audiences to Google Cloud Storage.
5
Choose the action and define the mapping
In the new screen that appears, choose the appropriate action and mapping. Under Choose your Action, select Send JSON file to GCS as the action for activating your audience (segment) in Audiences.You can send any number of identifiers and attributes to your Databricks instance using this action.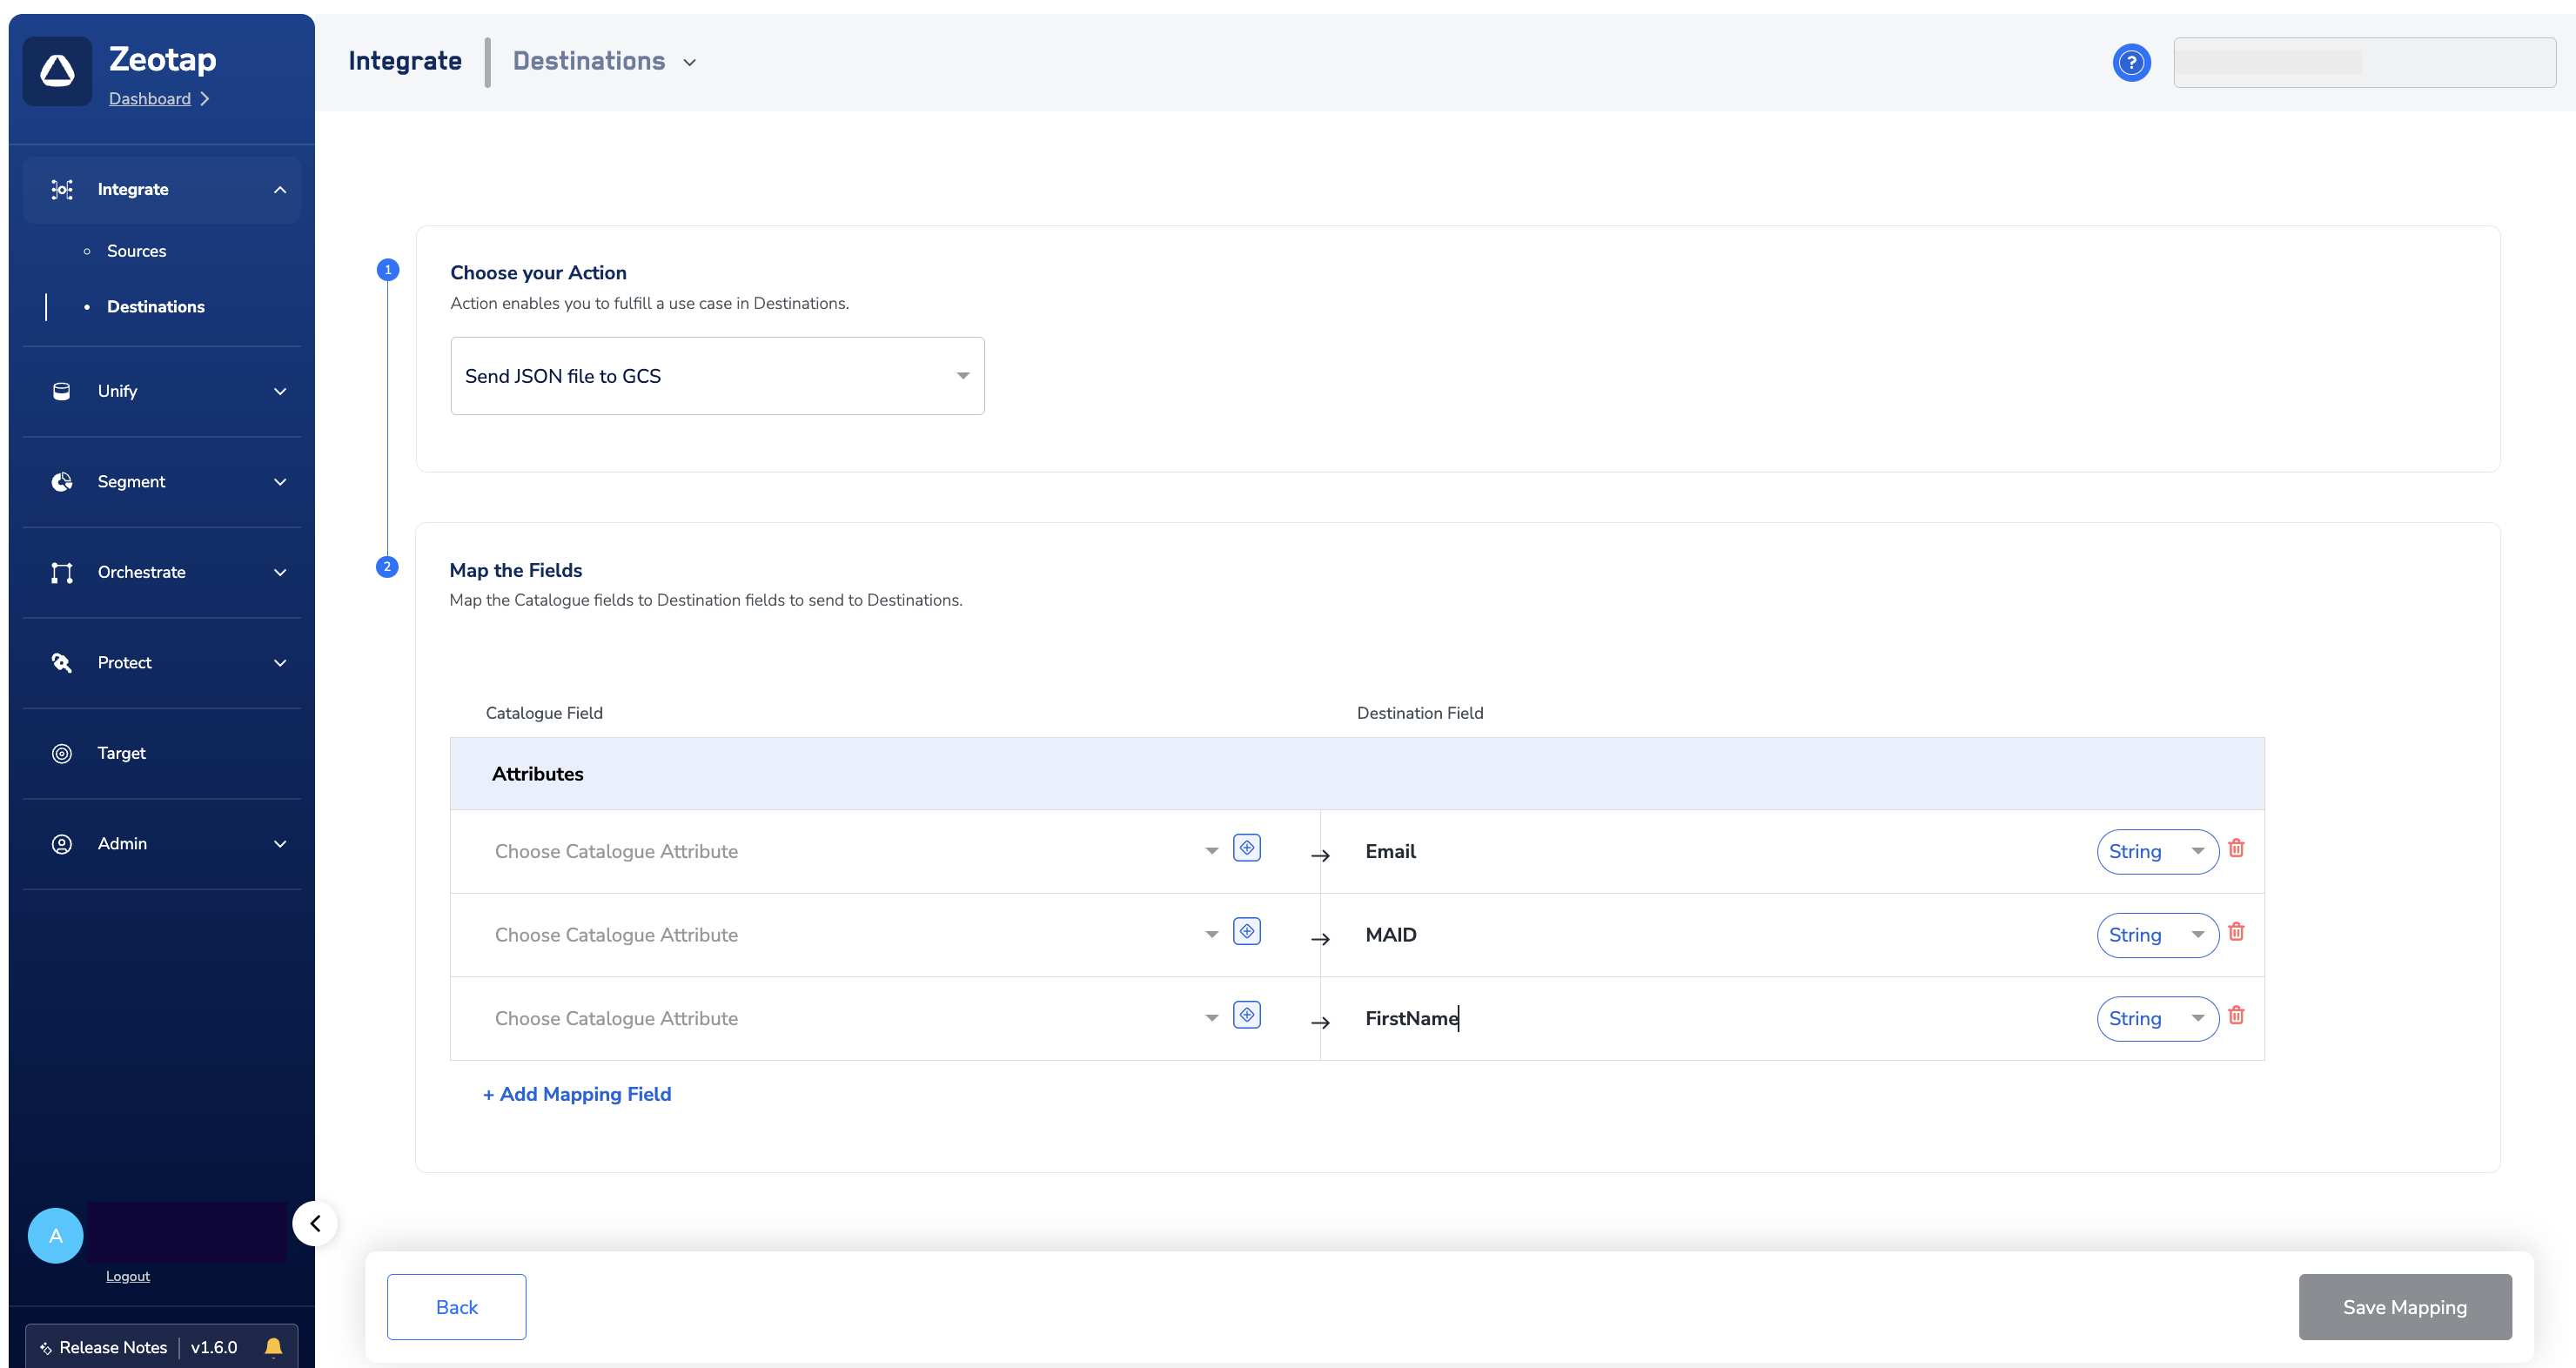
6
Create the destination
Click Create Destination. The created Destination gets listed in the Audiences application, ready to be linked to an audience.
Link an audience to the destination
Attach the destination you just created to a Zeotap audience from the Audiences application. For the full walkthrough, see Link an Audience to the Destination.The terms Audiences and Segments are used interchangeably to refer to customer cohorts that share a defined criterion — for example, customers over 18 who performed an
addToCart event in the last 30 days.Verify the destination worked
After linking an audience and triggering an activation, confirm delivery end to end:- In Zeotap CDP, confirm the destination is listed in the Audiences application and linked to the audience you activated.
- In your GCS bucket, confirm the activation run produced a JSON file.
- In Databricks, query the
catalog.schema.tableyou configured and confirm the rows have arrived with the identifiers and attributes you mapped.
Troubleshooting
If deliveries still fail after these checks, contact the Zeotap support team at [email protected]. Include the destination name, the Databricks catalog, schema, and table, the GCS bucket name, and the time of the failed run.
FAQ
Can I send event data to Databricks with this destination?
Can I send event data to Databricks with this destination?
No. Sending of event data is not supported currently. You can send any identifier or attribute of your choice from Zeotap CDP to Databricks.
Can I stage the files somewhere other than Google Cloud Storage?
Can I stage the files somewhere other than Google Cloud Storage?
No. Only the GCP upload type is supported today, so every Databricks destination writes to a GCS bucket first and Databricks Autoloader reads from there.
Should I use the Zeotap Service Account or my own service account JSON?
Should I use the Zeotap Service Account or my own service account JSON?
Either works. Choose Zeotap Service Account if you would rather whitelist the service account Zeotap provides on your bucket — the value auto-populates under Service Account to be Whitelisted during setup. Choose Client Service Account Json if you would rather supply your own service account key and upload it with the + Select File option.
Is the Catalog field the same as the Zeotap Catalogue?
Is the Catalog field the same as the Zeotap Catalogue?
No. Catalog on the destination form is the Databricks Unity Catalog (or metastore) catalog that holds your schema and table. The Zeotap CDP Catalogue is a separate concept — the layer where ingested fields are mapped to customer attributes before you build an audience.
What actually writes the rows into my Databricks table?
What actually writes the rows into my Databricks table?
Databricks Autoloader does. Zeotap CDP’s part ends when the audience file is written into your GCS bucket; Autoloader picks the file up from there and loads the records into Delta tables. The Schema you enter is where the table exists or will be created, and the Table is the target table the data is loaded into.
Next steps
- Explore the Databricks source → — pull data from a Databricks table into Zeotap CDP
- Explore linking an audience to a destination → — activate an audience against the destination you just created
- Explore how destinations, actions, and mappings fit together →
- Explore ID extension for audiences → — expand your audience across identifier types before sending to Databricks
- Explore delta upload and delete functions →