Partner or System Integrator Admin User
Note:The words Facebook and Meta are used interchangeably in this documentation. Both refer to Meta Platforms, Inc. and its suite of applications and services.
Overview
Meta, previously known as Facebook, offers a social media platform with a variety of advertising solutions to help you connect with your target audience through Meta Business Manager. By integrating with Zeotap CDP, you can create custom audiences and enhance personalisation for your campaigns. This integration allows you to target audiences across Facebook’s suite of applications that support Custom Audiences, including Facebook, Instagram, Audience Network and Messenger. You can choose the app during the campaign setup process at the “placement” stage, where you determine where your ads will appear within Facebook’s ecosystem.Use Cases
To illustrate how you can effectively use the Facebook destination, here are two scenarios that demonstrate its application.Use Case 1: Personalised Promotions for Your Beauty Products
Assume that you are Beauty products retailer who wants to target your current customers through social media by offering tailored promotions based on their purchase history and product preferences. You can import customer email addresses from your CRM into Zeotap CDP, create audience segments based on previous purchases and preferred brands, and then deliver these segments to the Facebook platform. This strategy helps you optimise your ad spend while promoting relevant offers to your existing customers.Use Case 2: Targeted Campaigns for Your Travel Agency
Let’s say you are a travel agency aiming to reconnect with past customers who booked trips through your services but have not engaged in a while. You have customer data, including email addresses and travel history, but lack app engagement metrics. To reach these customers on social media, you can transfer your customer data into Zeotap CDP using email addresses as key identifiers. Then, leverage their travel history to create distinct audience segments, which you can target with customised travel promotions on Facebook to re-engage them with your services.Actions, Supported Identifiers and Features
This integration allows you to send the following identifiers from Zeotap CDP to Facebook 1P Destination based on the action type selected while creating the Destination.| Action | Supported identifiers/Attributes | Supported Features |
|---|---|---|
| Send Identifiers to Facebook 1P | • MAIDs • Email address (SHA256) • Phone number (SHA256) • Facebook External ID. For information about how to capture the external IDs between a Brand and Facebook, refer here. | Audience Boost and Delete Functionality |
| Send Multiple User Identifiers to Facebook 1P | • MAIDs • Email address (SHA256) • Phone number (SHA256) • Gender • Date of birth • First Name and Last Name • State • City • ZIP Code • Country Code • Facebook External ID. For information about how to capture the external IDs between a Brand and Facebook, refer here. | Audience Boost and Delete Functionality |
Key Concepts
Facebook External ID
Facebook External ID or simply External ID is an unique string value that represents a user on an advertiser’s system. For example, Loyalty membership IDs, User IDs, external cookie IDs and more. For a given event, theexternal_ ID is used to match to someone on Facebook. Before you send external ID to Facebook, ensure that you add the identifier in your Zeotap Catalogue. You can then map these IDs when creating a Facebook 1P destination.
Prerequisites
Ensure that you take care of the following prerequisites before starting this integration:- Obtain Full Access to the Facebook Ad Account ID
- Accept the Facebook Audiences Terms of Service
- Create an App in Facebook Developers portal and obtain the App ID
- Obtain Access Token required for authenticating Zeotap CDP on the Facebook platform
- Obtain Your Facebook Graph API Version
Obtain Full Access to the Facebook Ad Account ID
This is the 16 digit Facebook Ad Account ID. Ensure that you have full access to the Facebook Ads account you want to forward your audience data to. To do so, perform the following steps:Log into Facebook Business Manager at business.facebook.com.
Select the Facebook business portfolio you want to use for sending audience data from the top right corner.
Under People with full control, ensure that you find the Facebook account you wish to use to set up the integration. In order to provide Full Access to someone, perform the following steps:a. Click Manage next to their name.b. To add new people, click Assign People, and select their name from the list of people with access to your Meta Business portfolio.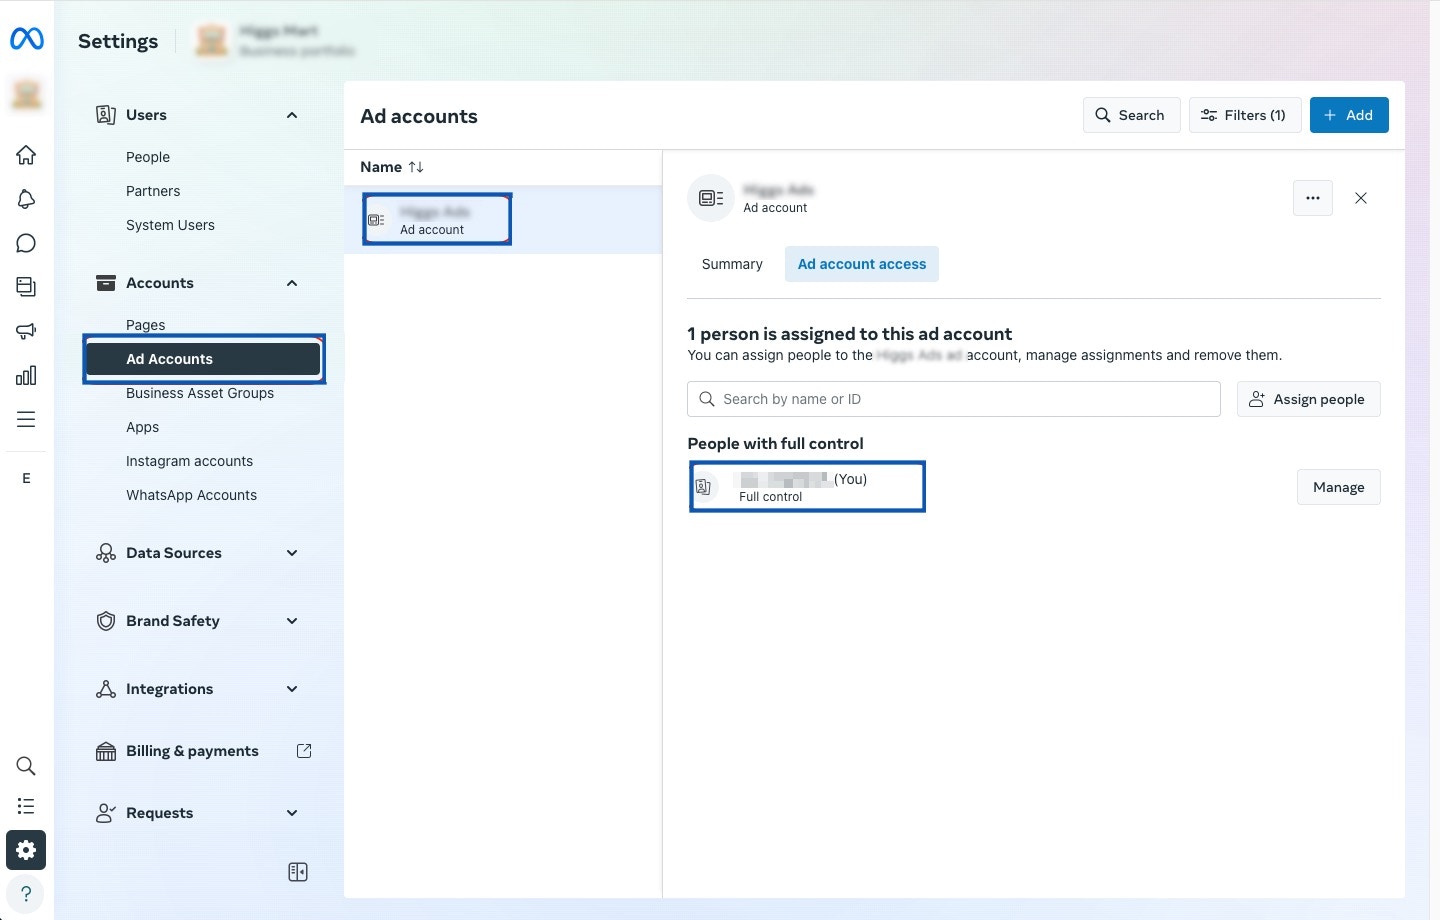
Accept the Facebook Audiences Terms of Service
Follow these steps to ensure the Facebook Ad Account has accepted the required Terms of Service for Audiences:Log in to your Facebook Ad Account at adsmanager.facebook.com.
Create an App in Facebook Developers Portal and Obtain the App ID
/* If an app has already been created on your behalf by a partner, you can skip this step. Otherwise, continue reading. When a partner creates the app, it is registered under the name Zeotap CDP, and access is granted using the OAuth2 flow. */ Ensure that you sign up for the Facebook Developers Portal and create a new app. For information about how to create and publish an App in Facebook, refer to the Facebook documentation.Note:When creating a new app, ensure to complete the App Reviewand Business Verification process with Facebook. This step is essential for creating the Access Token smoothly.
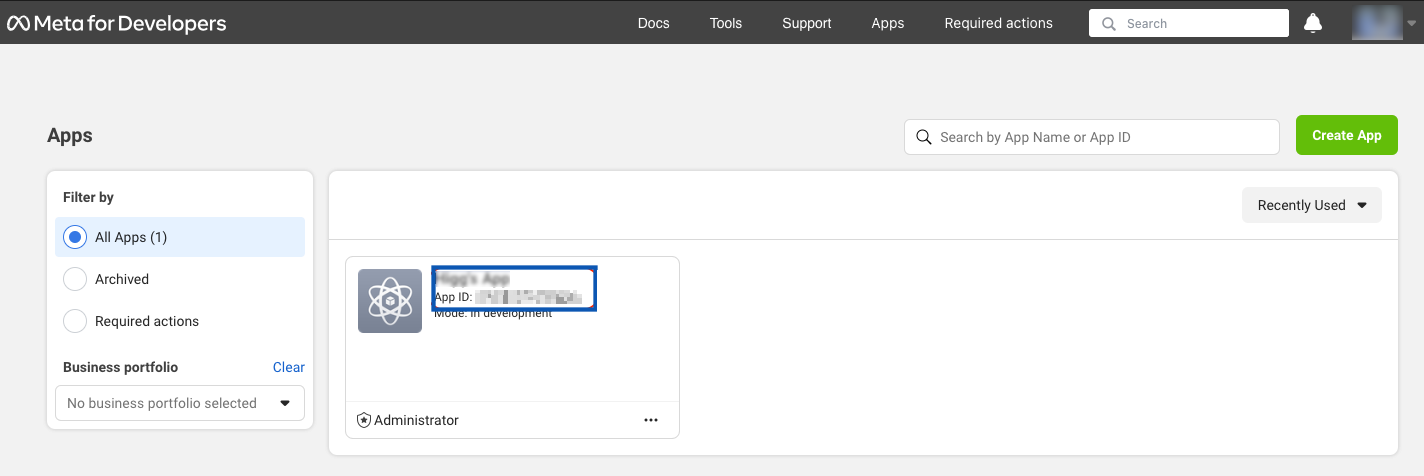
Obtain the App ID
To obtain the App ID, perform the following steps:Visit the Meta for Developers website at https://developers.facebook.com/ and log in with your Facebook account credentials.
Obtain Access Token required for authenticating Zeotap CDP on the Facebook Platform
Access Token is an unique identifier that is required for authenticating Zeotap CDP on the Facebook platform. The following are the two types of access tokens that you can generate:- System User Access Token - A System User Access Token is used if your app performs programmatic, automated actions on your business clients’ Ad objects or Pages without having to rely on input from an app user, or require re-authentication at a future date. Learn more
- Page Access Token - A Page Access Token is used to read, write, and modify the data belonging to a Facebook Page. To generate a page access token, an admin of the page must grant your app the Page permission or permissions needed. Once granted, you can retrieve the Page access token using a user access token with the required permissions. Learn more
Note:For handling errors related to the validity of access tokens, refer to the Facebook documentation.
Generate System User Access Token
Once your App is created on Facebook Developers Portal, perform the following steps to generate a System User Access Token: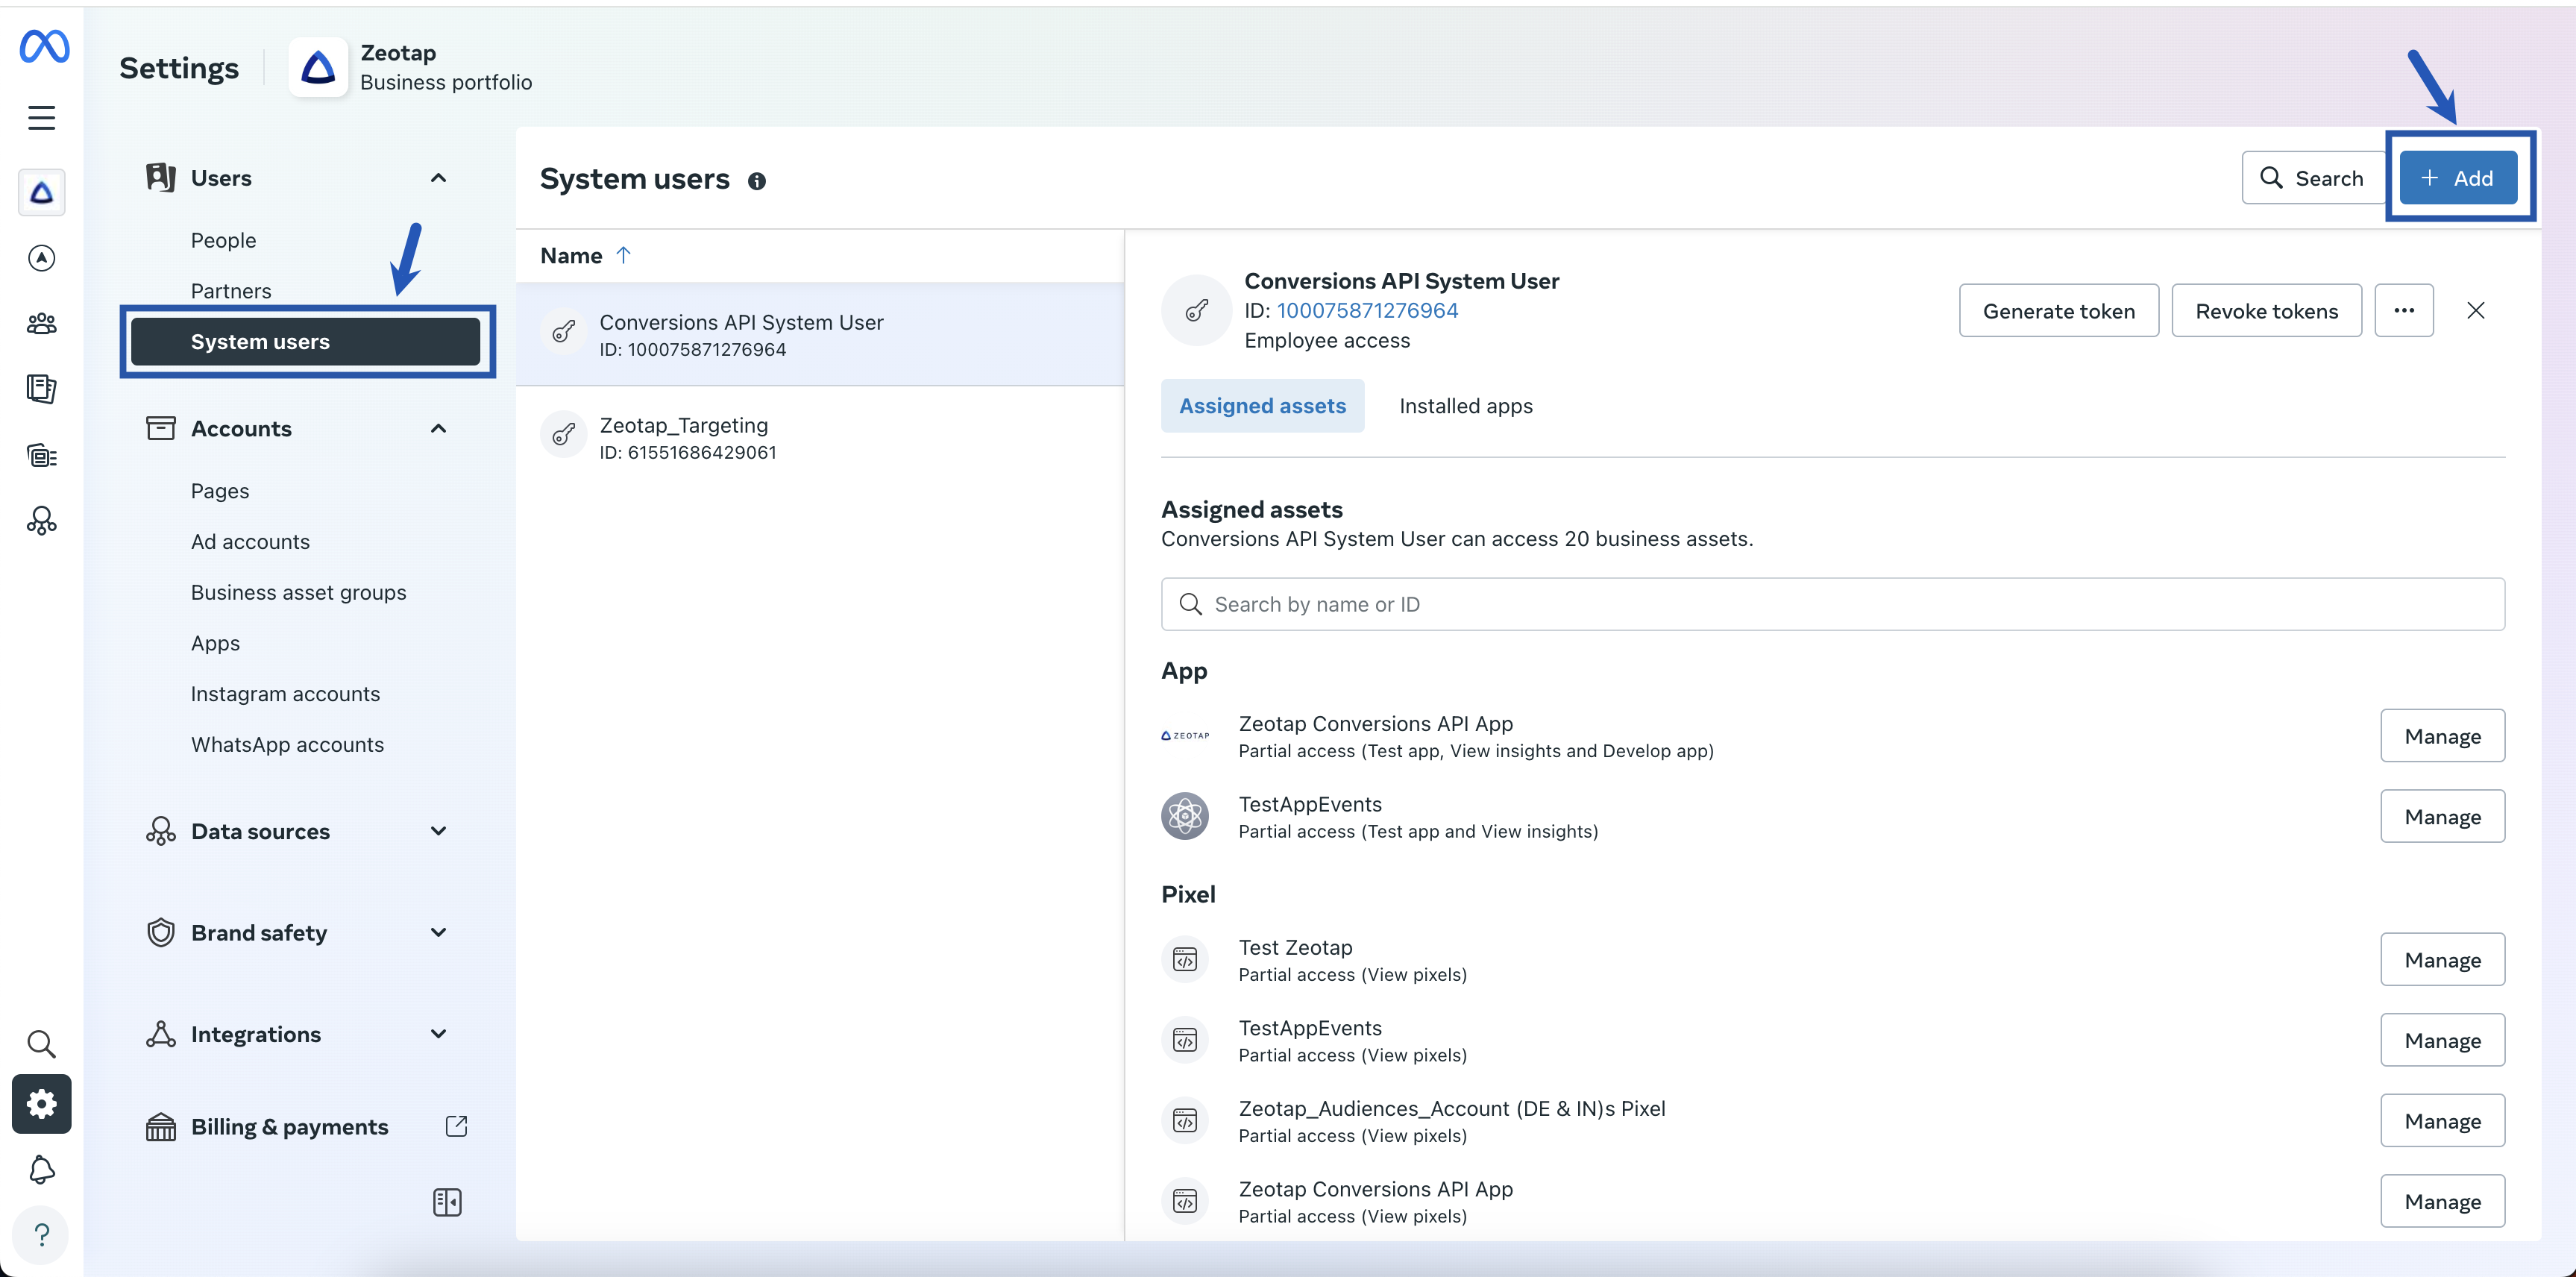
Enter a valid name for the system user and select the appropriate role and click Create system user. You can create one system user with the Admin role and one with the Employee role. Attempting to create additional users displays the following error:“This business has reached the maximum number of system users. The maximum number of system users allowed is 1.”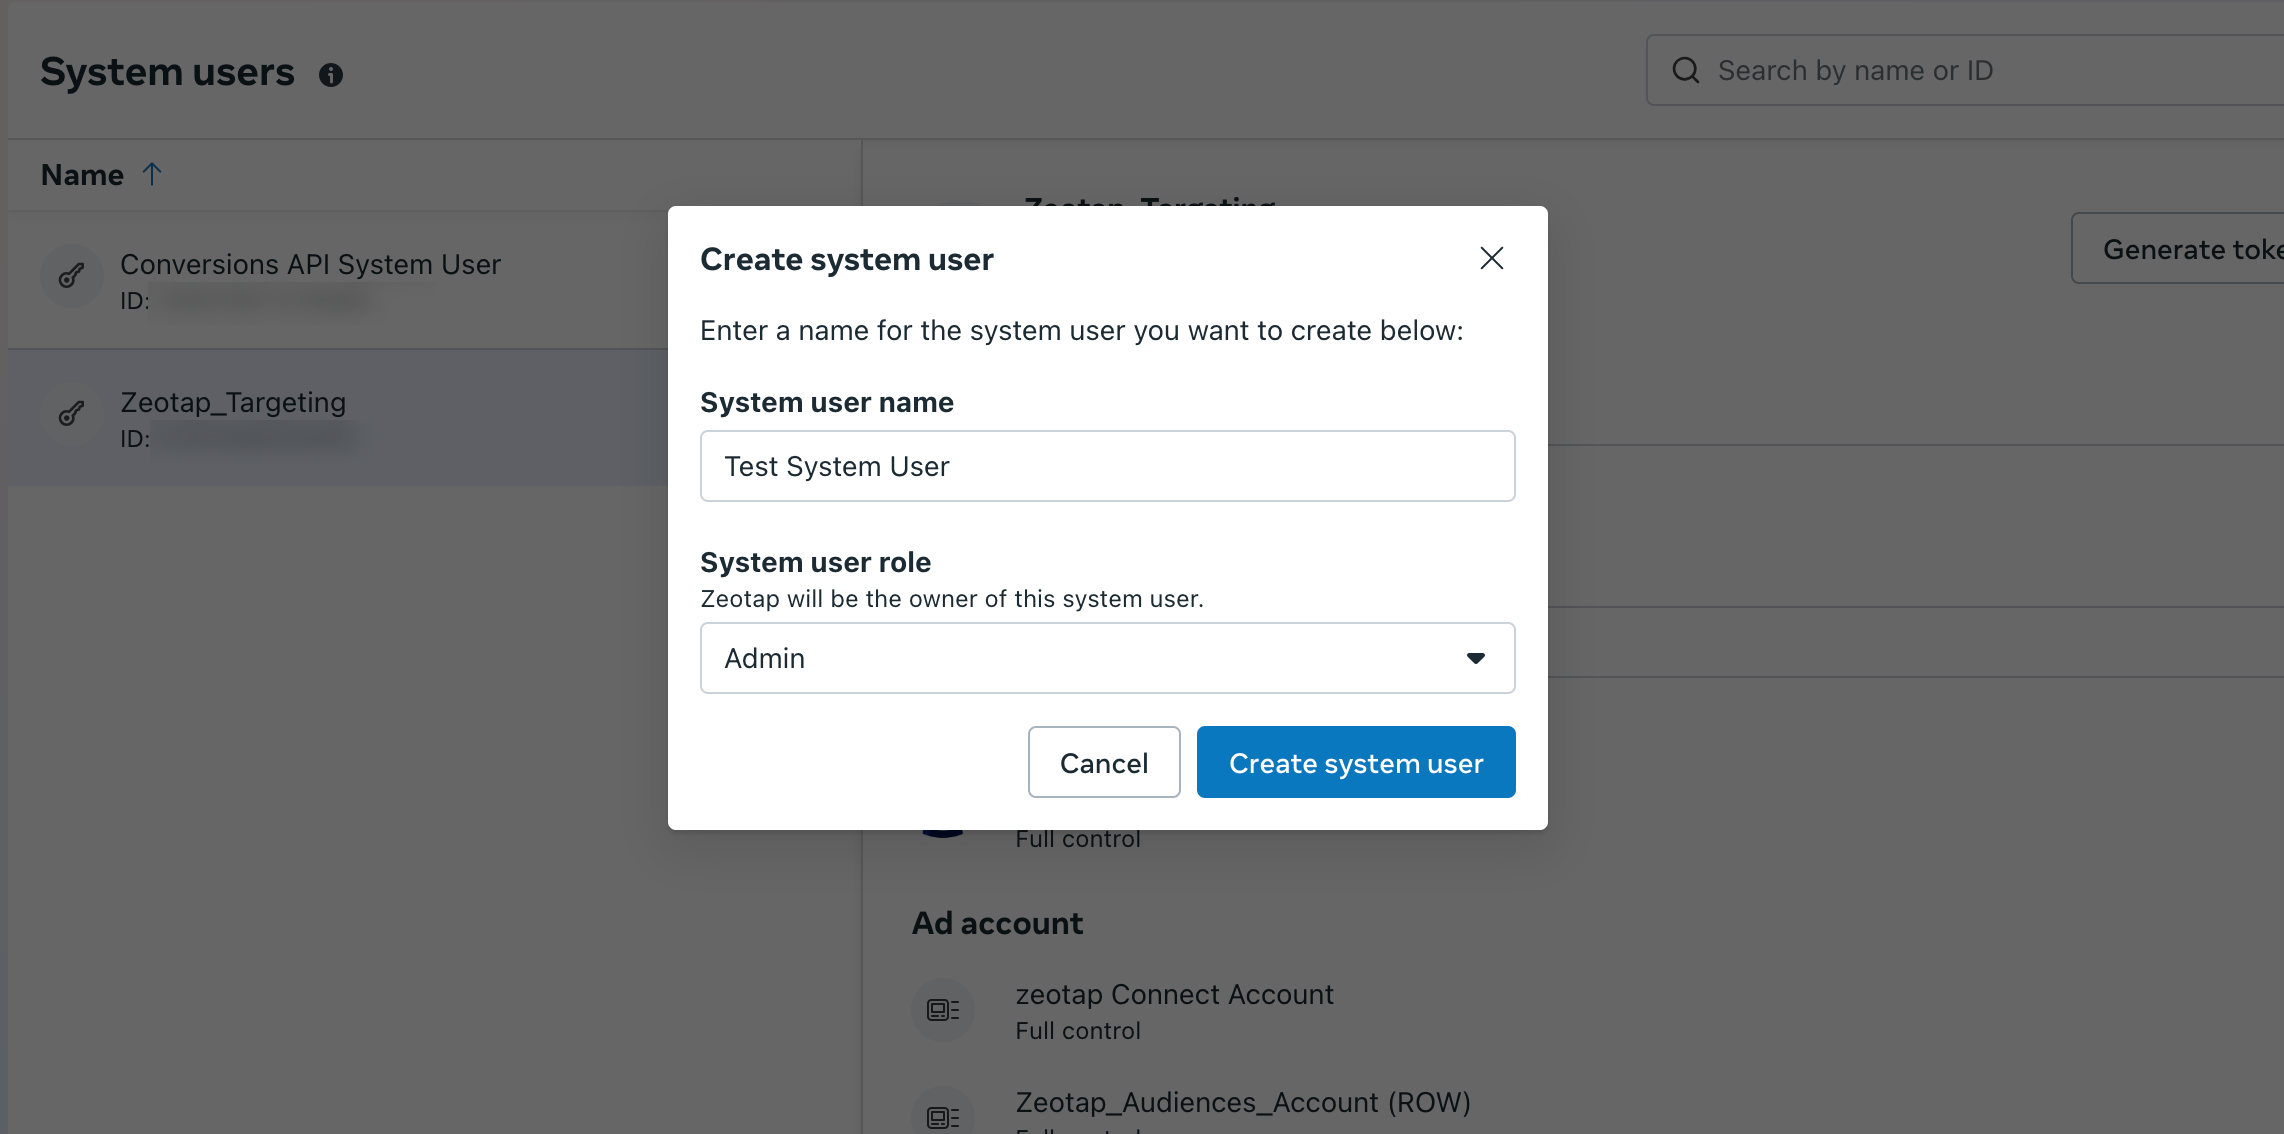
In the new window, under Select app, choose the desired app from the drop-down menu and click Next.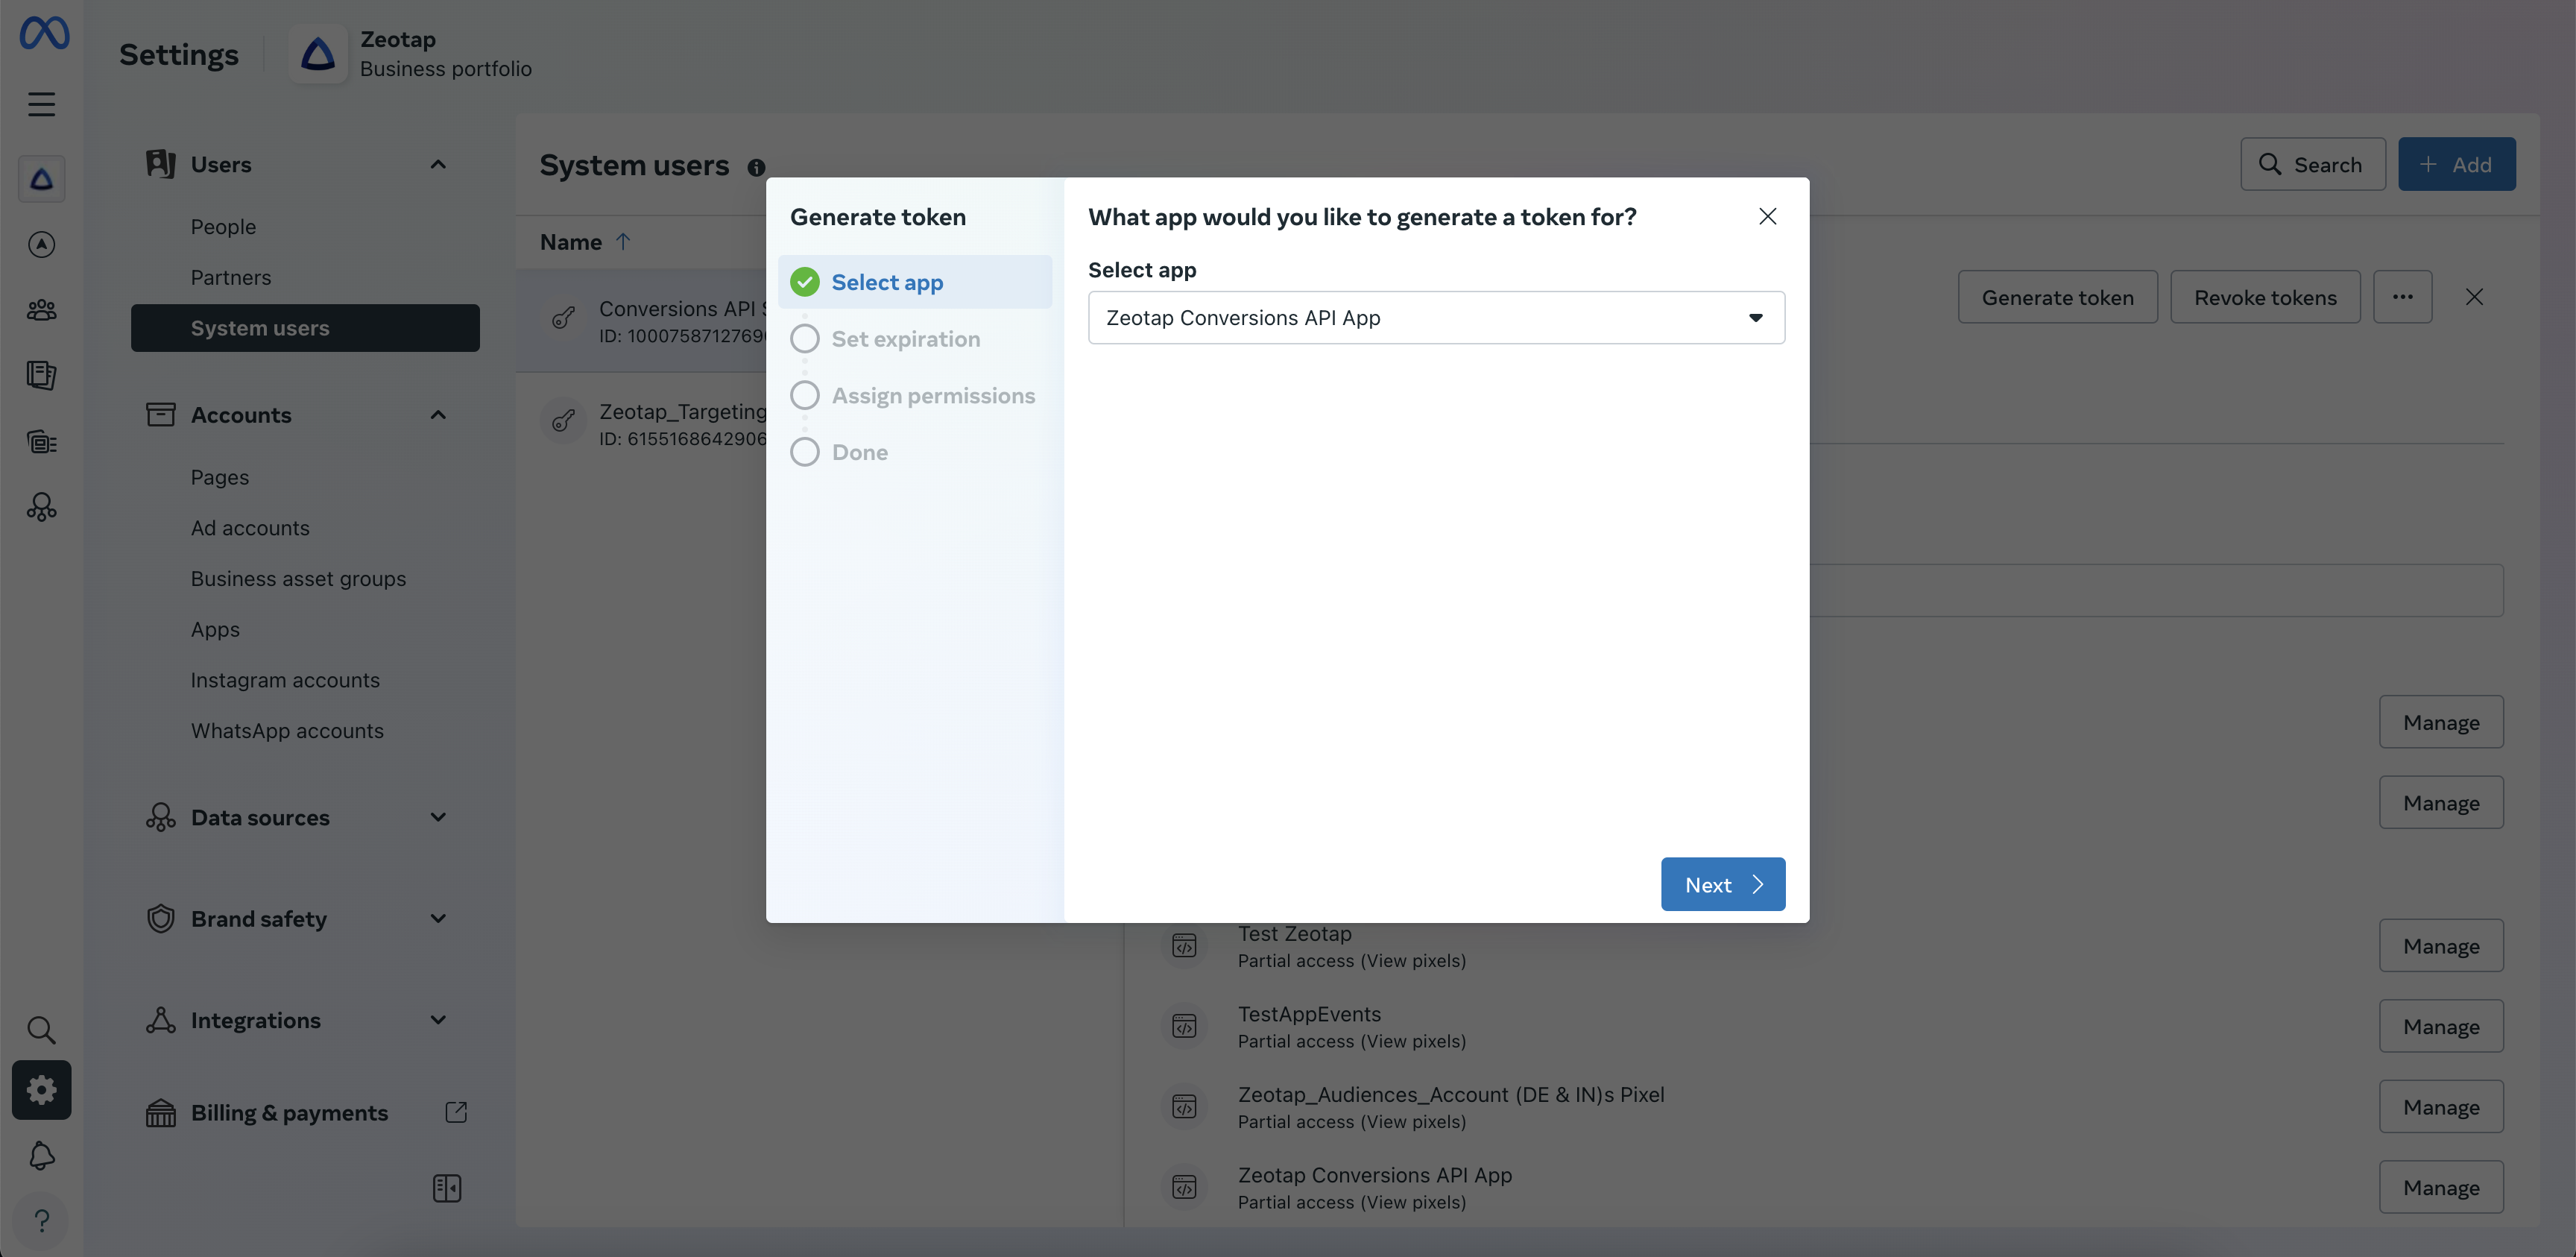
In the Set expiration window, choose the token expiry using the radio button. Here, you can either choose 60 days or Never. However, Facebook recommends selecting 60 days.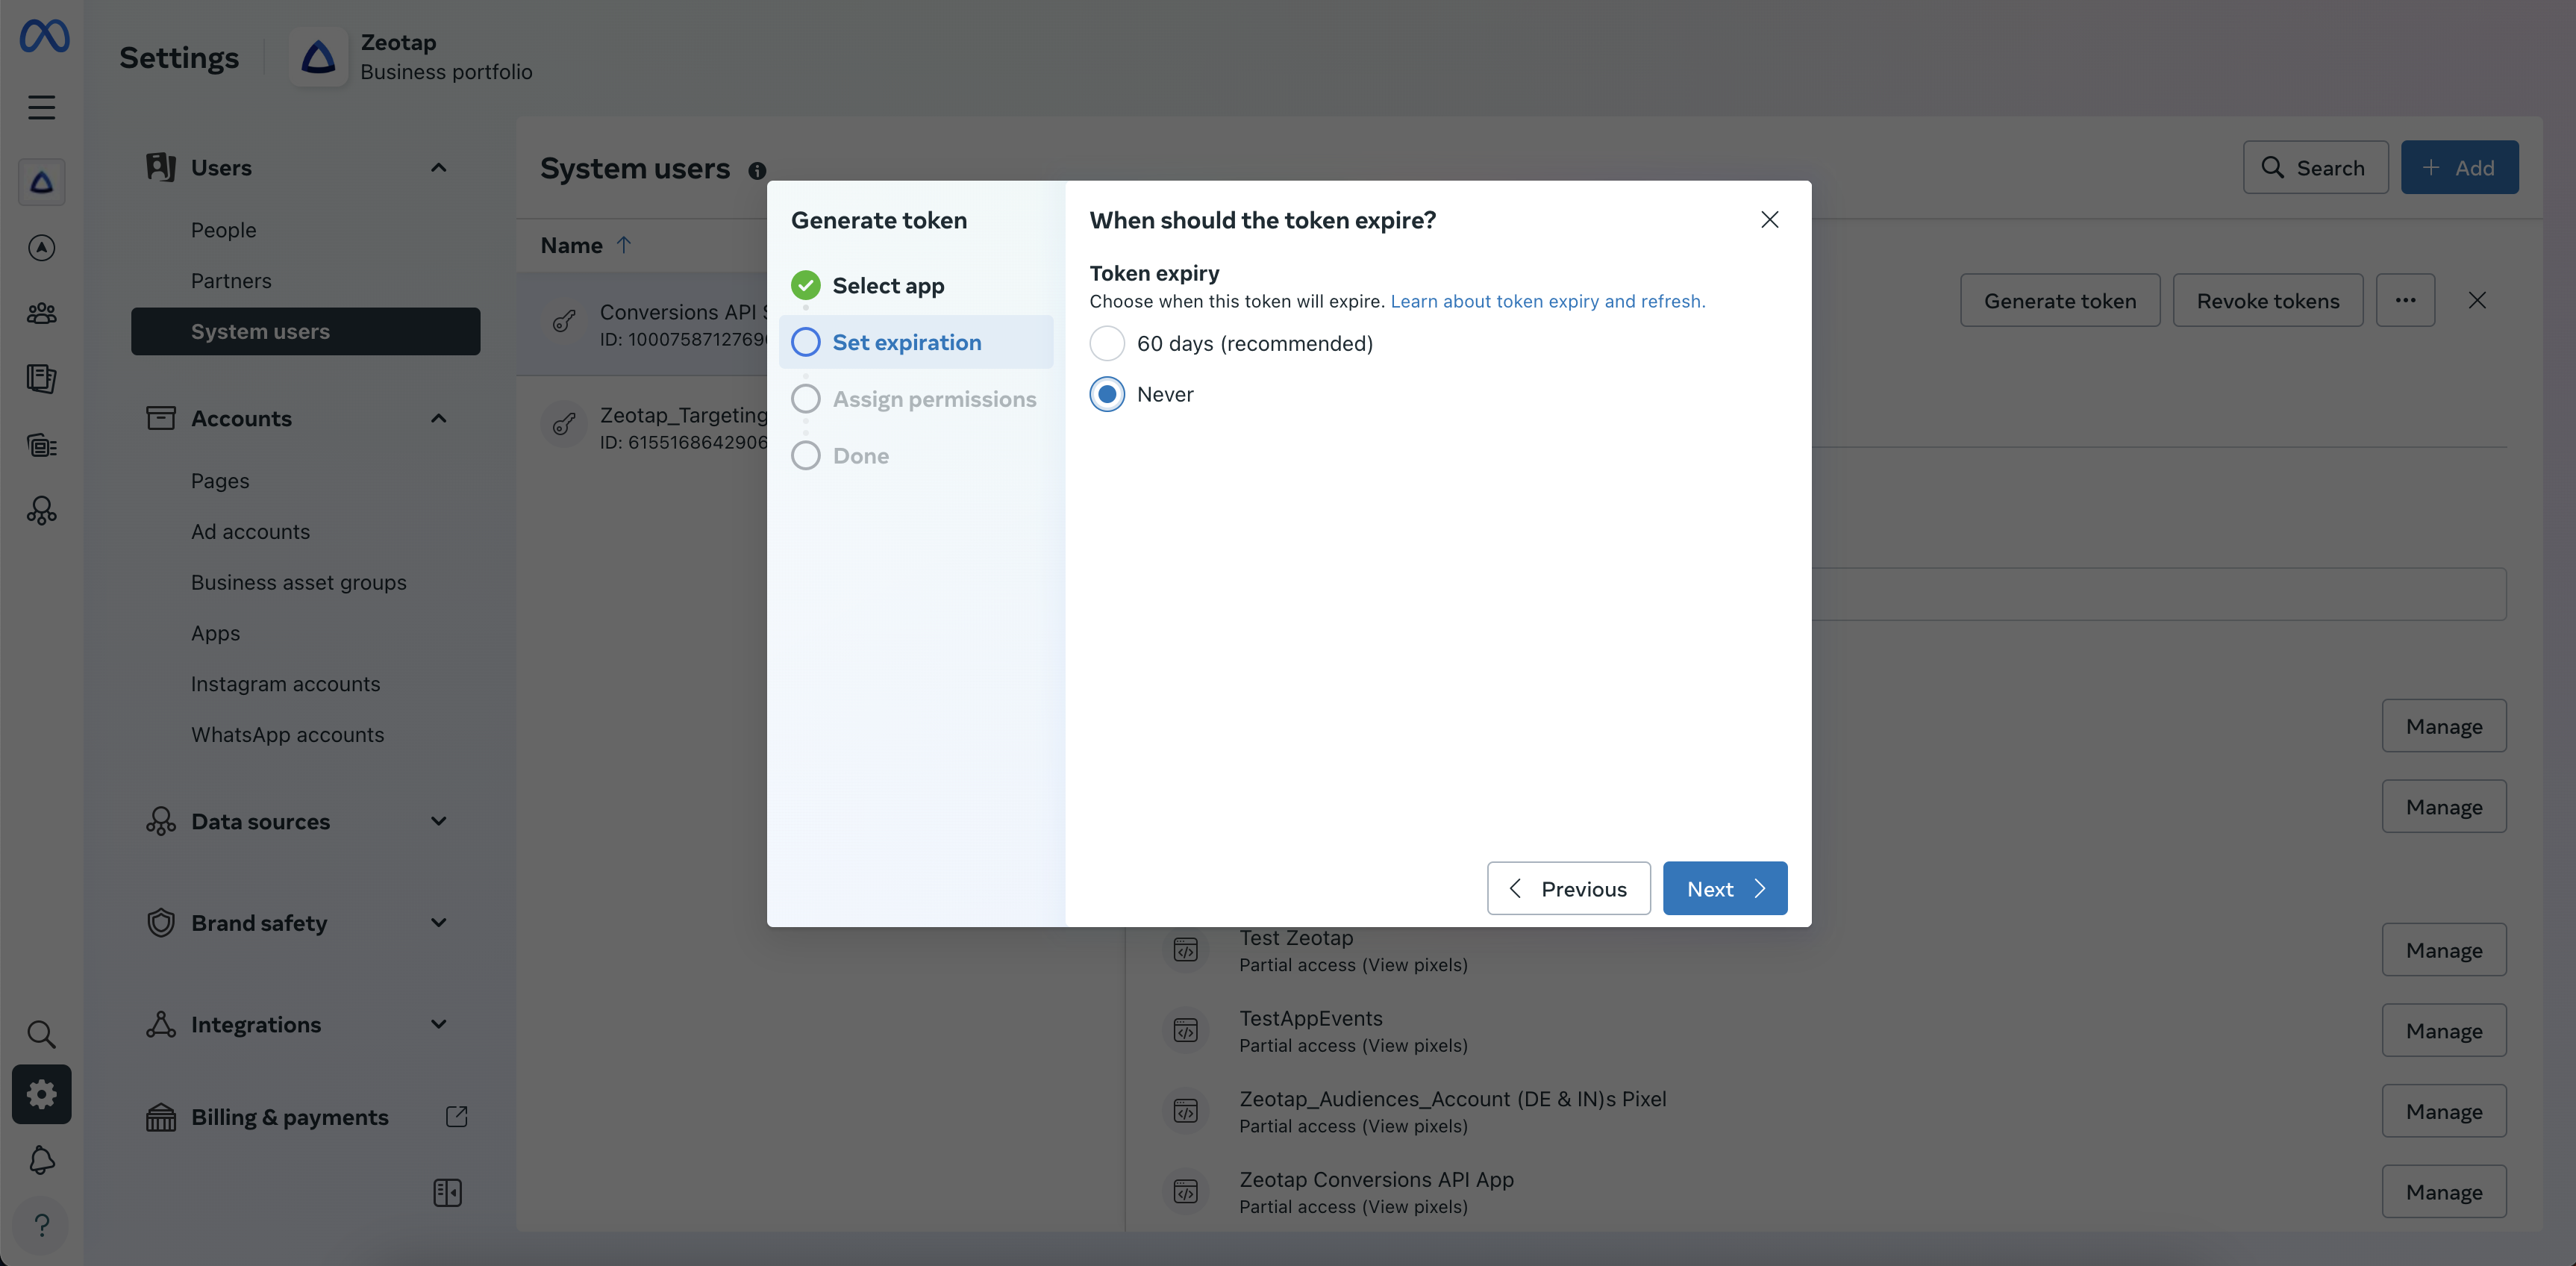
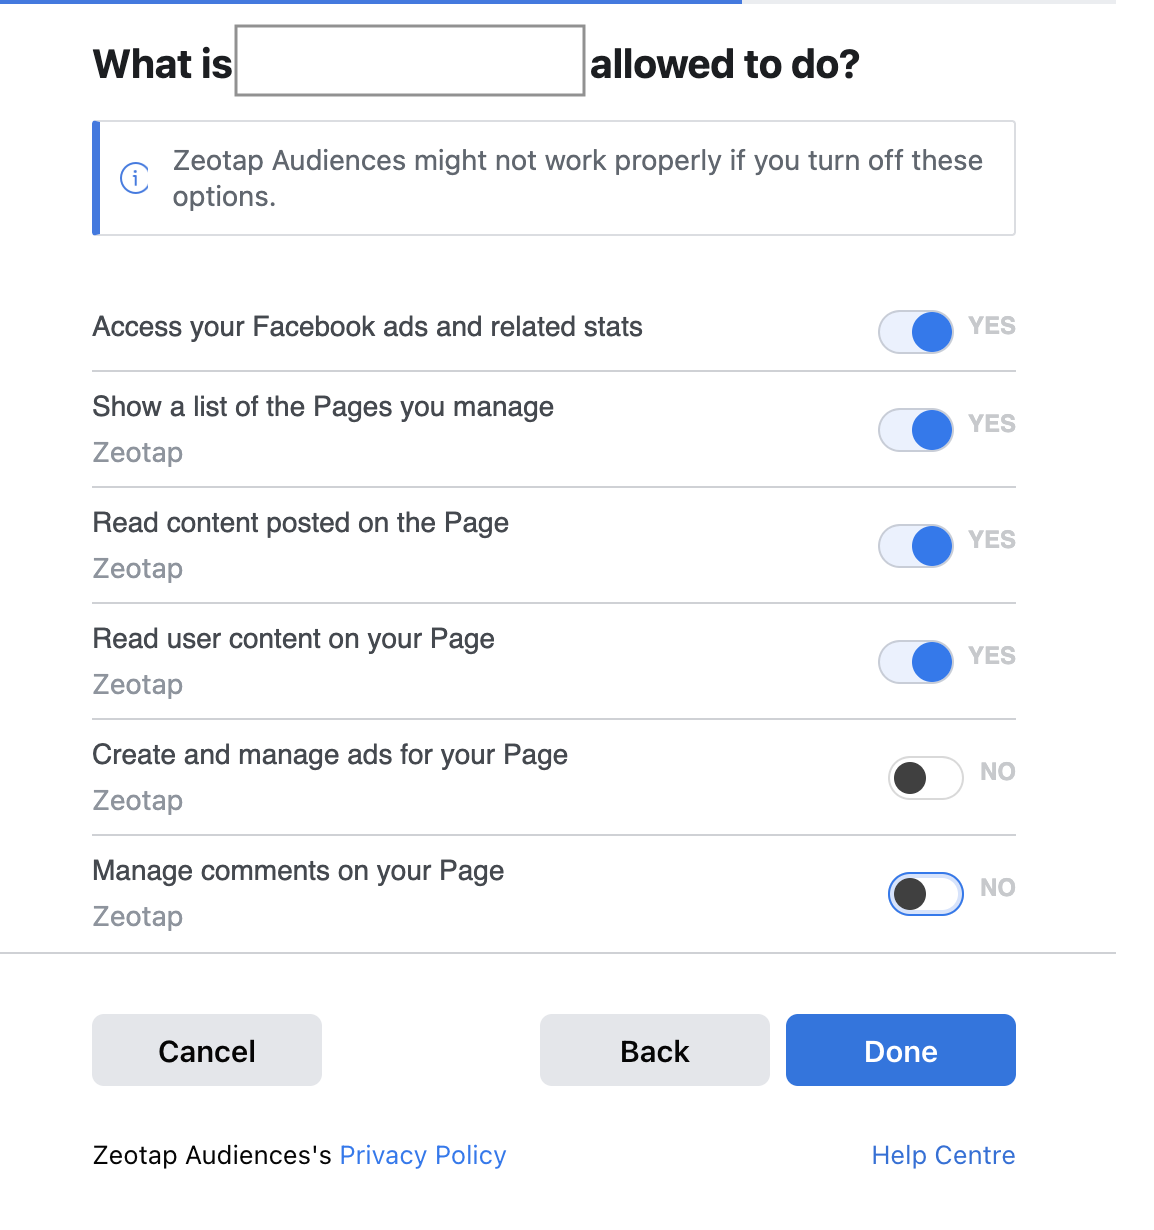
In the Assign Permissions window, select the following permissions: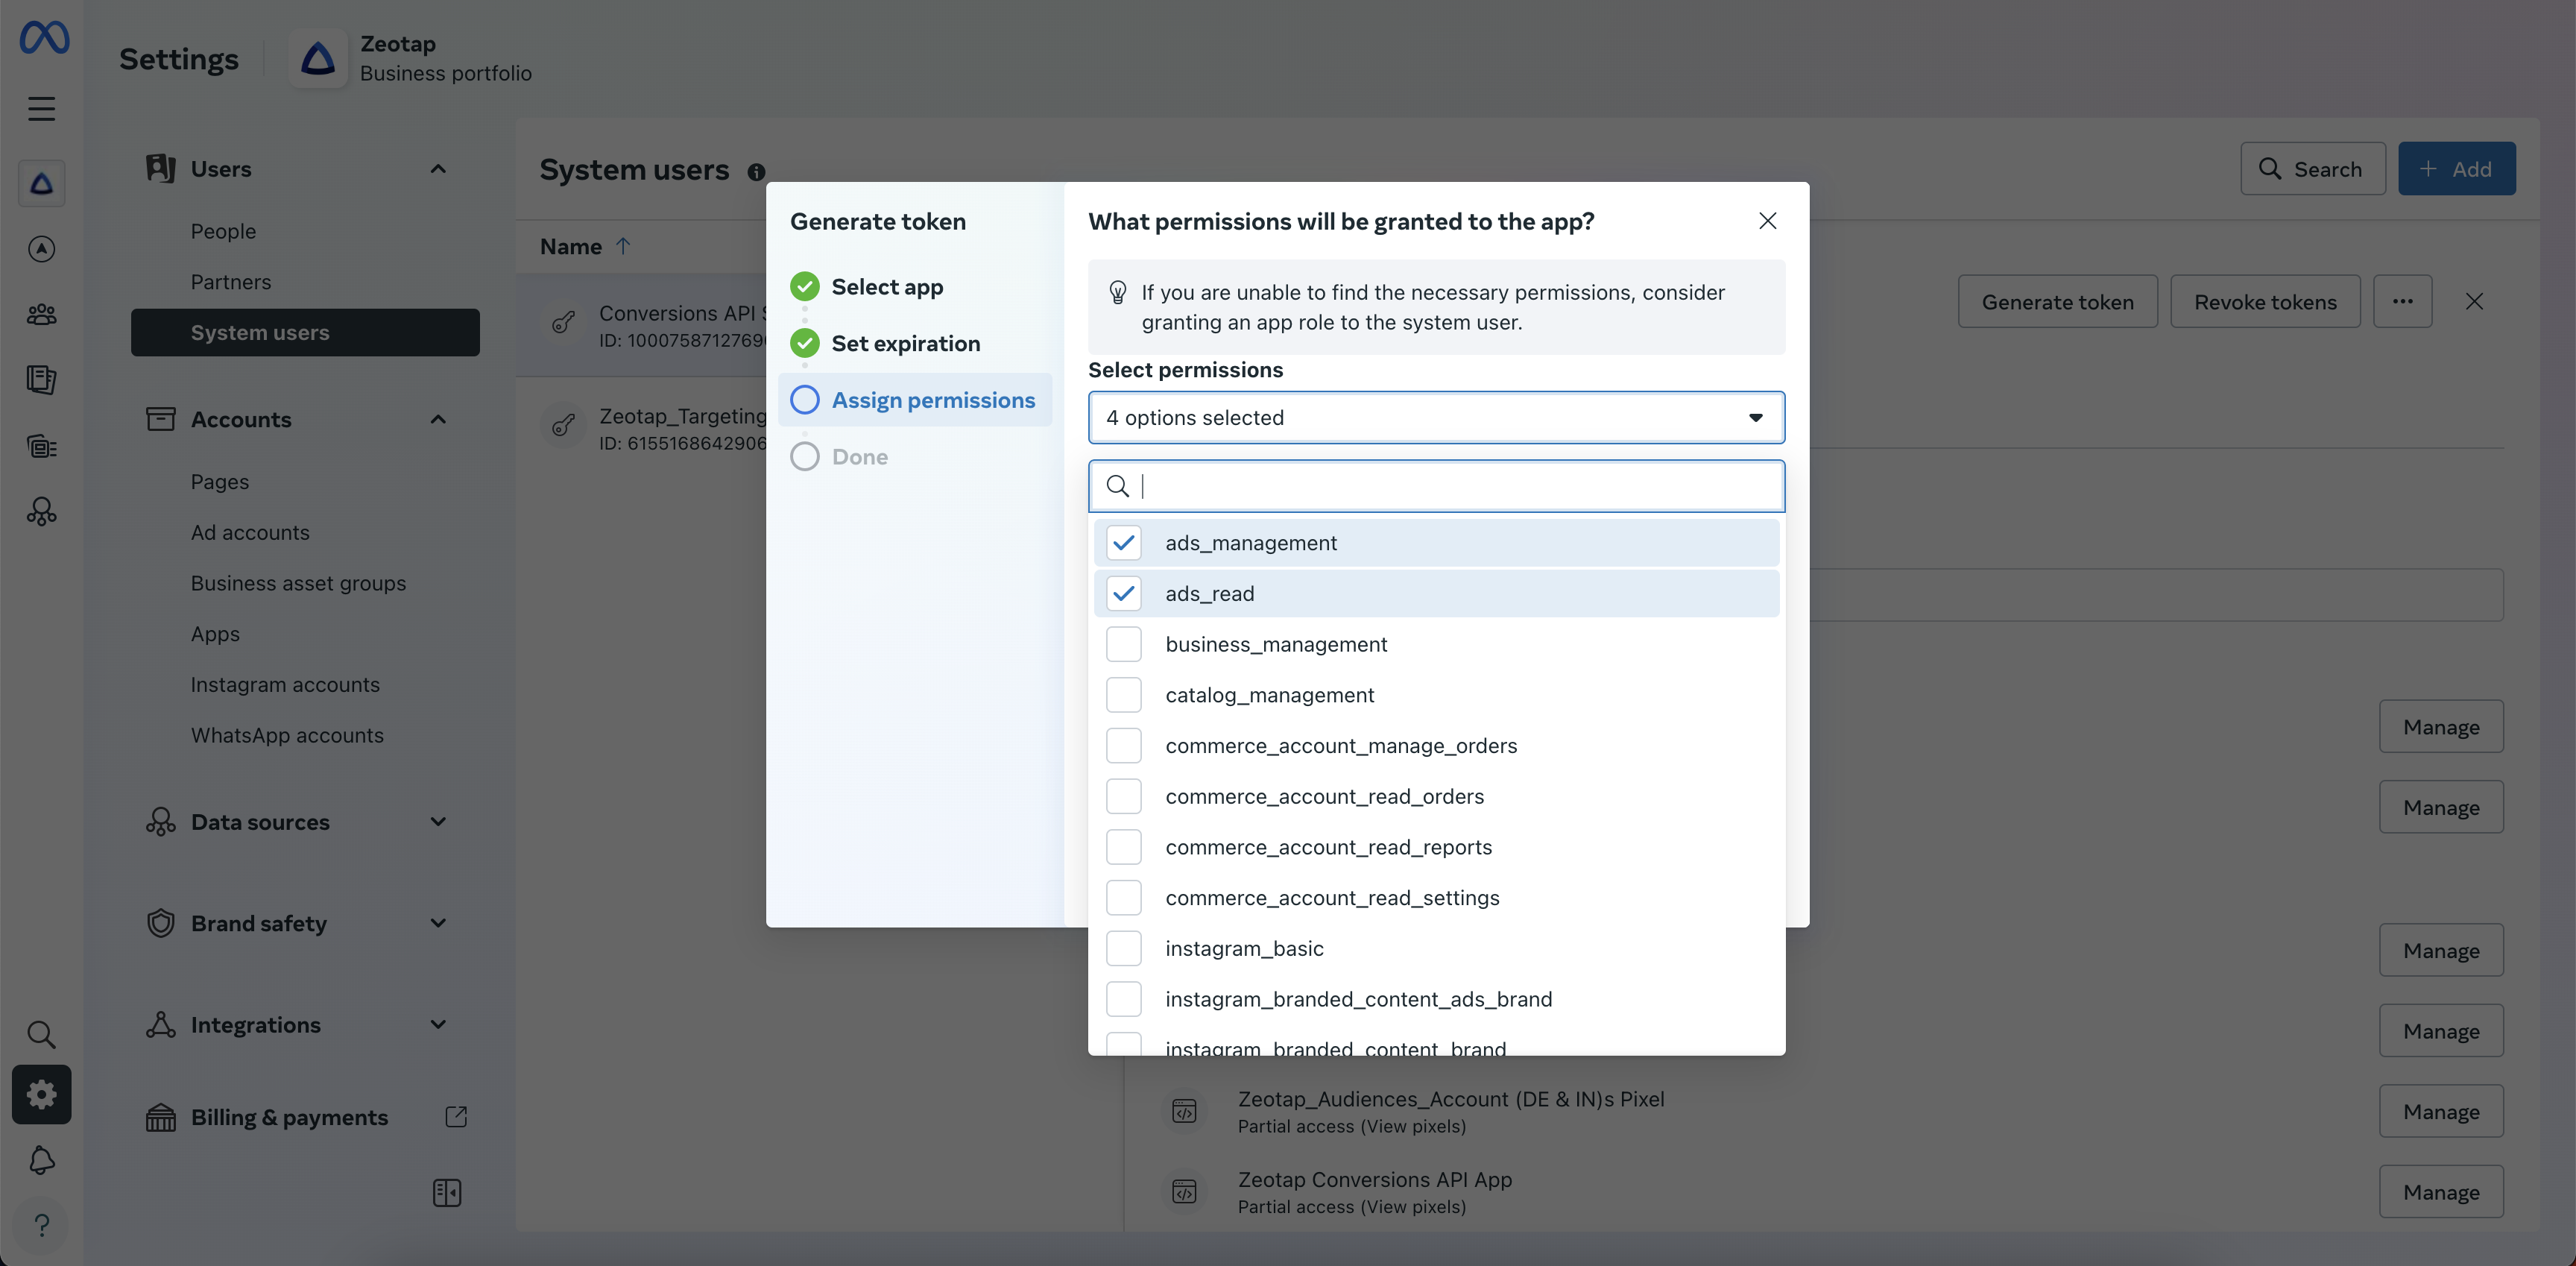
- ads_read
- ads_management
- pages_manage_ads
- pages_show_list
Review the selected permissions and click Generate token. You can copy the generated token and save it for the steps ahead.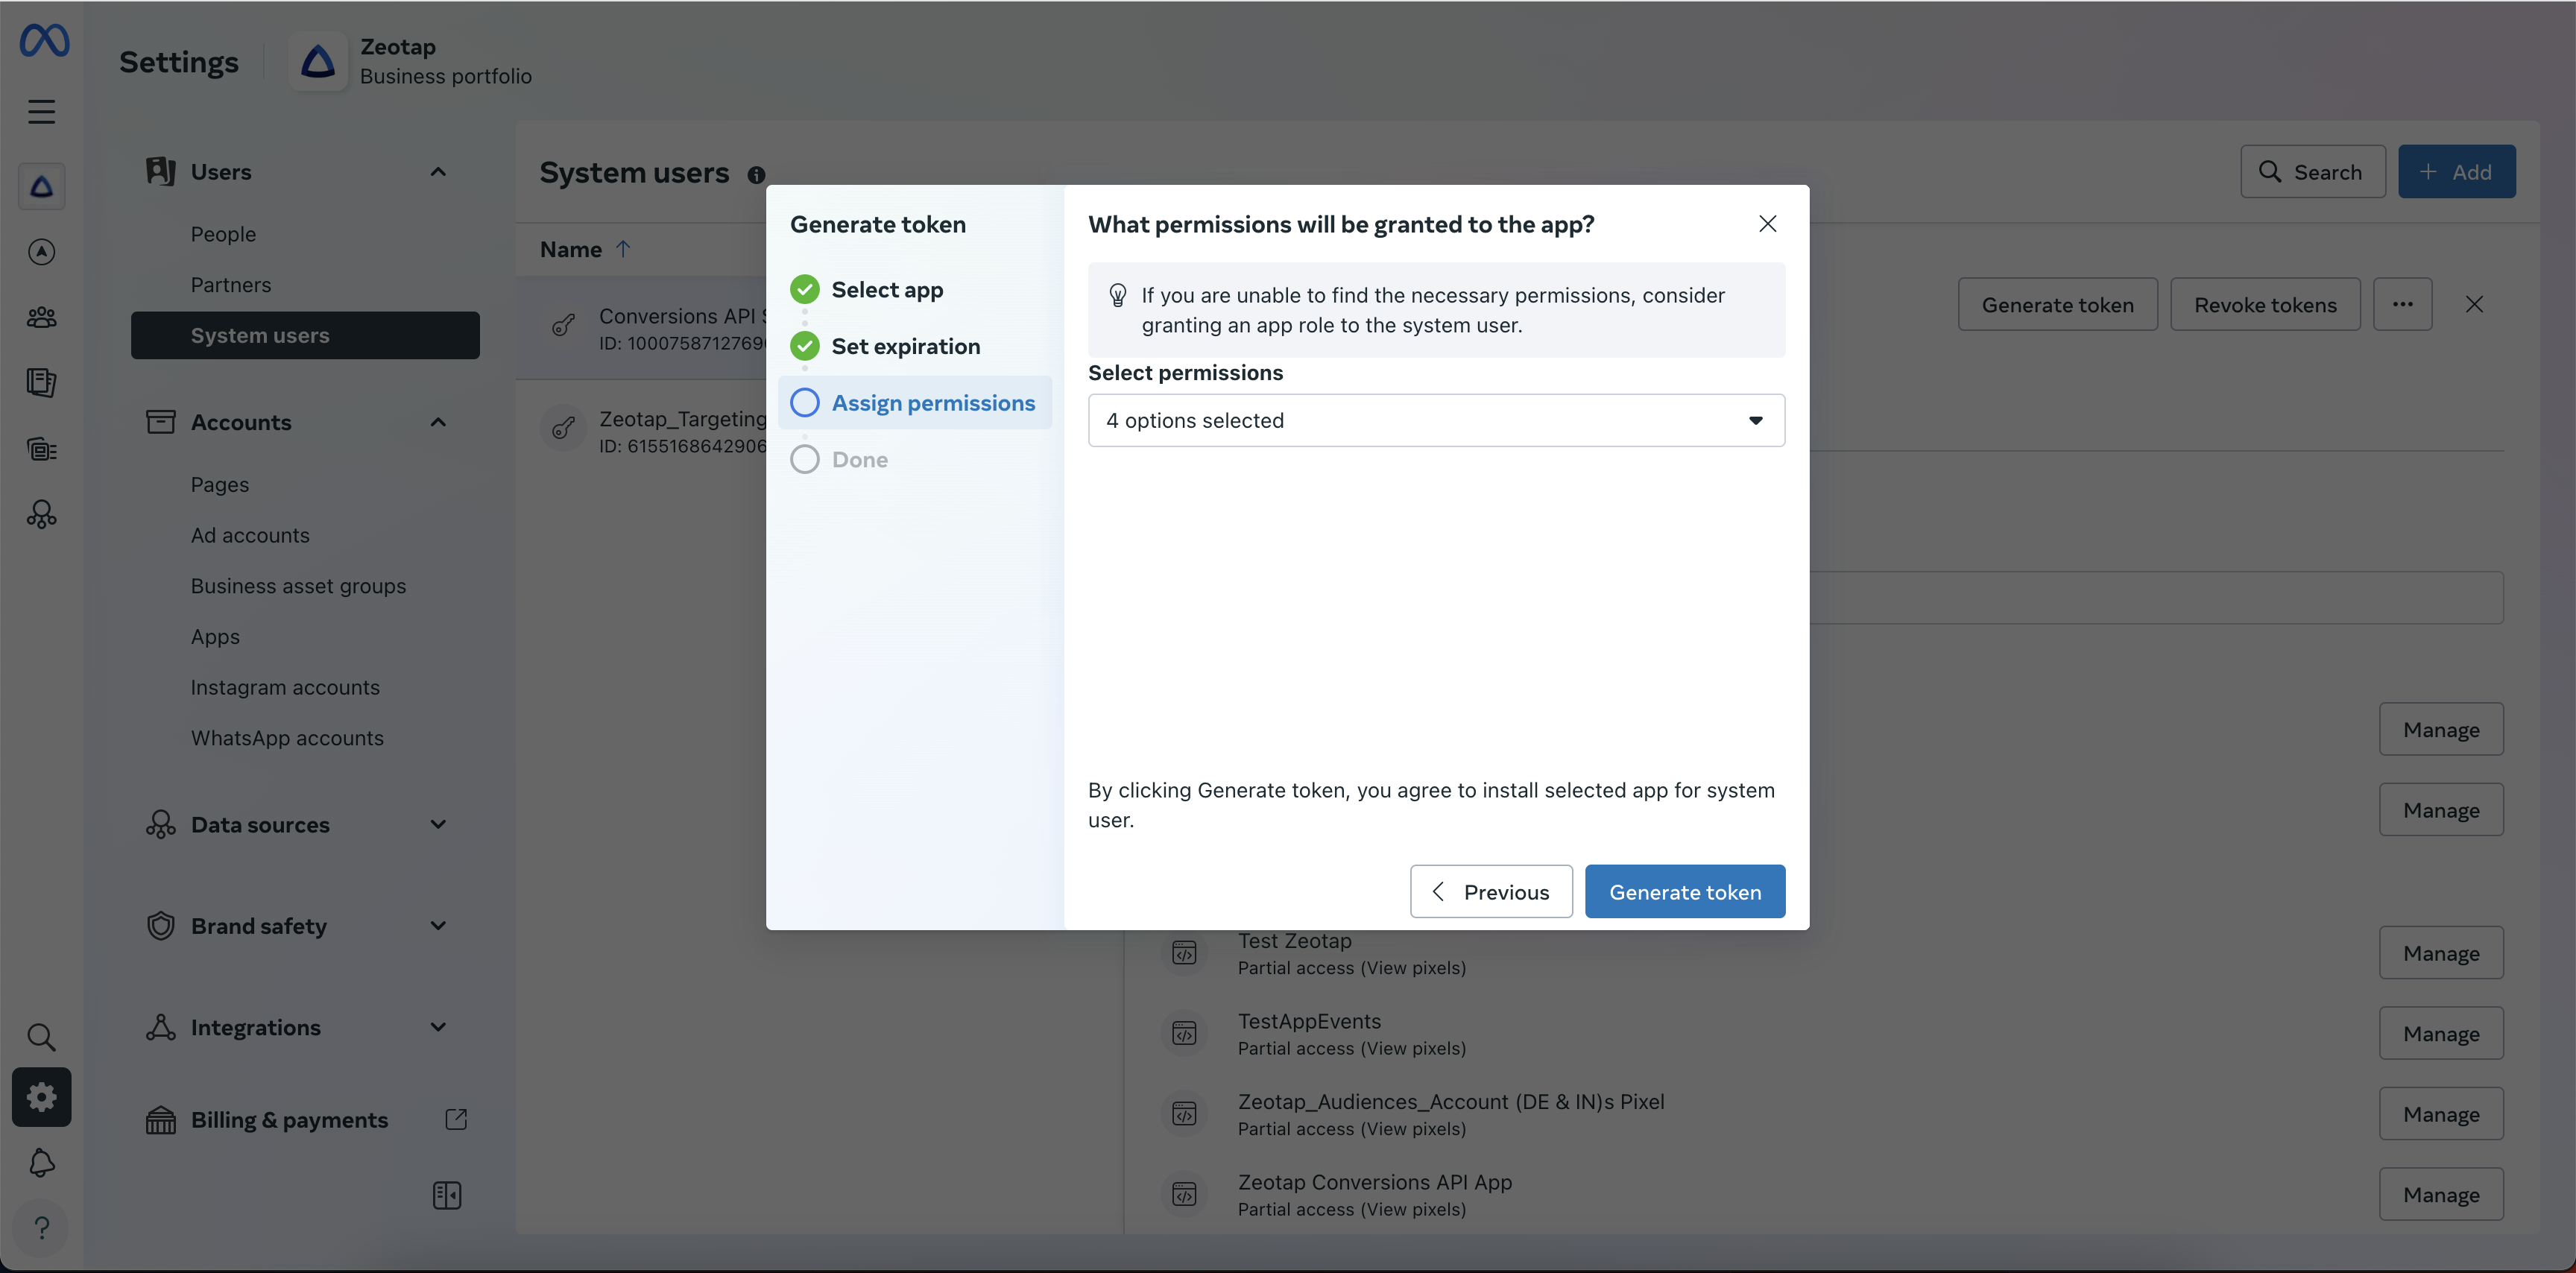
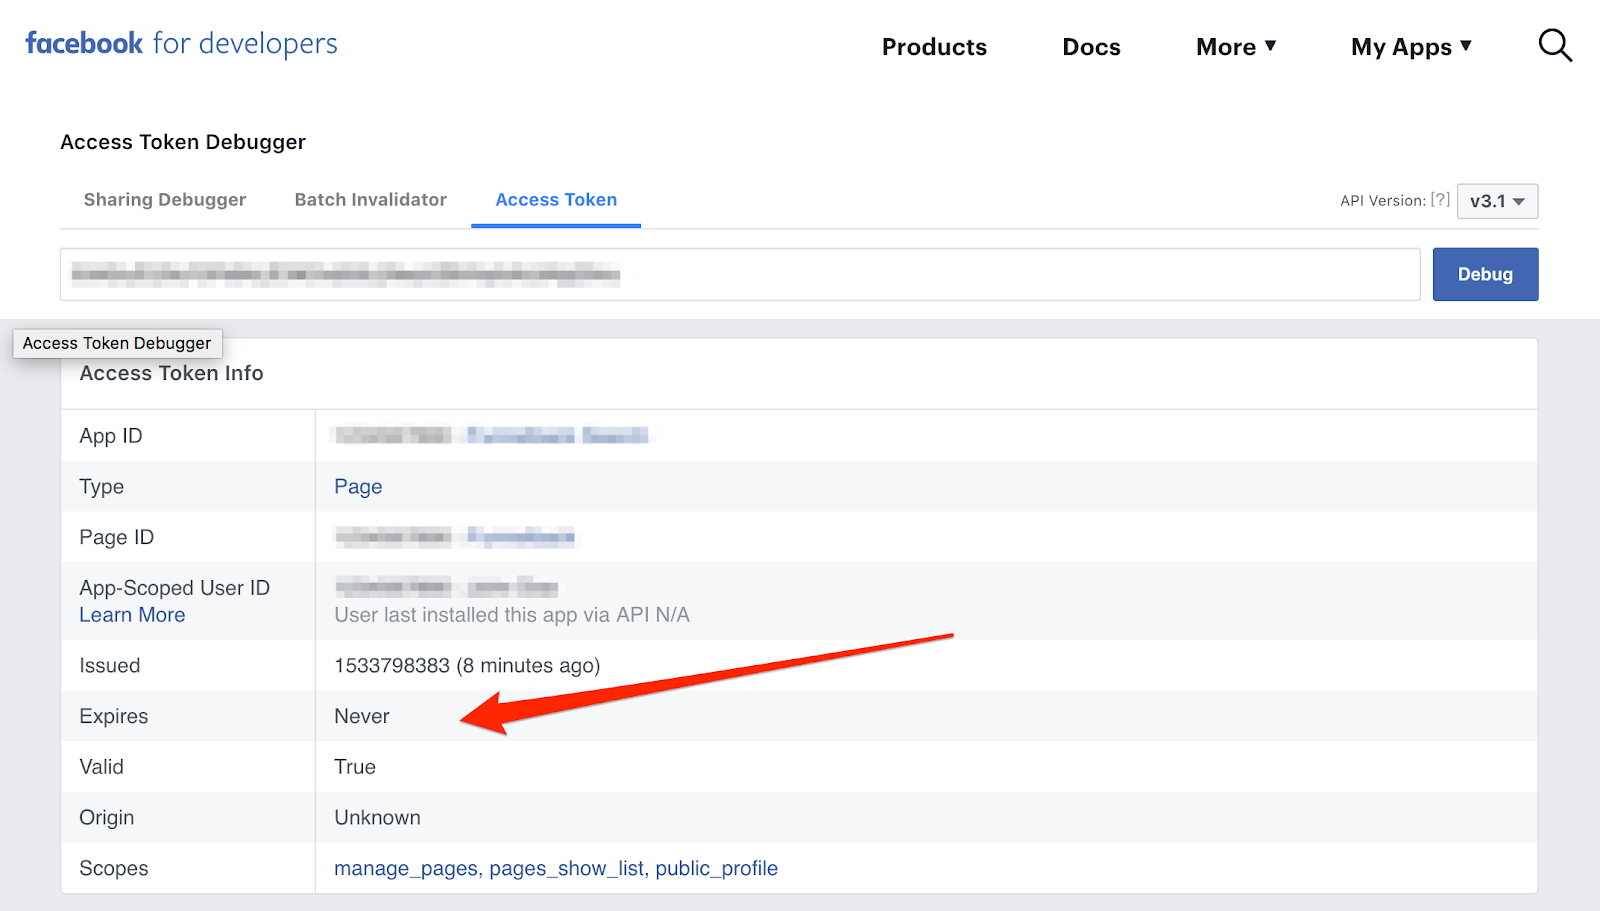
Navigate to Access Token Tool. In the new screen that appears, click access token debugger.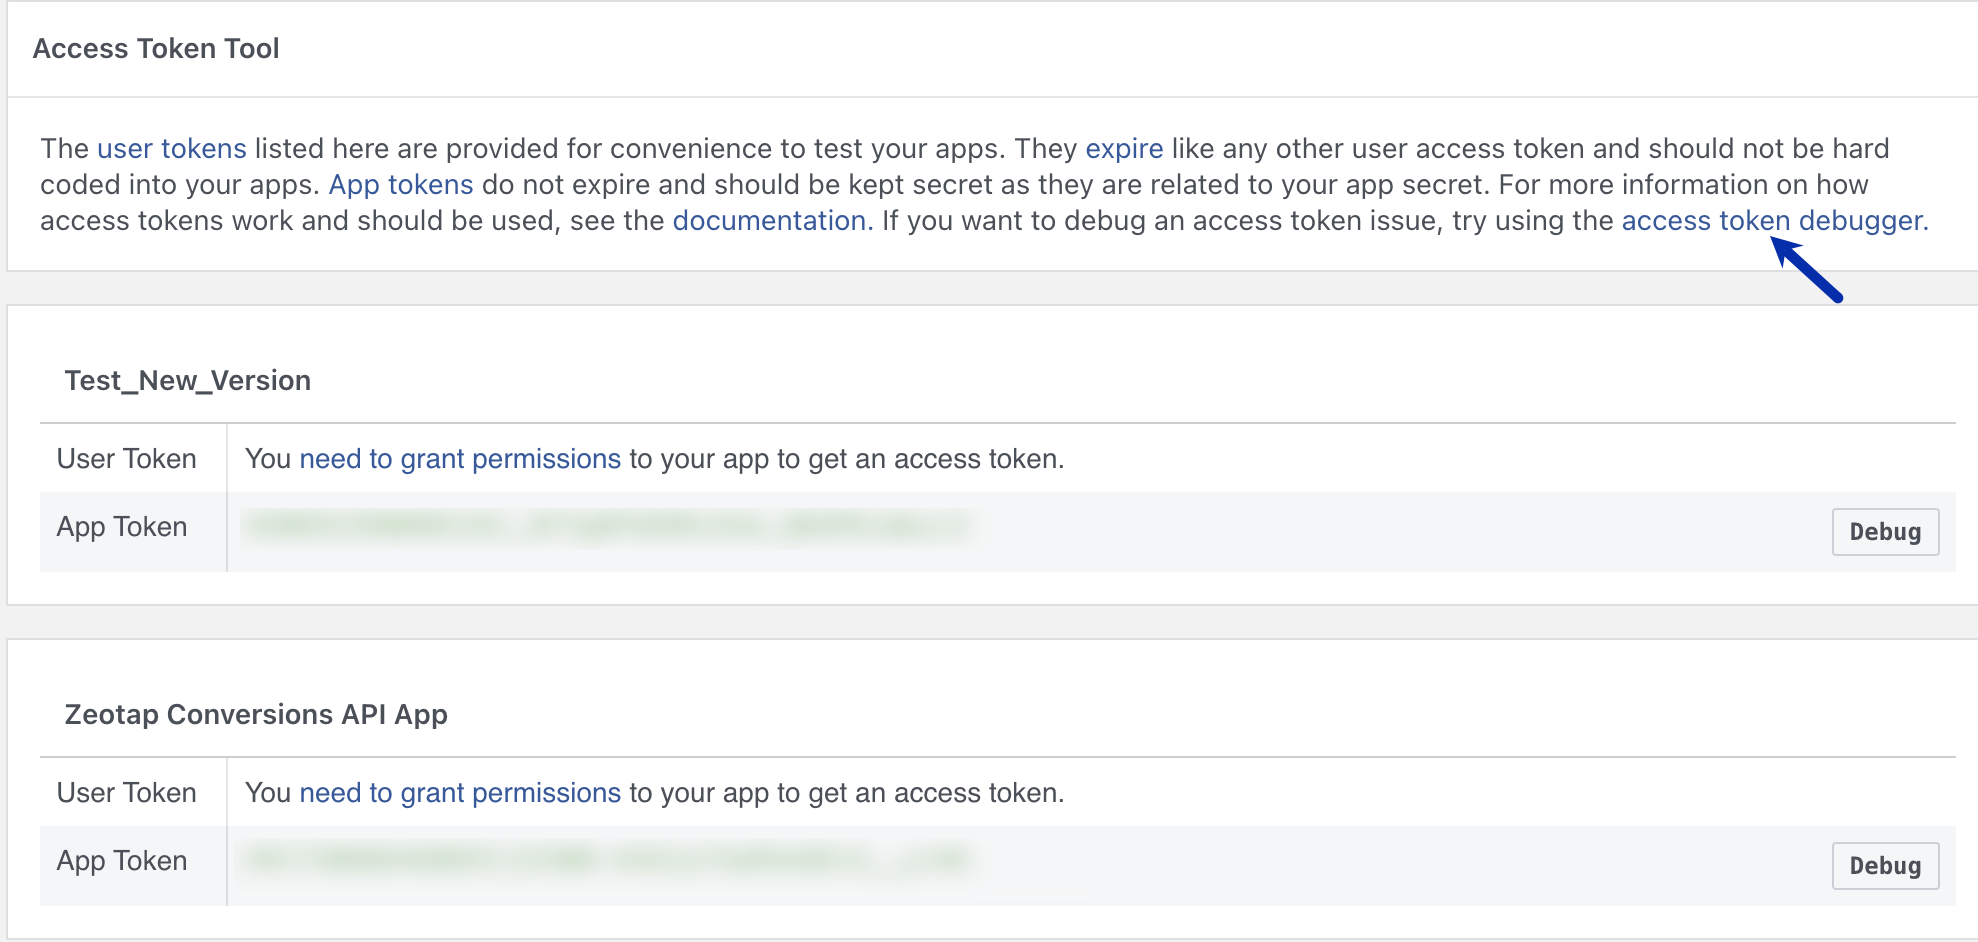
Paste the access token and click Debug. The page appears where you can find the full information of the access token. Note that you can create a new destination on Zeotap CDP using the newly generated access token, or to update an existing destination, simply provide the token to Zeotap Support Team.
Note:Whenever you update the access given to the system user, you need to generate a new access token.
Generate Page Access Token
To generate a page access token, an admin of the page must grant your app the Page permission or permissions needed. Once granted, you can retrieve the Page access token using a user access token with the required permissions. This is the never-ending token that you generate using the Postman tool.Note that an incorrect access token leads to the failure of segments. Therefore, ensure that you use the never-ending token as mentioned below and check it using the token validation tool.
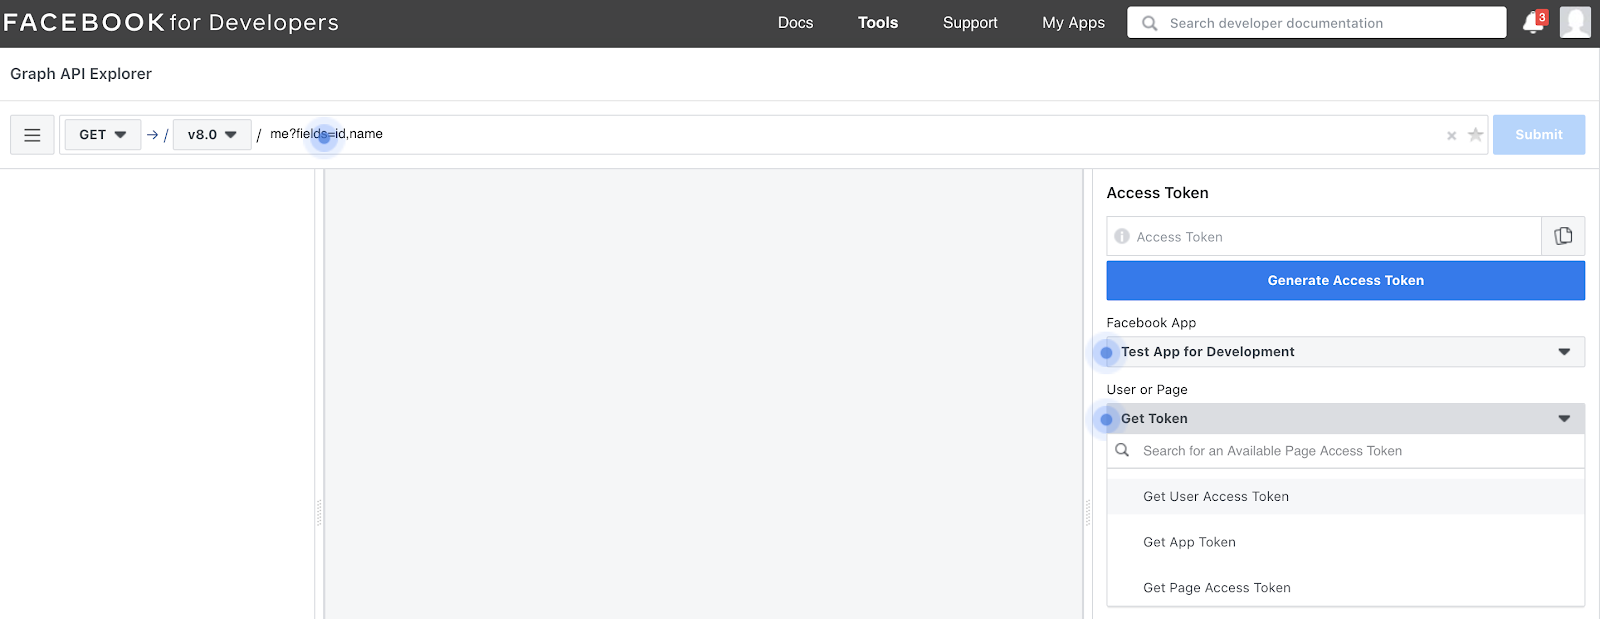
Navigate to Facebook Graph API Explorer and generate a short-lived access token.
The Add a Permission option appears as mentioned below. Select Event Groups Pages and select the following permissions:
- ads_read
- ads_management
- pages_manage_ads
Note:To understand more about the permissions, refer here.
This creates a short-lived user access token that opens a popup. Select the relevant page you want to manage.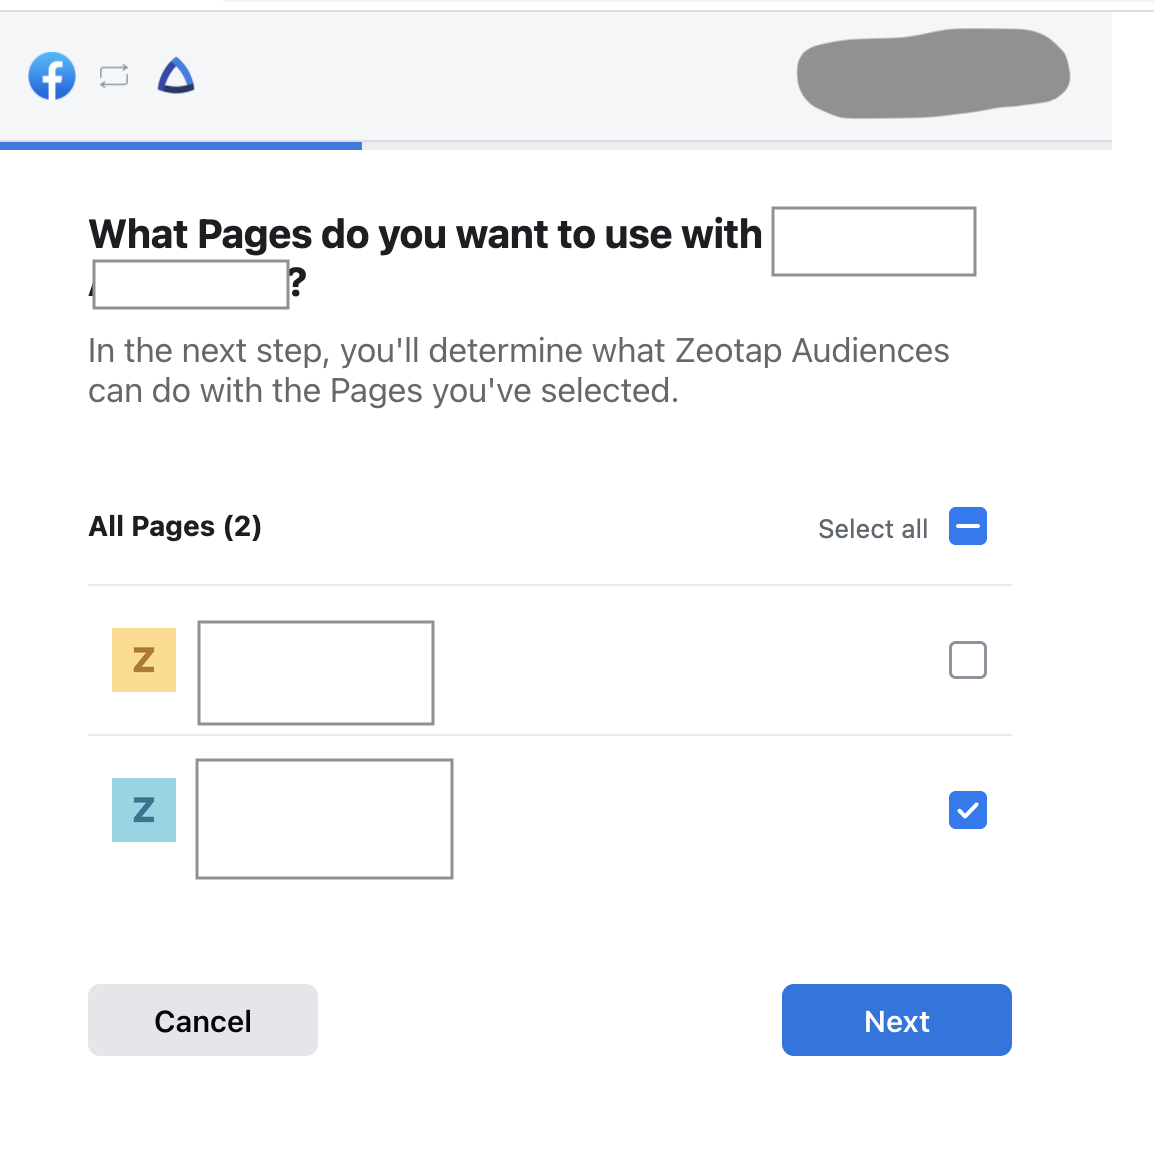
Navigate to and click Debug. The page appears where you can find the full information for the short-lived user access token. Note that the short-lived user access token expires after an hour.
Copy this new long-lived access token to use in the next step. If you do not see Extend Access Token and your token expires within two months, then it indicates that you already have the long-lived access token. In that case, you can skip this step and go to the next step.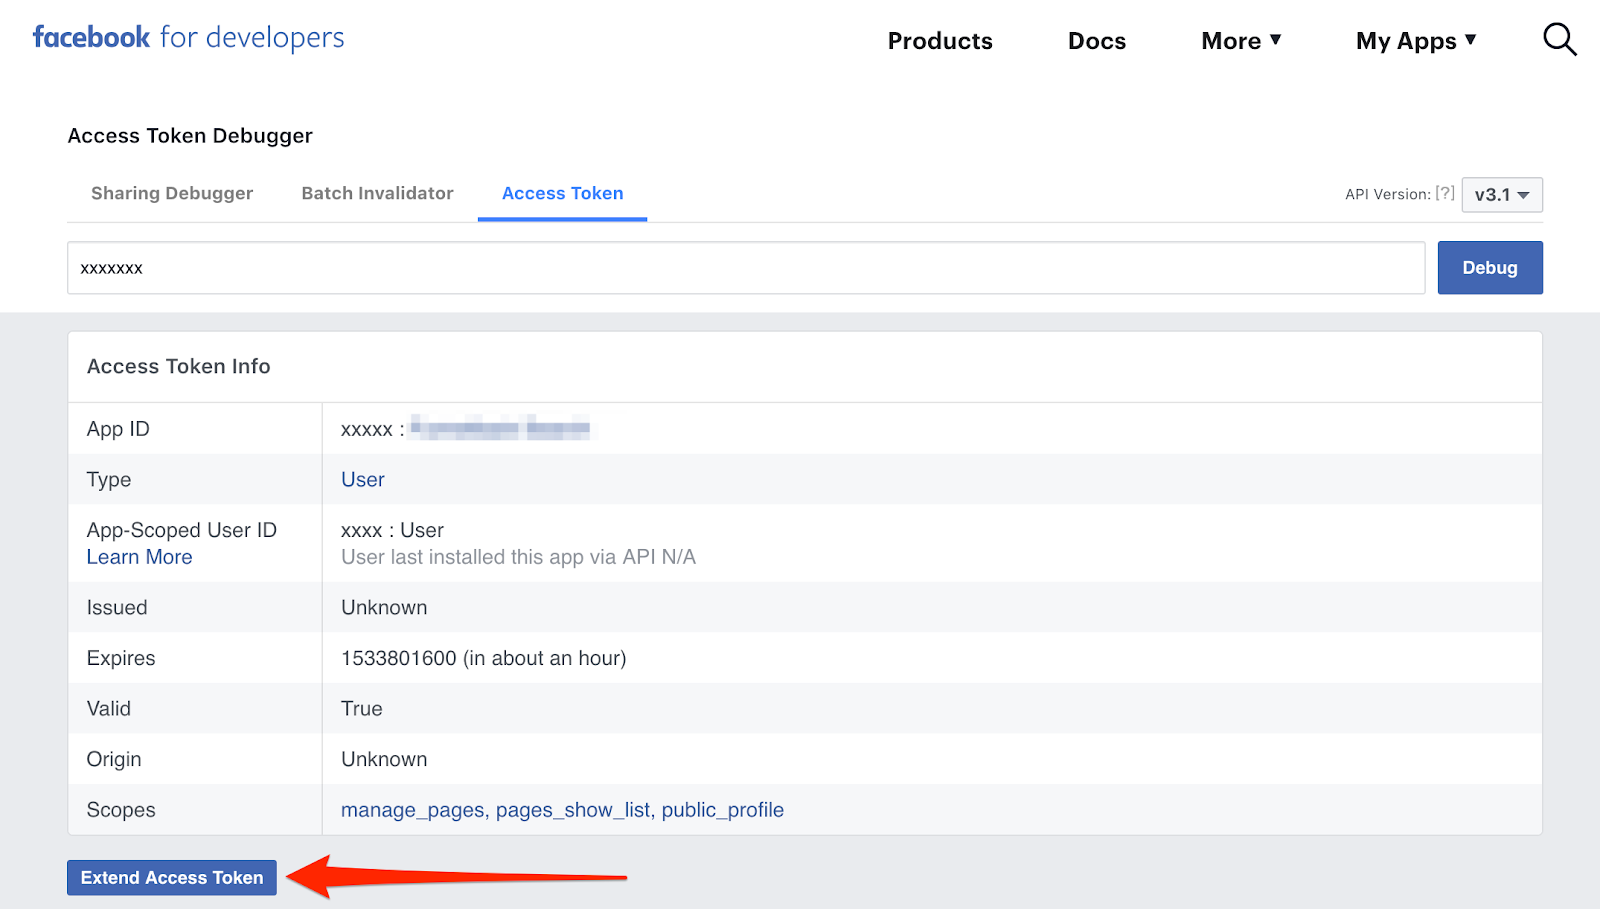
Go to and paste the recently created long-lived user access token in the Access Token field. Perform the following steps:a. Change the API endpoint to access /me/accounts and click Submit. This displays the result with information about all the pages including the page access token, which is a never expiring token that is used to authenticate all the requests.b. Copy the access token of the relevant page and the API version used in the request to generate the token. This information is required when you set up a Destination within the Zeotap CDP App.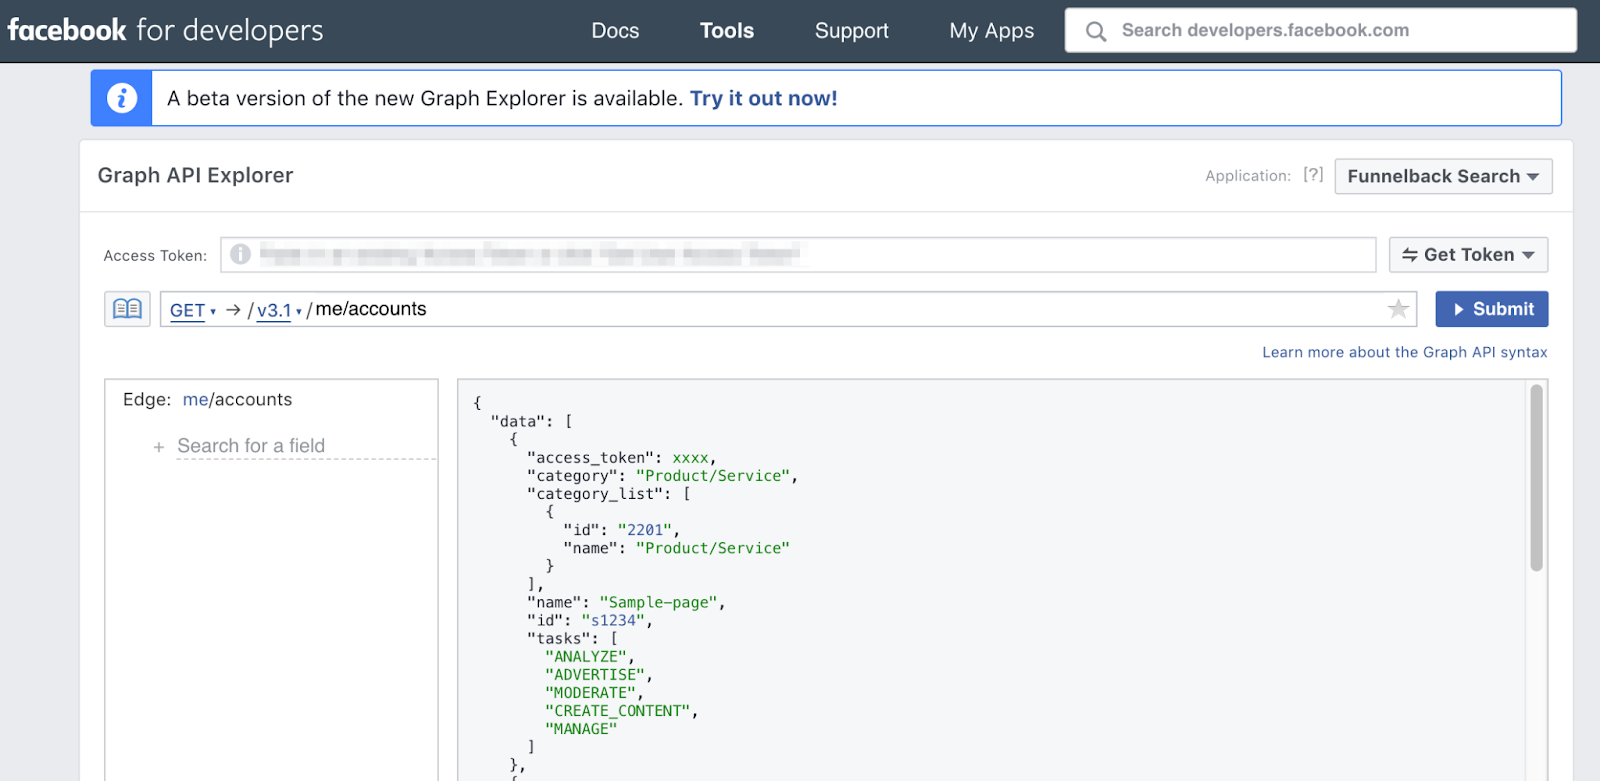
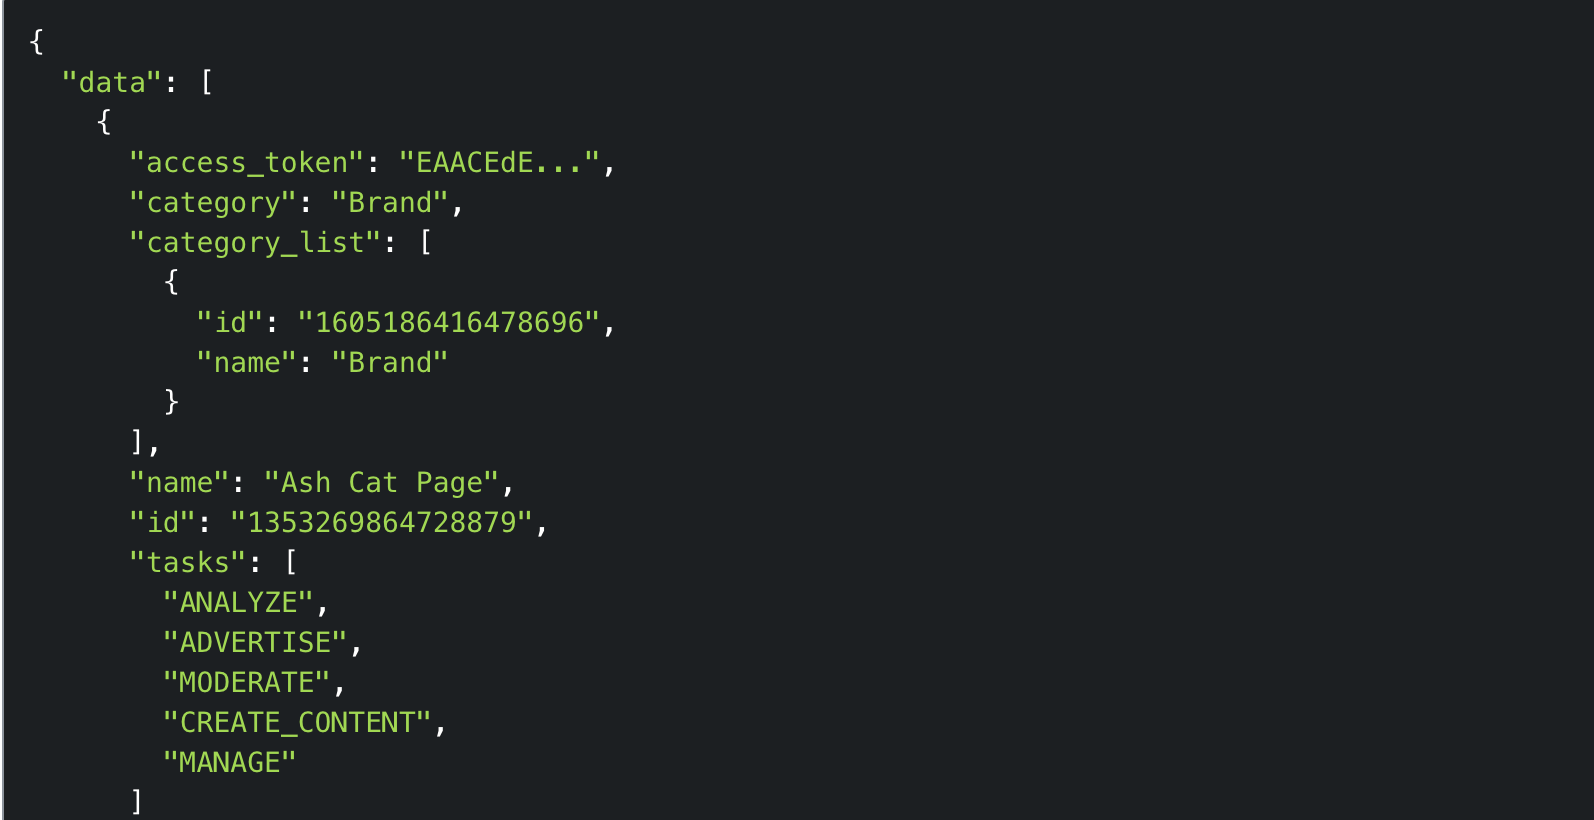
Code
- Replace
{your-user-id}with App-Scoped User ID. - Replace
{long-lived-access-token}with the long-lived access token that you have generated. Ensure to make these changes before importing this code in Postman. The below response is obtained.
Obtain Your Facebook Graph API Version
This is the current version of your Facebook Graph API. You can find it while generating the access token as mentioned above. It appears on the left-hand side of the screen along with the other details about your access token.Note:Enter only the numerical part of the version while creating a destination in Zeotap CDP. For example, if the version is
v17.0, then enter only 17.0What Next?
Once you have completed the above mentioned prerequisites, perform the following steps to set up the integration between Zeotap CDP and Facebook 1P:1. Create a Destination for Facebook 1P
Perform the following steps to create a Destination for Facebook 1P: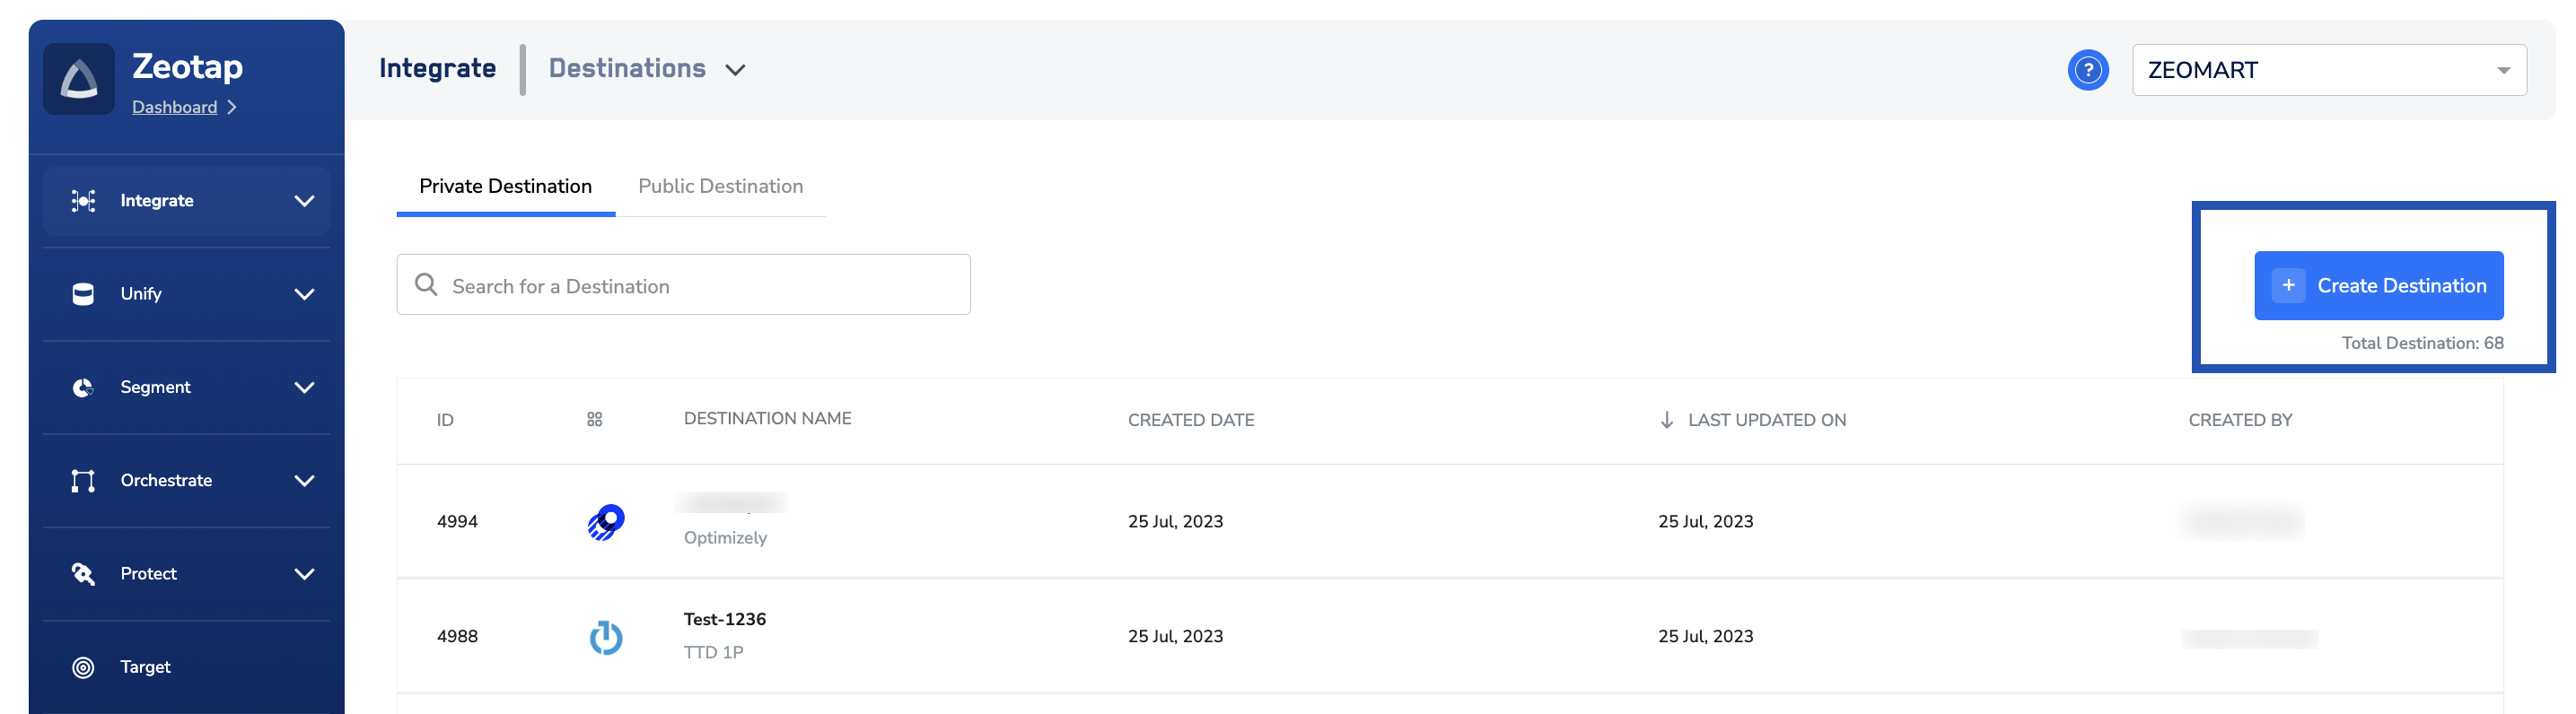

Click Facebook 1P. A screen appears displaying details about the particular destination towards the left. On the right-hand side of the screen find a list of fields that are required for the integration to be established. Enter the required details as mentioned in the following steps:
a. Enter a name for the Destination.b. Enter the Ad Account ID number associated with Facebook Business Manager.c. Enter the Access Token that you have obtained as mentioned in the section above.d. Enter the API Version.e. Review all the values entered above and then click Next to proceed.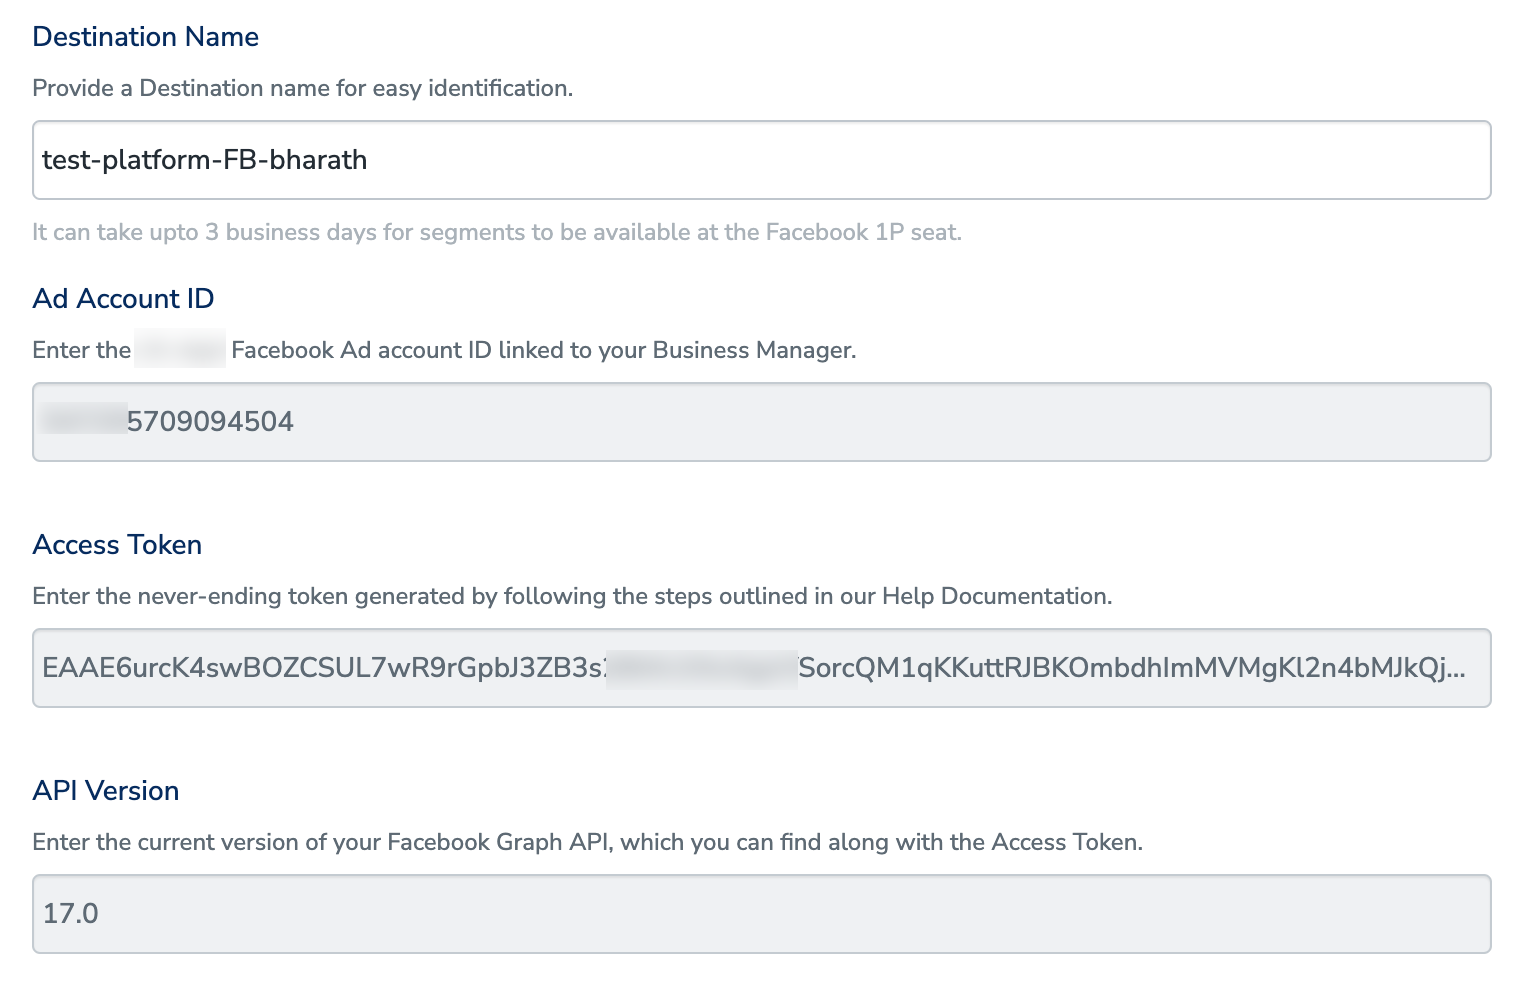
Note:Enter only the numerical part of the version while creating a destination in Zeotap CDP. For example, if the version is V17.0, then enter only 17.0
In the new screen that appears, choose the appropriate Action and mapping as explained below.a. Under Choose your Action, you can either choose Send Identifiers to Facebook 1P or Send Multiple User Identifiers to Facebook 1P as the action based on your use case.i. If you choose Send Identifiers to Facebook 1P as the action, then the output identifiers such as 
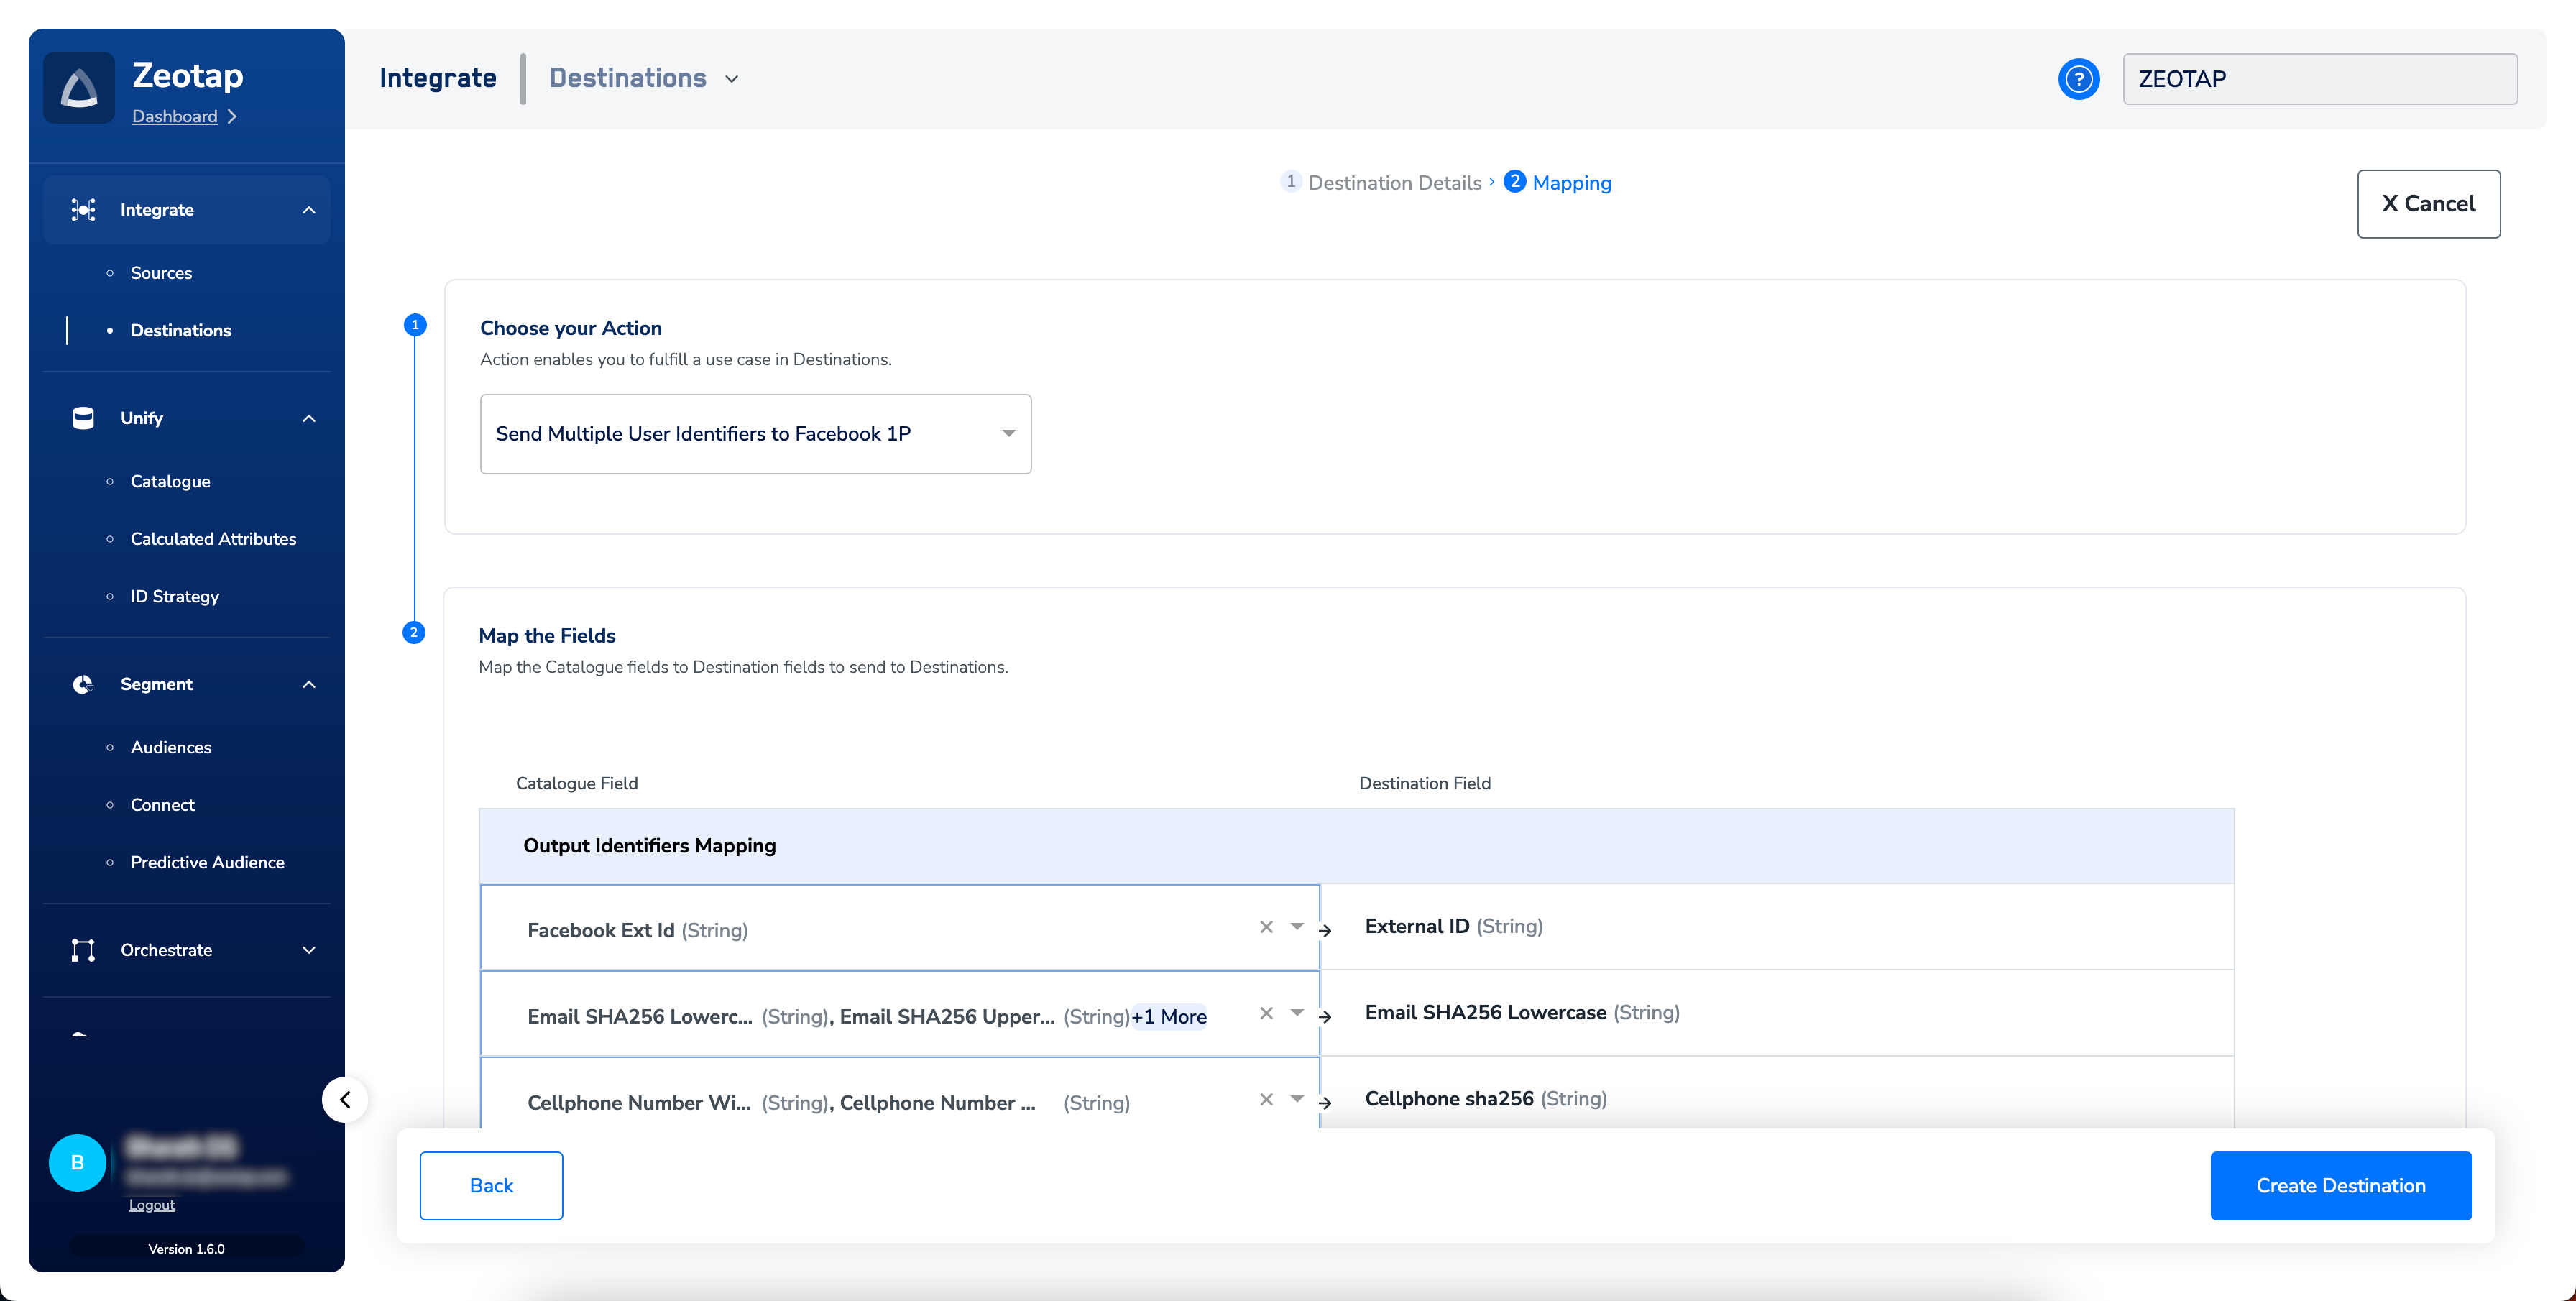
b. After reviewing the fields, click Create Destination. The created Destination gets listed in the Audiences application, which can be linked to an Audience/segment.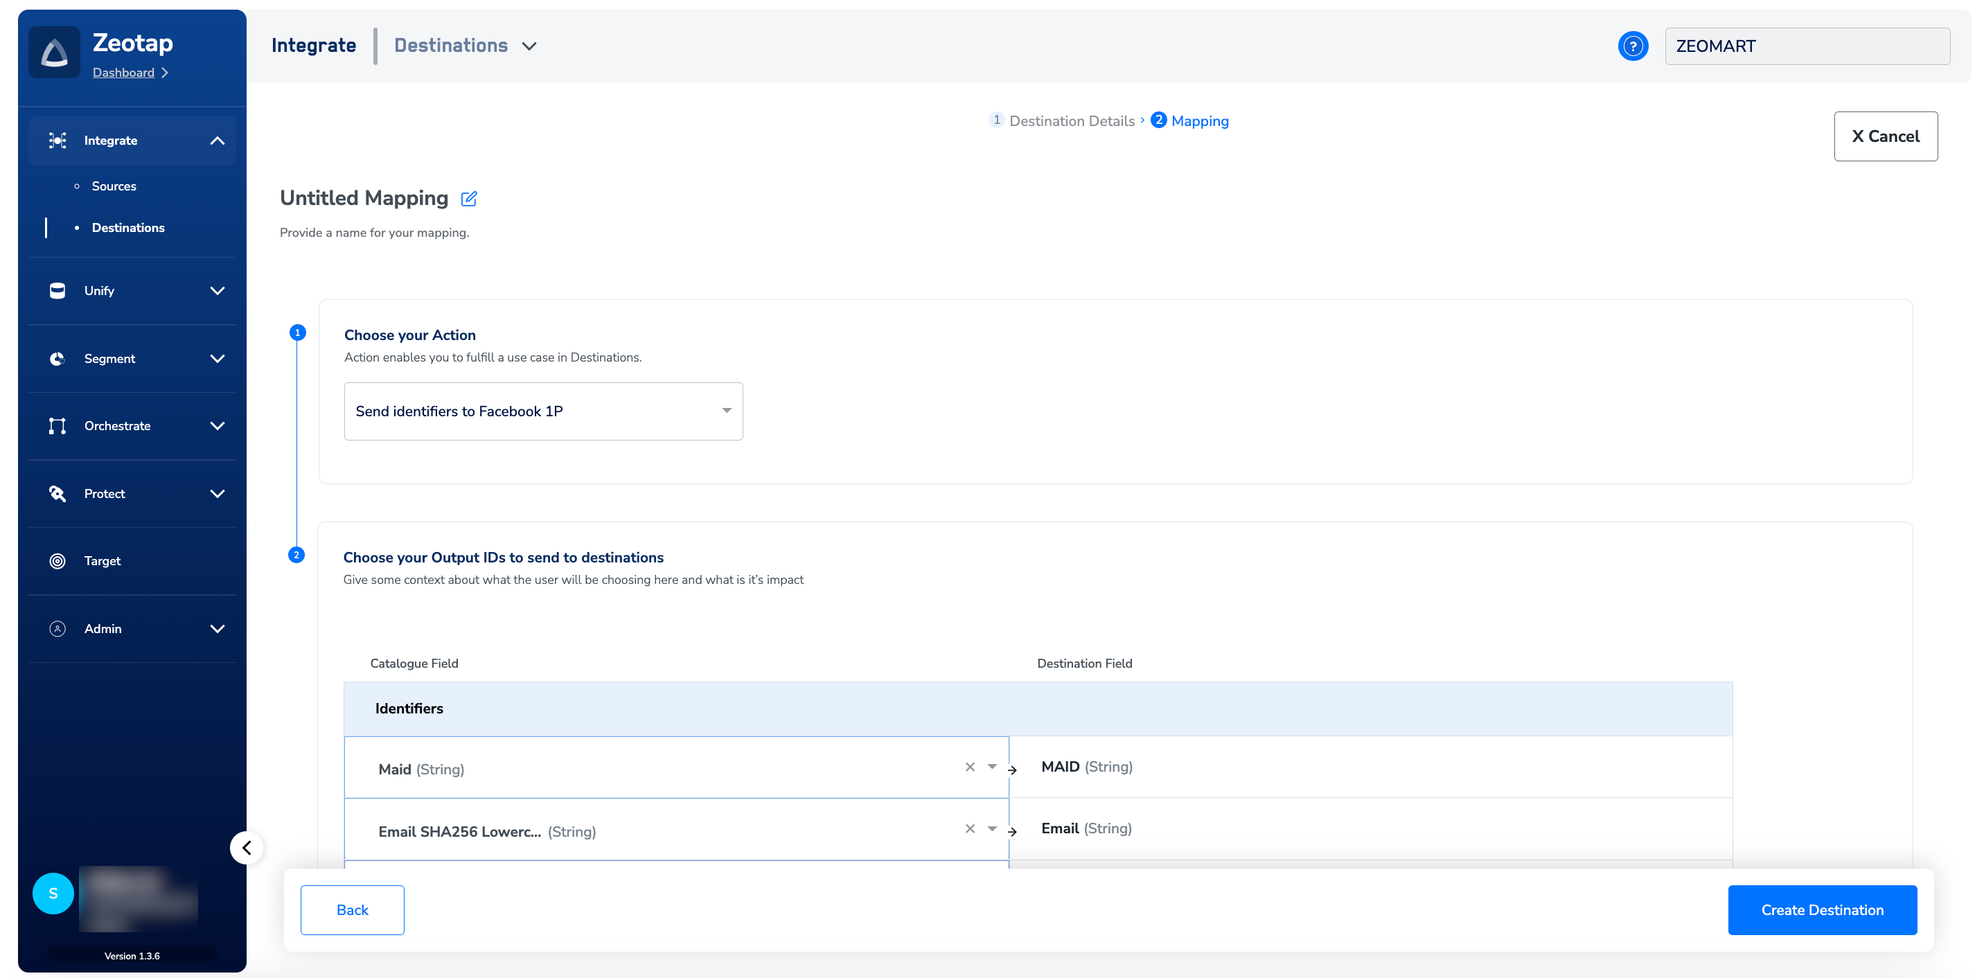
MAIDs, email addresses, cellphone numbers and Facebook external ID are populated. You can edit and remap the identifiers as required. Note that in this action, each identifier is sent as an individual user profile.email addresses, MAIDs, cellphone numbers, gender, date of birth, last name, first name, city, state, zip and country are populated. Note that all the identifiers selected under the mapping screen are sent as a single user profile.Note:To increase the match rate, we recommend that you use Send Multiple User Identifiers to Facebook 1P as the action.
| Attribute | How Facebook wants the attribute | Transformation performed by Zeotap CDP |
|---|---|---|
| External ID | Hashing NOT required | Zeotap CDP sends it as it is |
| Email Address | Hashing requiredTrim leading and trailing white space, and convert all characters to lowercase. | Email SHA256 Lowercase in Zeotap Catalogue can be mapped to this attribute.Consult your Zeotap POC to understand how to ingest this identifier |
| Phone Number | Hashing requiredRemove symbols, letters, and any leading zeroes. | Cellphone Number Withcode Sha256 in Zeotap Catalogue can be mapped to this attribute.Consult your Zeotap POC to understand how to ingest this identifier |
| Gender | Hashing requiredm for male, f for female. |
|
| Date of birth | Hashing requiredSend YYYY, MM, DD separately to Facebook. |
|
| First Name and Last Name | Hashing requiredUse a-z only. Lowercase only, no punctuation. Special characters in UTF-8 format. | Zeotap performs relevant transformation |
| State | Hashing requiredUse the 2-character ANSI abbreviation code, lowercase. Normalize states outside the US in lowercase, with no punctuation, no special characters, and no white space. | Zeotap hashes the State values ingested by the customer and send it to Facebook |
| City | Hashing requiredUse a-z only. Lowercase only, with no punctuation, no special characters, and no white space. | Zeotap hashes the State values ingested by the customer and send it to Facebook |
| ZIP Code | Hashing requiredUse lowercase, and no white space. For the US, use only the first 5 digits. For the UK, use the Area/District/Sector format. |
|
| Country Code | Hashing requiredUse lowercase, 2-letter country codes in ISO 3166-1 alpha-2. | Country in Zeotap Catalogue can be mapped to this attribute.If you are mapping any other attribute, make sure you are onboarding 3-letter country code. Zeotap will convert it into 2-letter country code and send it to Facebook. |
| Mobile Advertising ID | Hashing NOT requiredUse all lowercase, and keep hyphens. | Zeotap CDP sends it as it is |
2. Link an Audience to the Facebook 1P Destination
For information about how to link an Audience or segment to the created Destination in Audiences, refer here. Note that the terms Audiences and Segments are used interchangeably to refer to customer cohorts belonging to a specific category. For example, an Audience or a segment can be a specific group of customers who are over 18 years of age and have performed anaddToCart event within the last 30 days.
Note:The following are some useful information related to linking an audience to the Facebook 1P Destination:
- It can take up to one business day for segments to be available at the Facebook seat.For more information about the SLA, refer
- We recommend that you directly create segments in the client’s account so that theyare not available under Zeotap’s Ad accounts, unlike the third-party setup.
- The custom audience limit of 500 applies to each Ad account that the client usesbut not on the Zeotap account.Facebook compares the data uploaded by us against asegment with their encrypted user data. If they find a match, the IDs gets added to thecustom audience/segment and Ads gets delivered to them.
3. Find Your Zeotap CDP Audience on Facebook 1P
Perform the following steps to find your new audience(s) on Facebook 1P:Log into Facebook Ads Manager and select the business portfolio that contains the ad account used to set up your audience connection from the left-hand navigation.
Additional Information about the Integration
User Disqualification from Audiences
This integration supports user disqualification from audiences. That is, a user can be disqualified from an audience (segment) for various reasons, such as not meeting audience criteria, consent requirements or other conditions set for a particular audience.- When a user disqualifies from an audience, Zeotap CDP initiates a user deletion request in the next refresh cycle. These requests are sent to the audiences linked to the specific destination.
- The disqualified users are excluded from the audiences based on the configured refresh frequency for a particular audience.
- User disqualification is a programmatic process that works automatically. You do not need to specify anything to trigger the disqualification and exclusion of users from audiences.
Sending/Capturing External IDs
The following steps summarise the process of sending or capturing the external IDs between a Brand and Facebook:- A Brand places the Facebook pixel on their websites and configures the tag to pass the Facebook cookie/any other custom identifier as an extern_id to Facebook. Refer to the implementation guide here.
Code
- Facebook internally creates a mapping table that maps the extern_ID (for example, Orange’s cookie) to a standard Facebook ID (for example, Zeotap’s UCID).
- The Brand separately passes the Facebook cookie to Zeotap as id_mid_62, using the Google Tag Manager (GTM), JavaScript (JS) or any other tag implementation.
- The Brand creates an audience within Audiences using the Facebook cookies.
- Zeotap uploads the Facebook cookie as an extern ID to Facebook. Facebook then refers to the mapping table to target the user within their ecosystem.
Note:Ensure to accept the terms of Custom Audience as mandated by Facebook from Sept 2021 by visiting the link mentioned here. This is a mandatory step. To accept the terms, go to the following link and click Accept in the left corner: https://business.facebook.com/ads/manage/customaudiences/tos/?act=
Troubleshooting
When setting up this destination, you might encounter the following error:{"message":"Facebook Error: Permission error","code":"400 BAD_REQUEST"}.
This error typically happens when new accounts are being used and Facebook permissions are not yet active.
Note:Ensure you accept the Facebook Audiences Terms of Service as explained in the Prerequisites section.