Overview
Facebook Conversions API is a tool that provides a way for businesses to track important events on their website or applications through a single endpoint rather than across multiple sources. The events can be purchases, form submissions and page views, which they can then send directly to Facebook. This information can then be used to optimise ad campaigns and measure their effectiveness, as well as provide insights into how people are interacting with a business’s website or applications. The below image illustrates how the Conversions API works in conjunction with Facebook Pixel.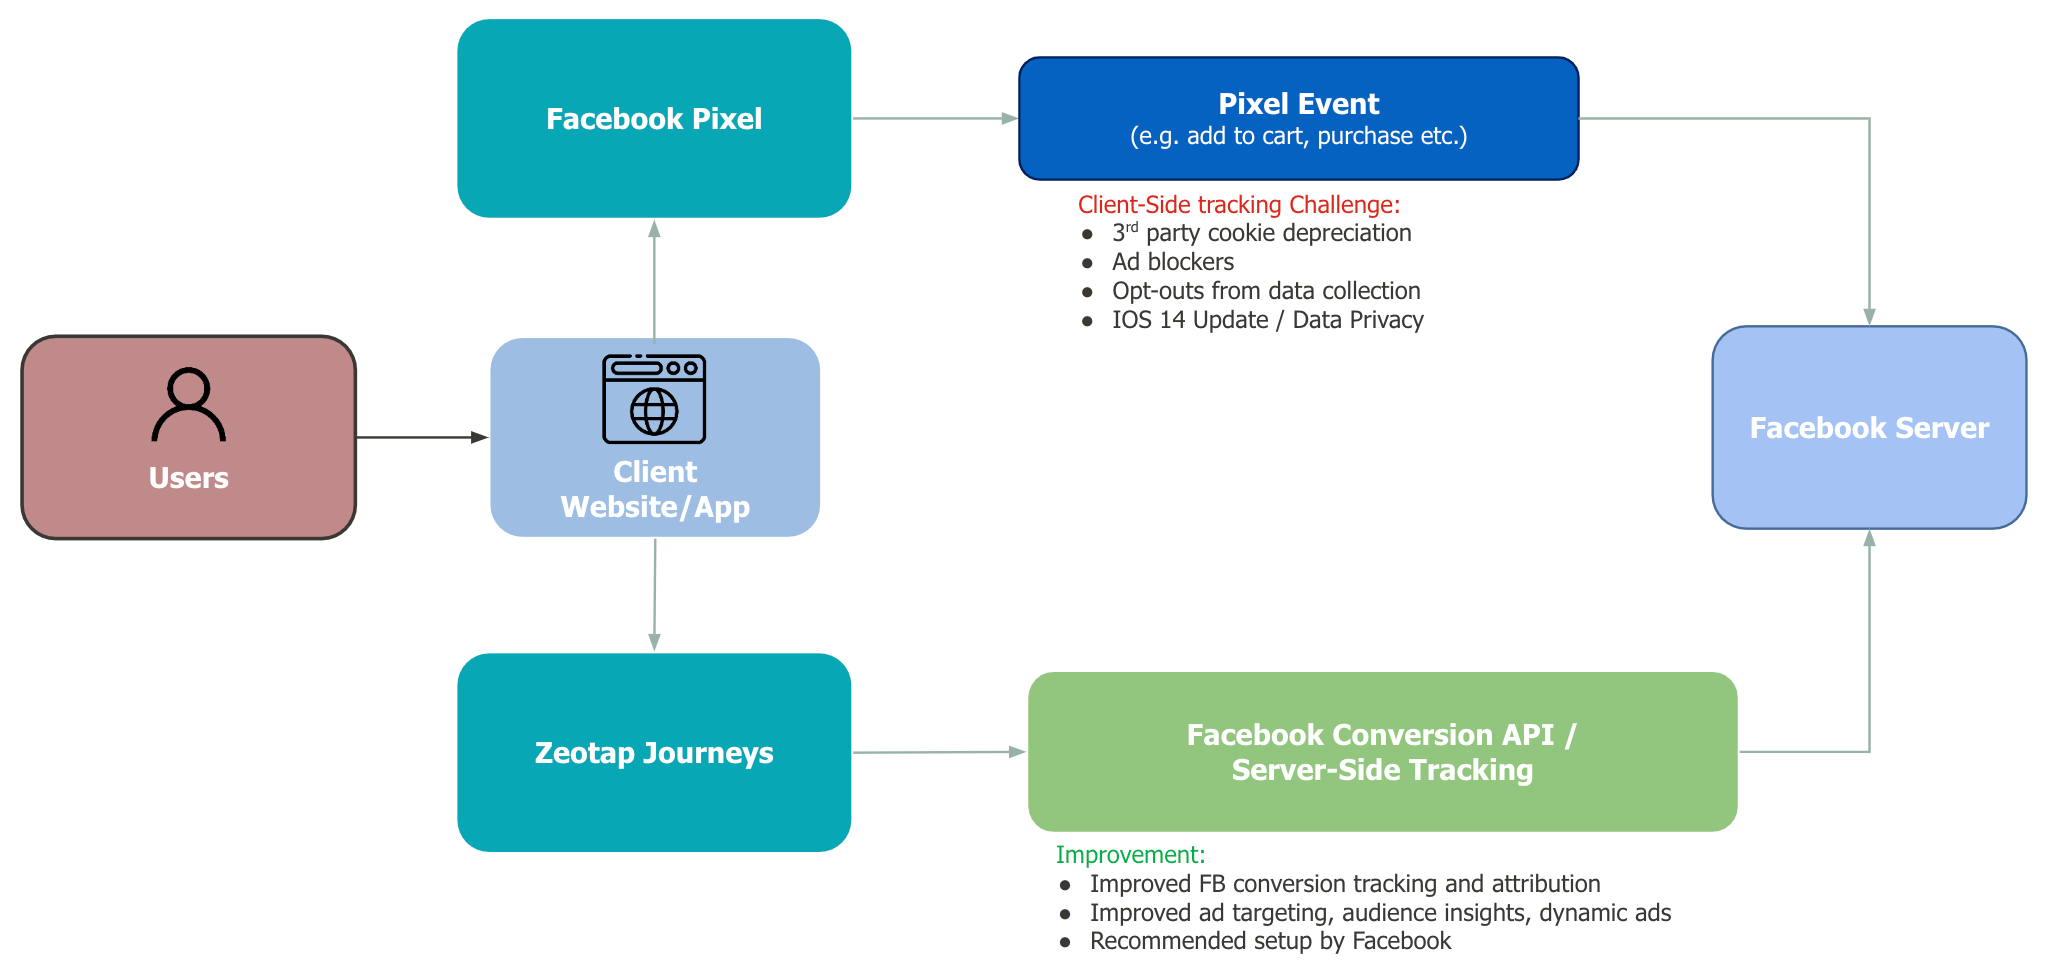
Note:Facebook recommends you use a setup with both the Facebook Pixel and the Conversions API to pass the events. However, Zeotap only offers implementation for the server-to-server Conversions API. Therefore, the responsibility to implement the Pixel lies with you.
Why use this Integration?
Integrating with the Facebook Conversions API offers several significant advantages, including:- Extended Conversion Insights: Utilising the API, you can base your decisions on a broader range of information, including CRM data and conversion paths across multiple sites within a website or application.
- Data Control: The Conversions API gives you added control over what data you share.
- Reliability and Resilience: The Conversions API is intended to be more resilient to problems such as connectivity issues or browser crashes. As new industry regulations impose restrictions on data transmission, cookies and pixel tracking may become less effective and the Conversions API provides a means of controlling the sharing of signals that may no longer be captured by the pixel.
Process Overview
The following are the high-level steps for setting up the Conversions API integration:- Choose the integration method that is right for you. For example, Web, App and so on.
- Complete the necessary prerequisites for the implementation you choose.
- Implement and verify your setup.
Choose your Integration Approach
Before you proceed with this Integration, ensure to choose a suitable approach that fits your business requirement, based on the following actions:- Define the events and attributes to send to Conversions API
- Choose a deduplication strategy
Define the Events to Send
After you have decided on the use case for your integration, specify the events and parameters that you want to send to Facebook. You can choose this in the Actions and Mapping screen while creating the Destination. Note that you can send events attributes, user data, app data and custom data to Conversions API.Choose a Deduplication Strategy
Advertisers do not want to send the same event twice through the Conversions API and the Facebook Pixel as it results in the duplication of events. Hence, deduplication is necessary. We recommend an approach that enables the deduplication of events sent through the Facebook Pixel on the web and the Conversions API. Our recommended approach is that you must ensure both events (Pixel and Conversions API) use the identical Event Name. Also, ensure that either Event Id or a combination of External Id and FBP is included. We recommend you include all these parameters to help Facebook properly deduplicate events and reduce double reporting of identical events. Based on the combination of parameters that you choose, ensure that you ingest the respective attributes to Zeotap and map them within Zeotap CDP. For more information about the Deduplication Strategy, refer here.Components of the Conversions API
Ensure that you have the following details available before creating a destination for Conversions API:- Dataset ID/Pixel ID - Different approaches for Website and App events
- Access Token
- Business Manager
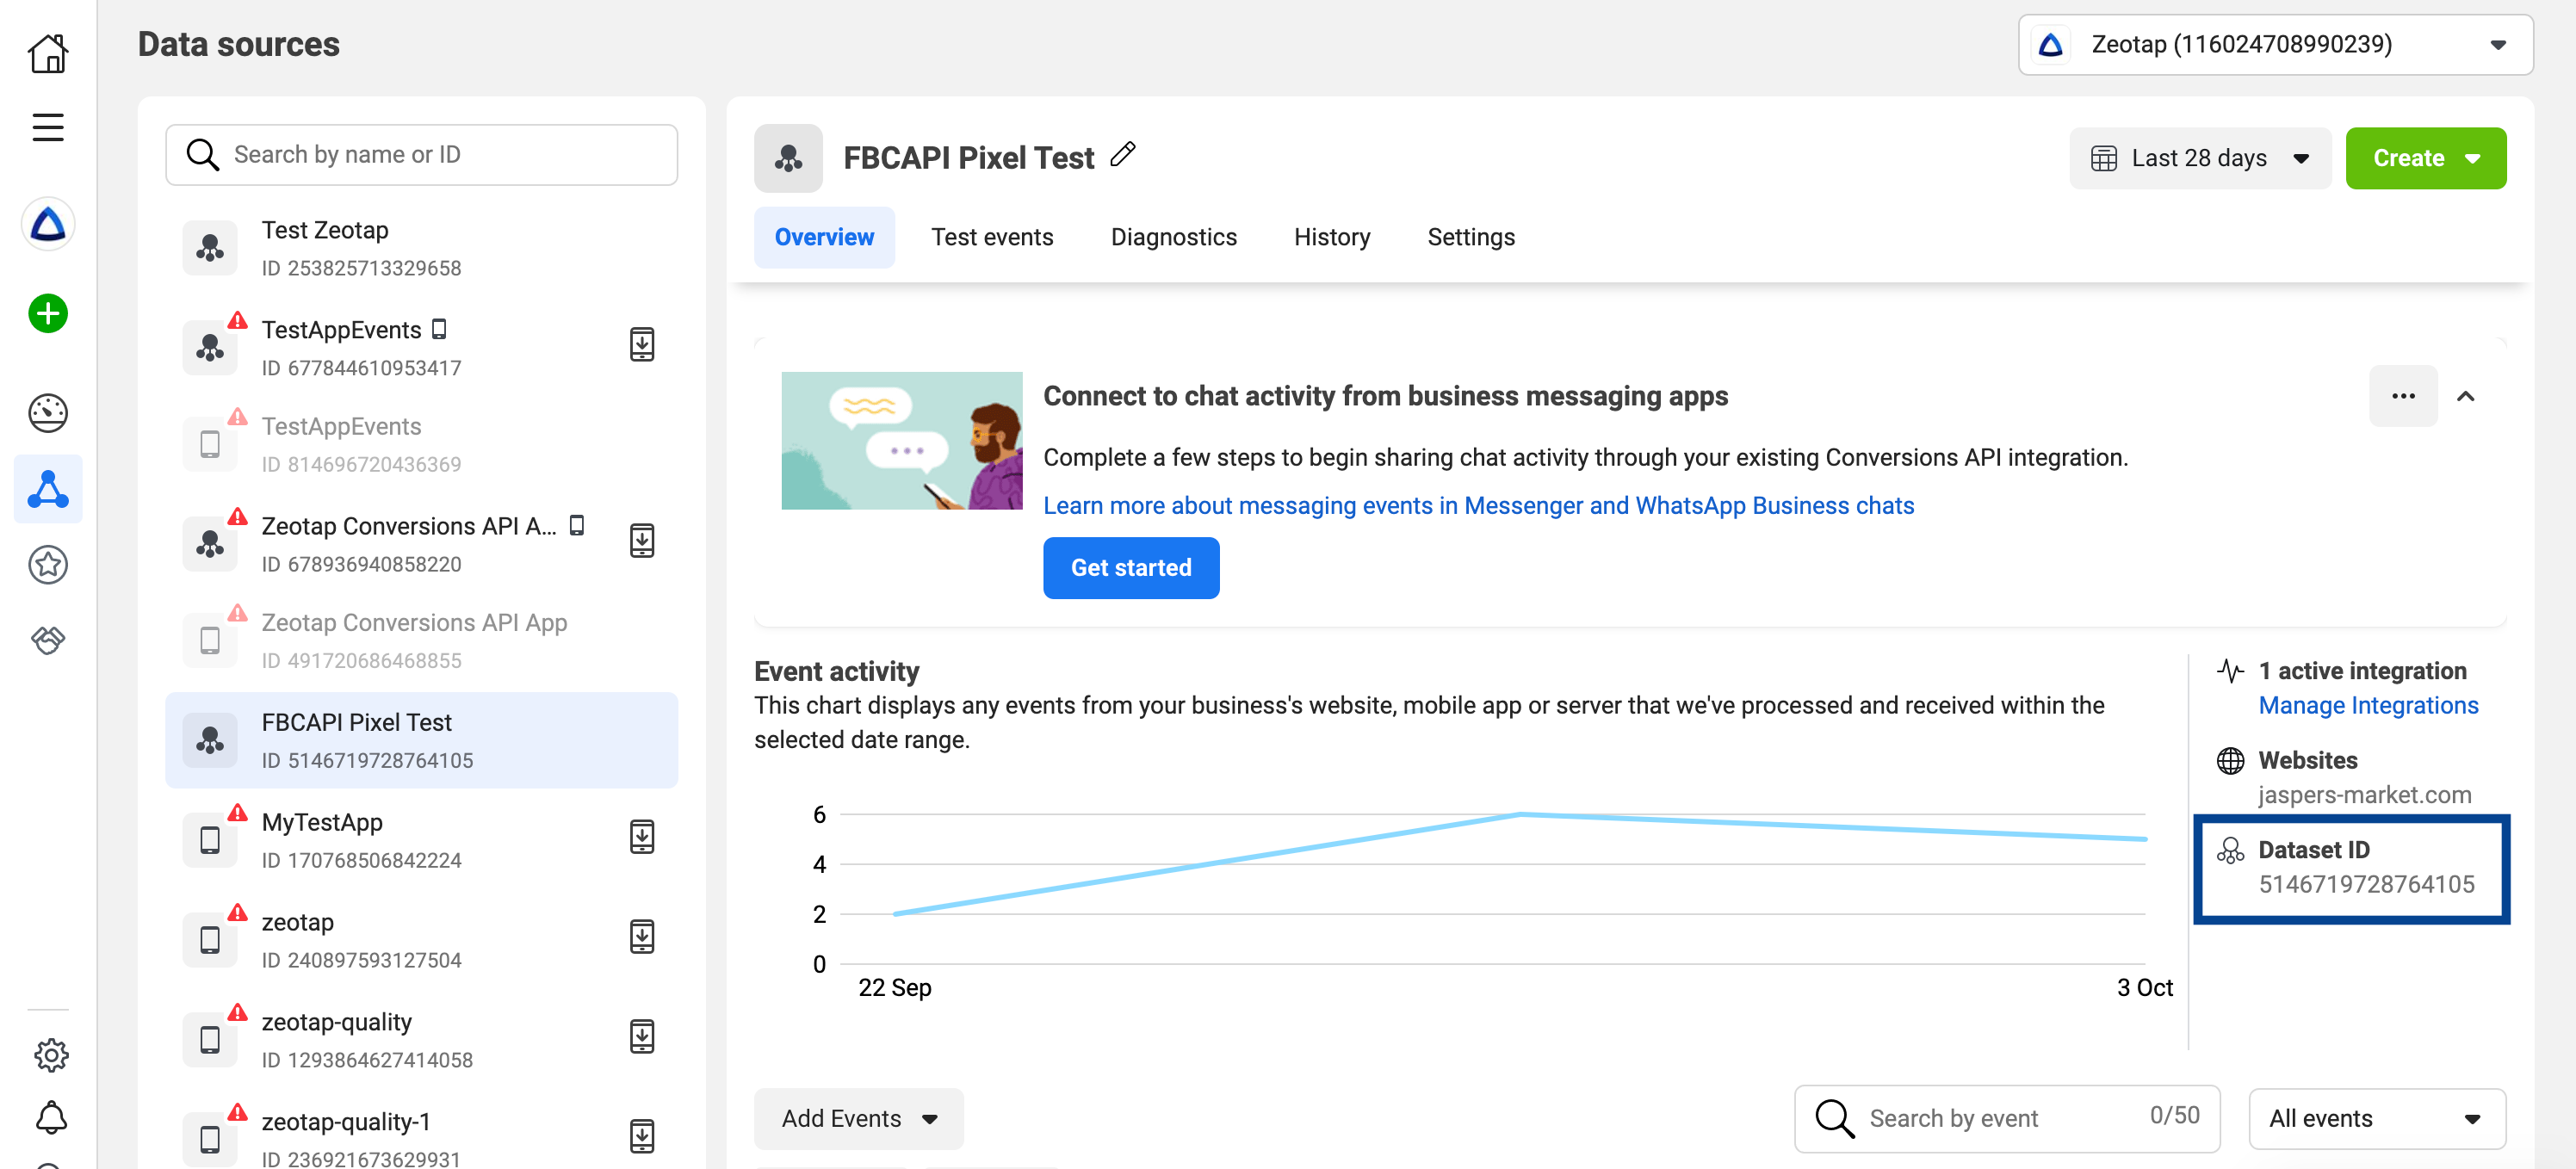
Dataset ID/Pixel ID (Applicable for Website events)
A pixel is a tool that allows you to track your website visitors’ activities. You can perform the following steps to get your Dataset ID/Pixel ID from Facebook Events Manager.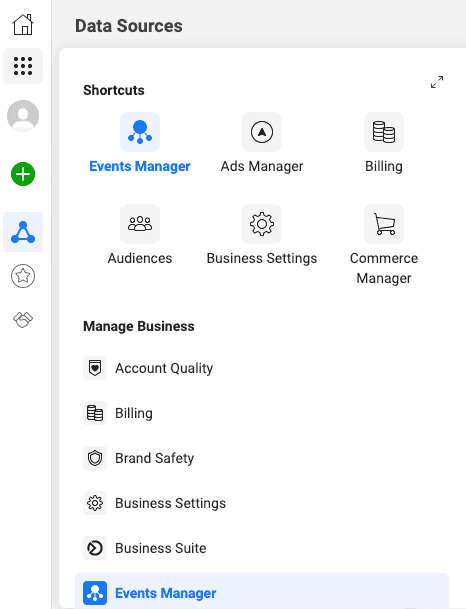
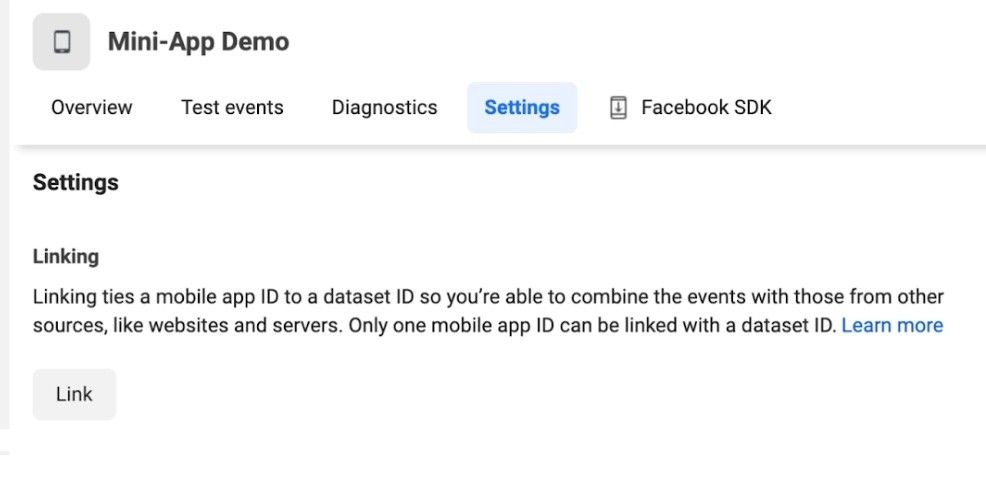
Linking the App to the Dataset ID (Applicable for App events)
Once you create an App in the Developer’s page, the app gets listed in Facebook Events manager under the Data sources tab as shown below.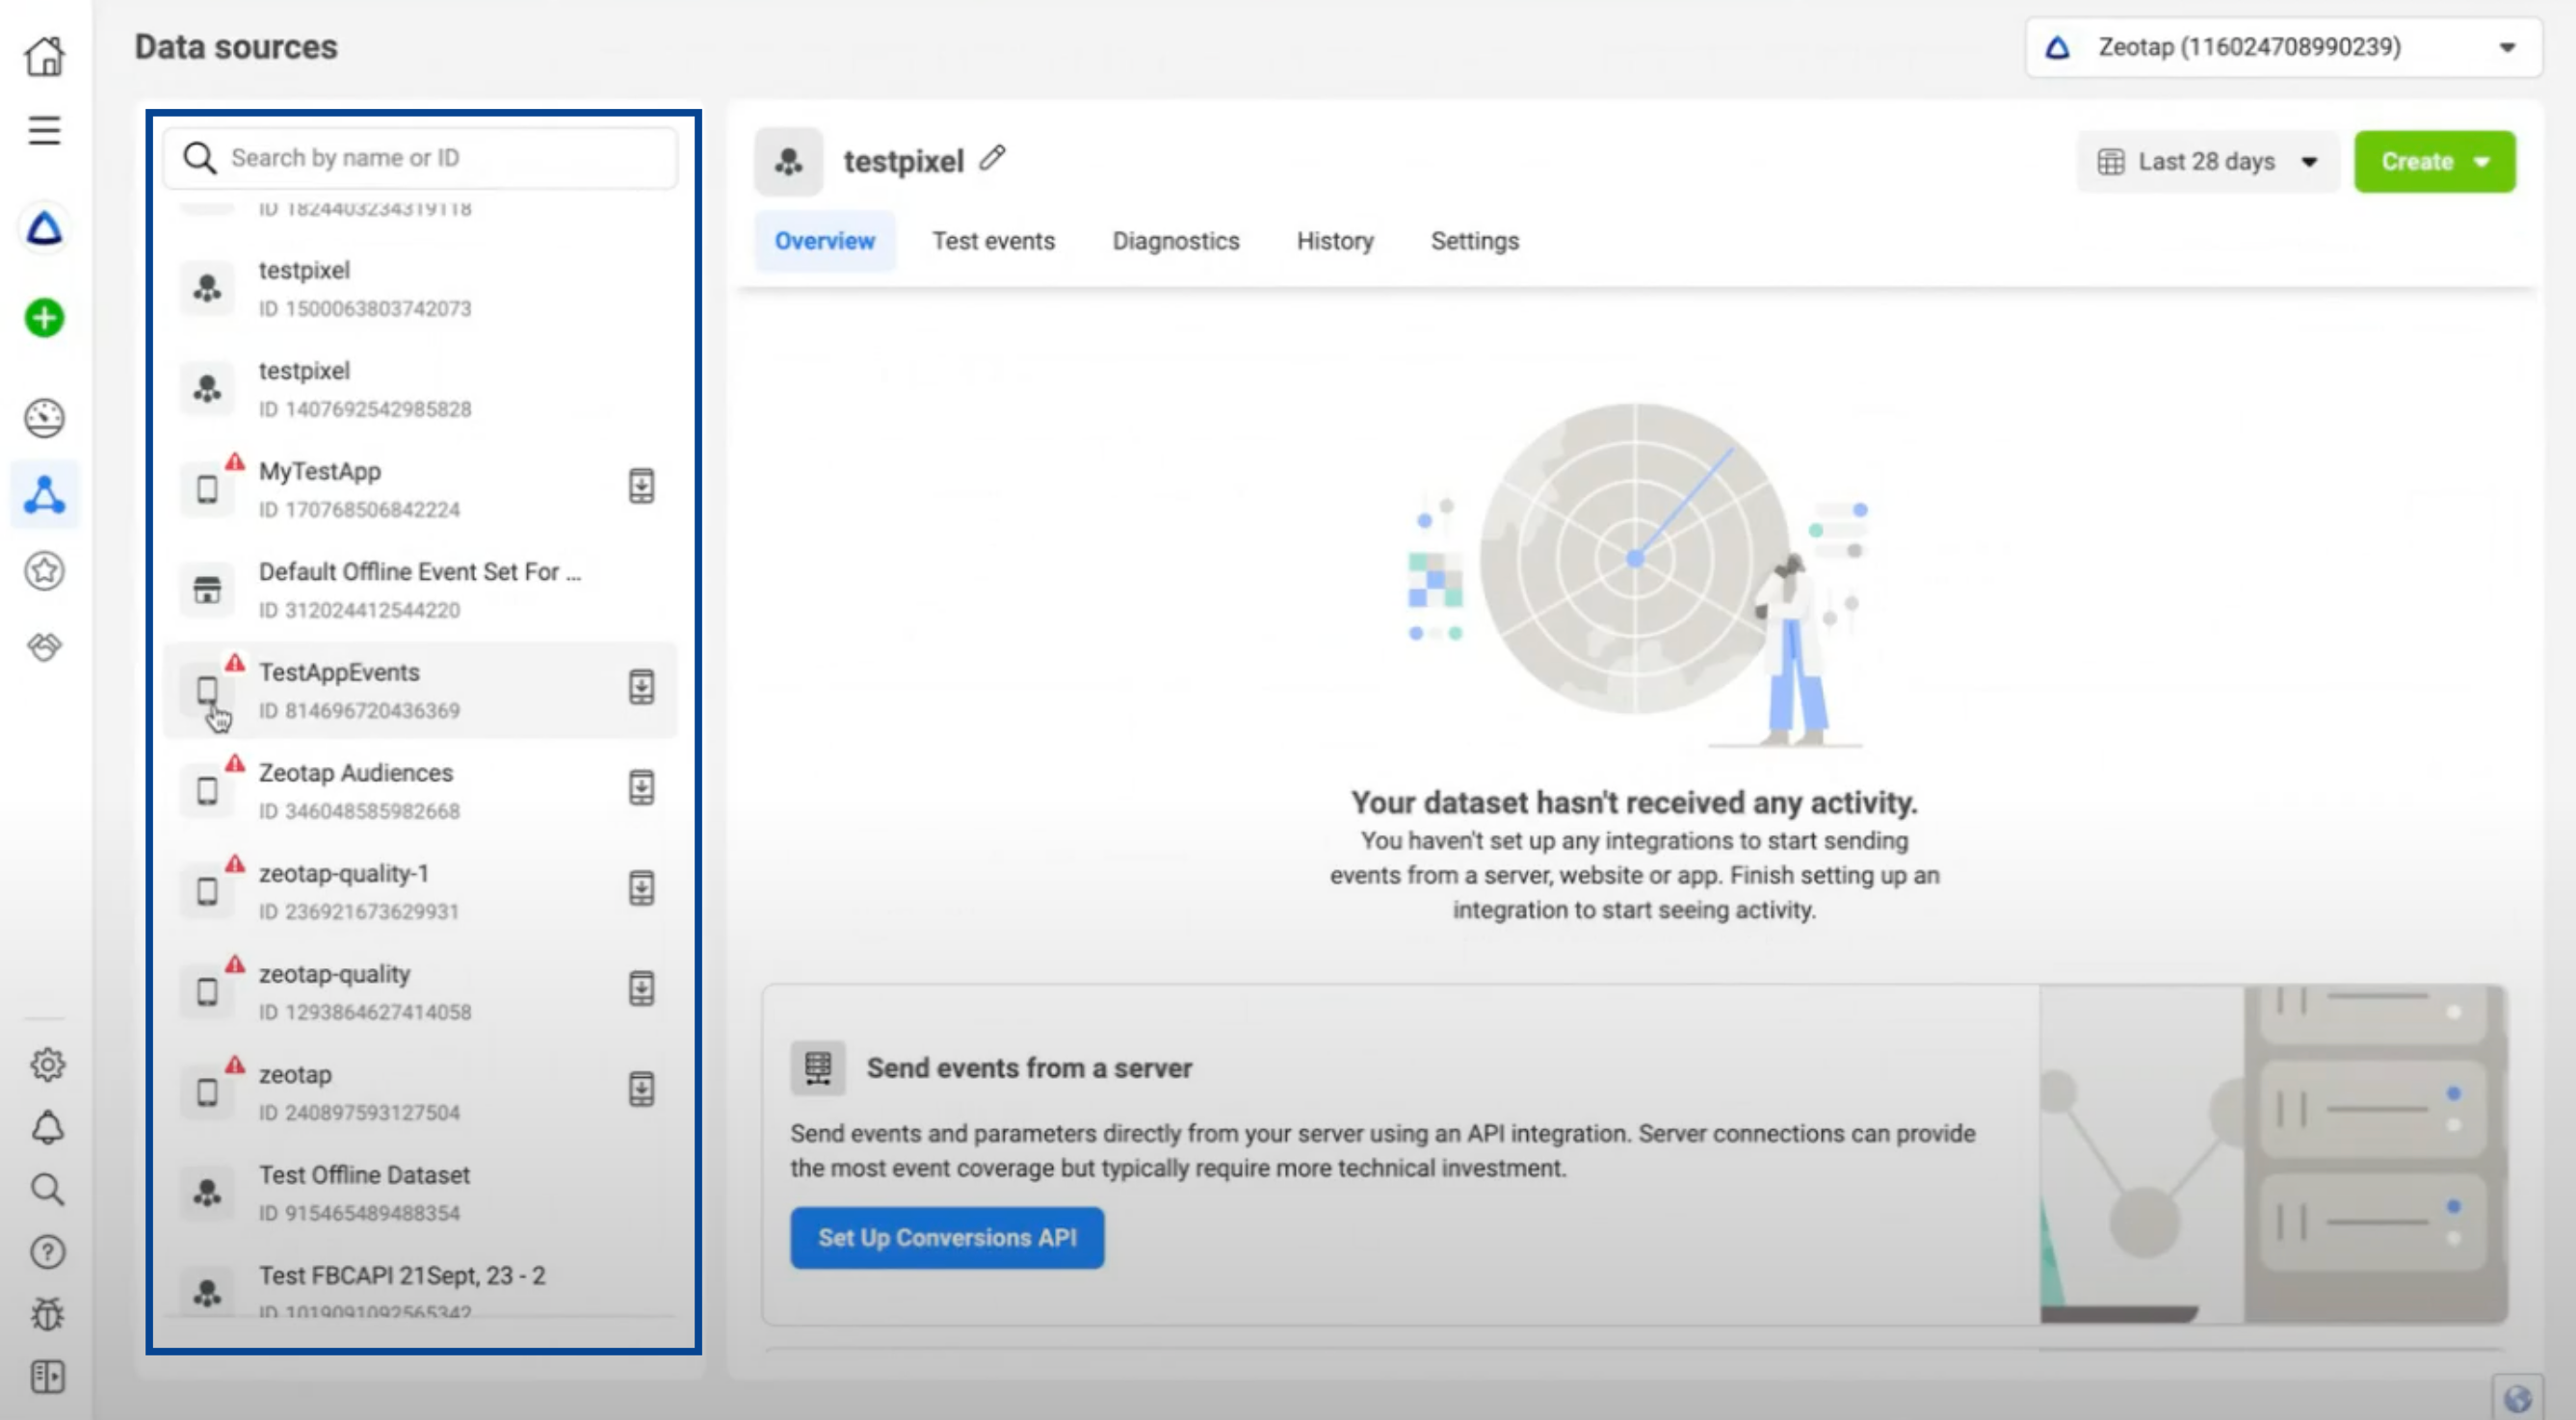
Note that once you complete the linking, the dataset includes the connected App.
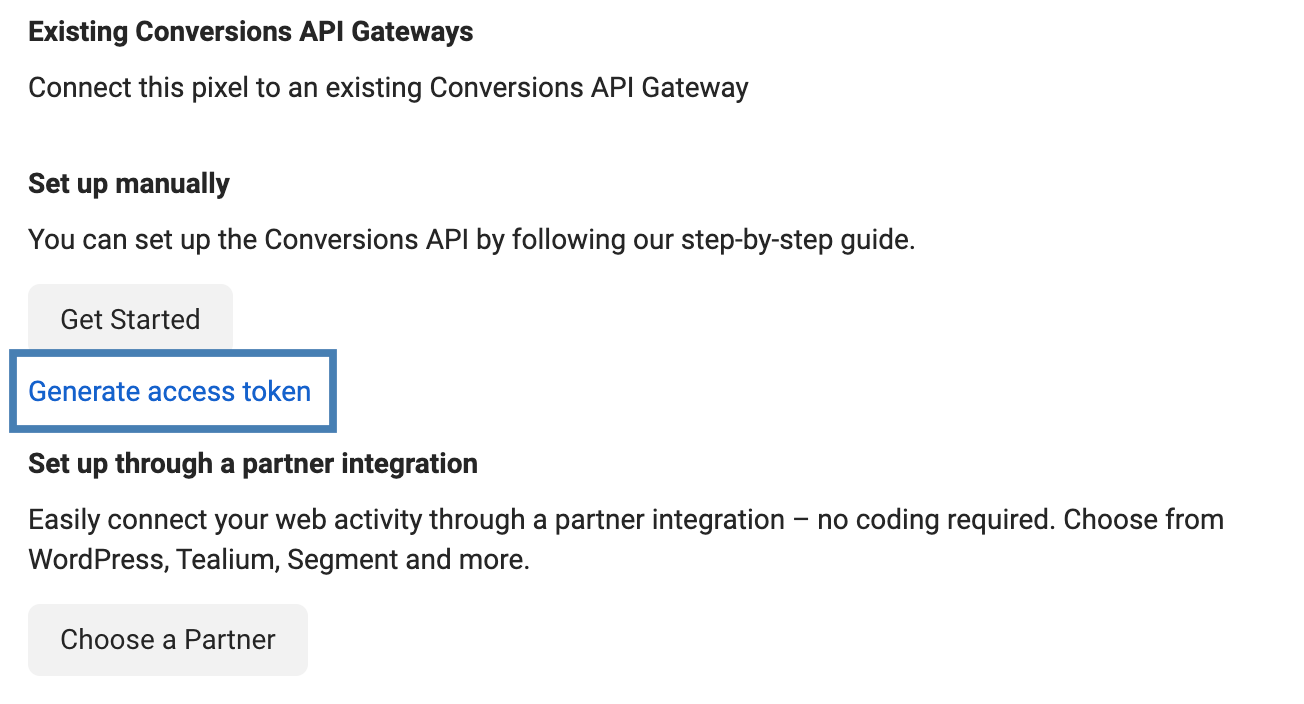
Access Token
Perform the following steps to generate an access token:Note:The generate access token link is visible only to the users with developer privileges for the business. The link is hidden for other users.
Business Manager
Note that you need to have a Business Manager to use the Conversions API. This helps advertisers integrate Facebook marketing efforts across your business and partners. For more information on how to create a Business Manager account, refer to the article how to Create a Business Manager.Destination Setup
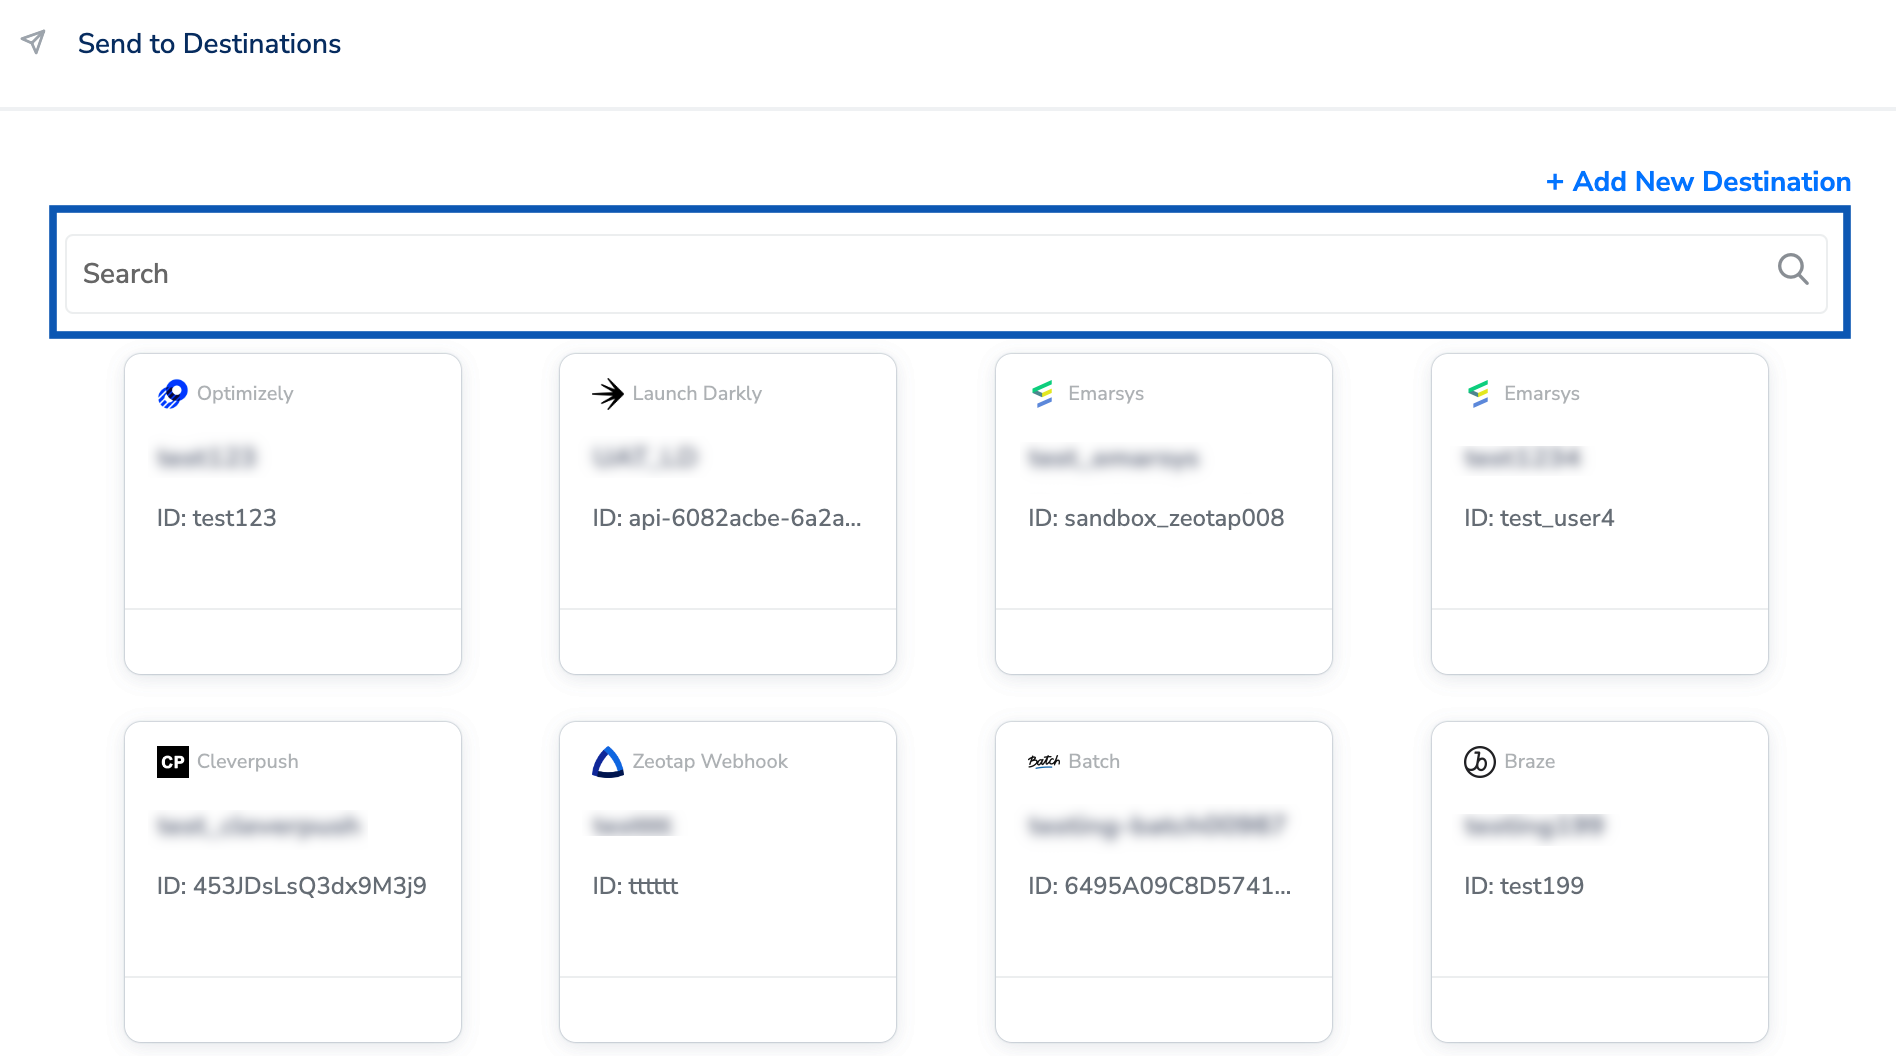
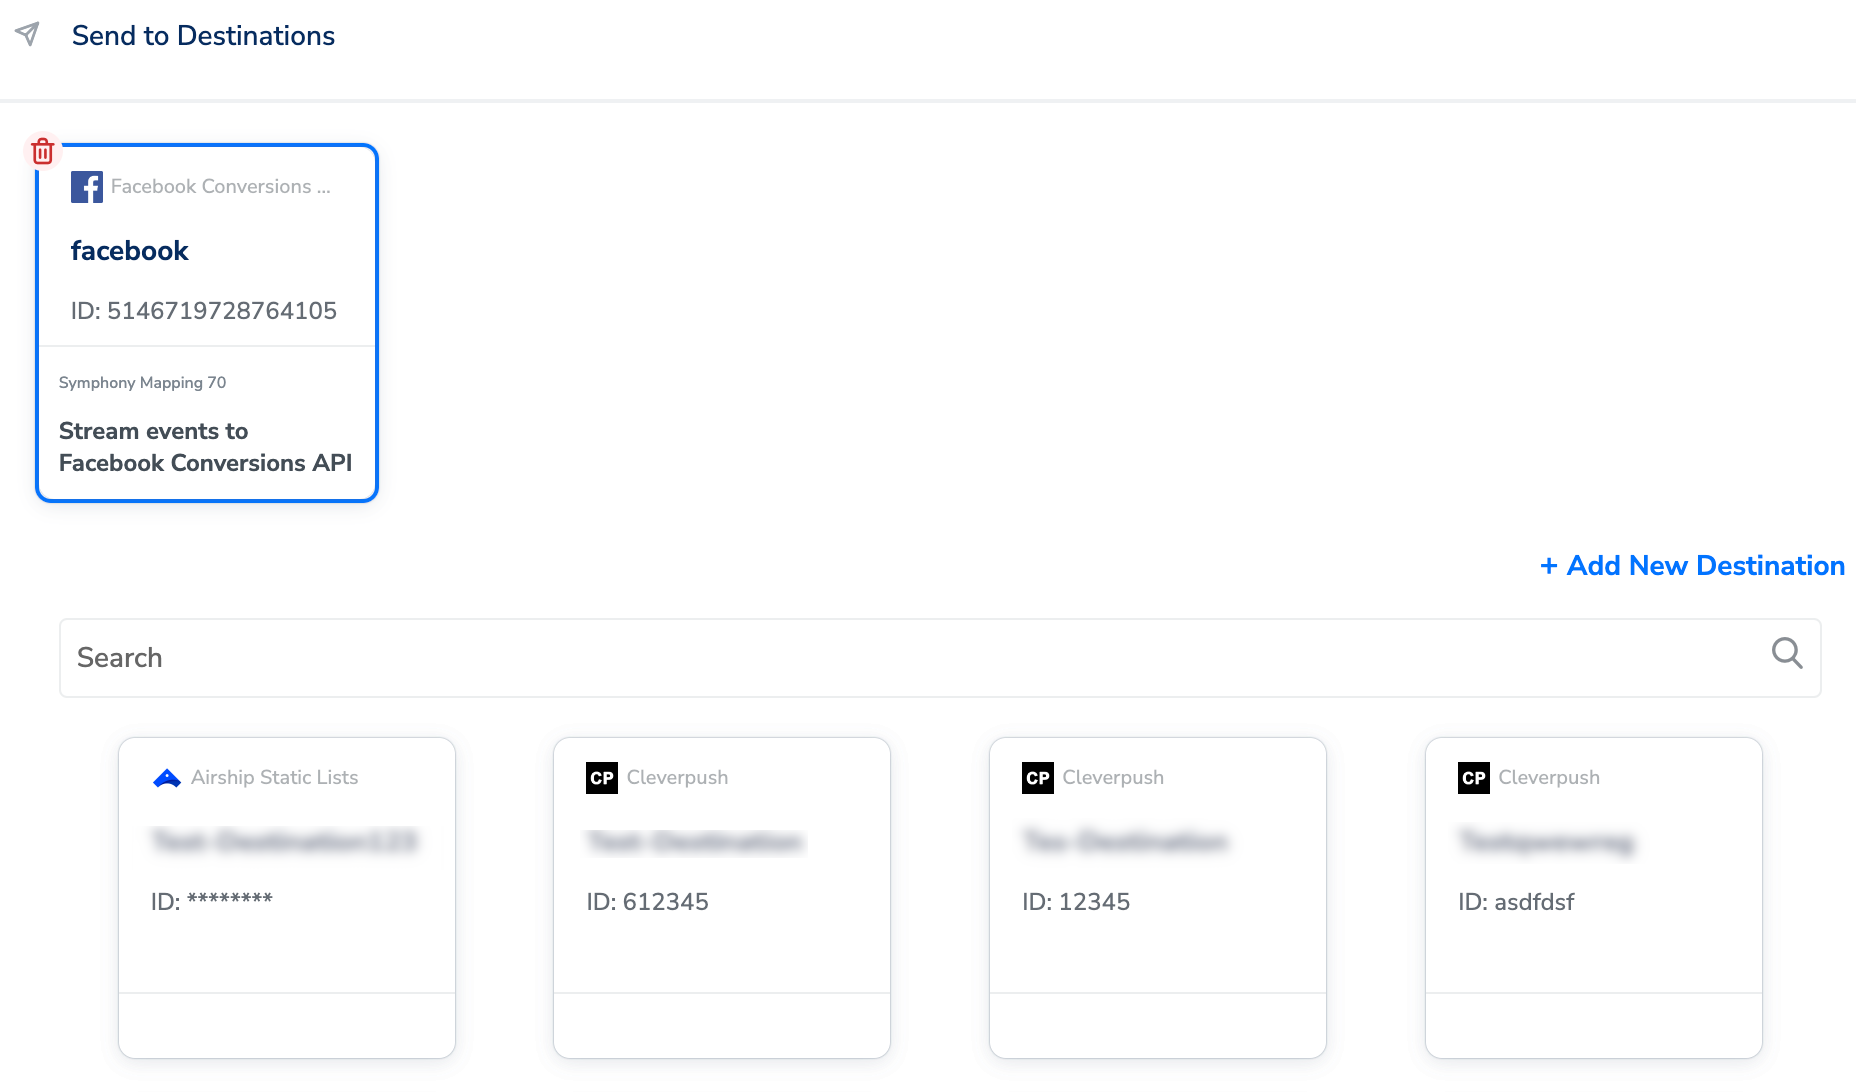
After you have applied filters or added conditions for your users in Journeys, you can activate them in Facebook Conversions API under Send to Destinations. A new window appears, where you can set up your destination. You can use an already existing destination from the list of available Destinations **** or create a new one by clicking + Add New Destination.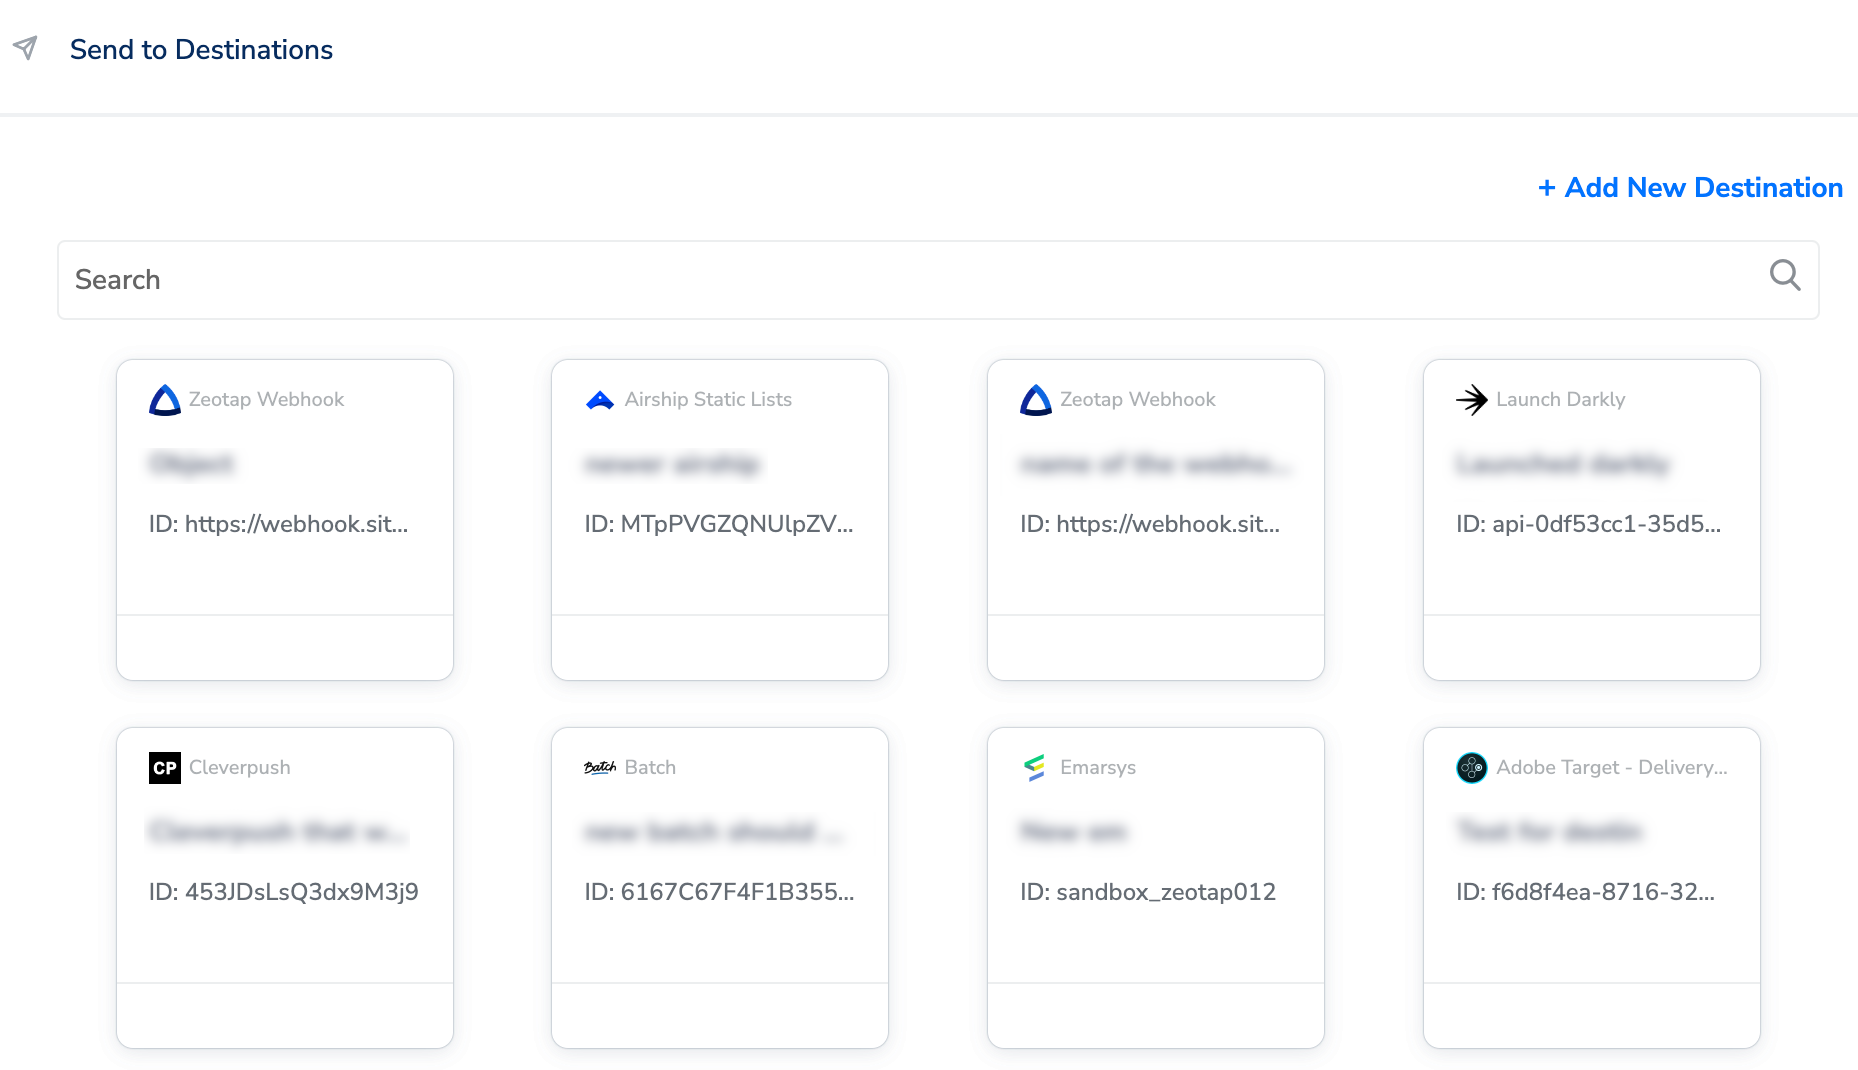
Add New Destination
Perform the following steps to add a new destination: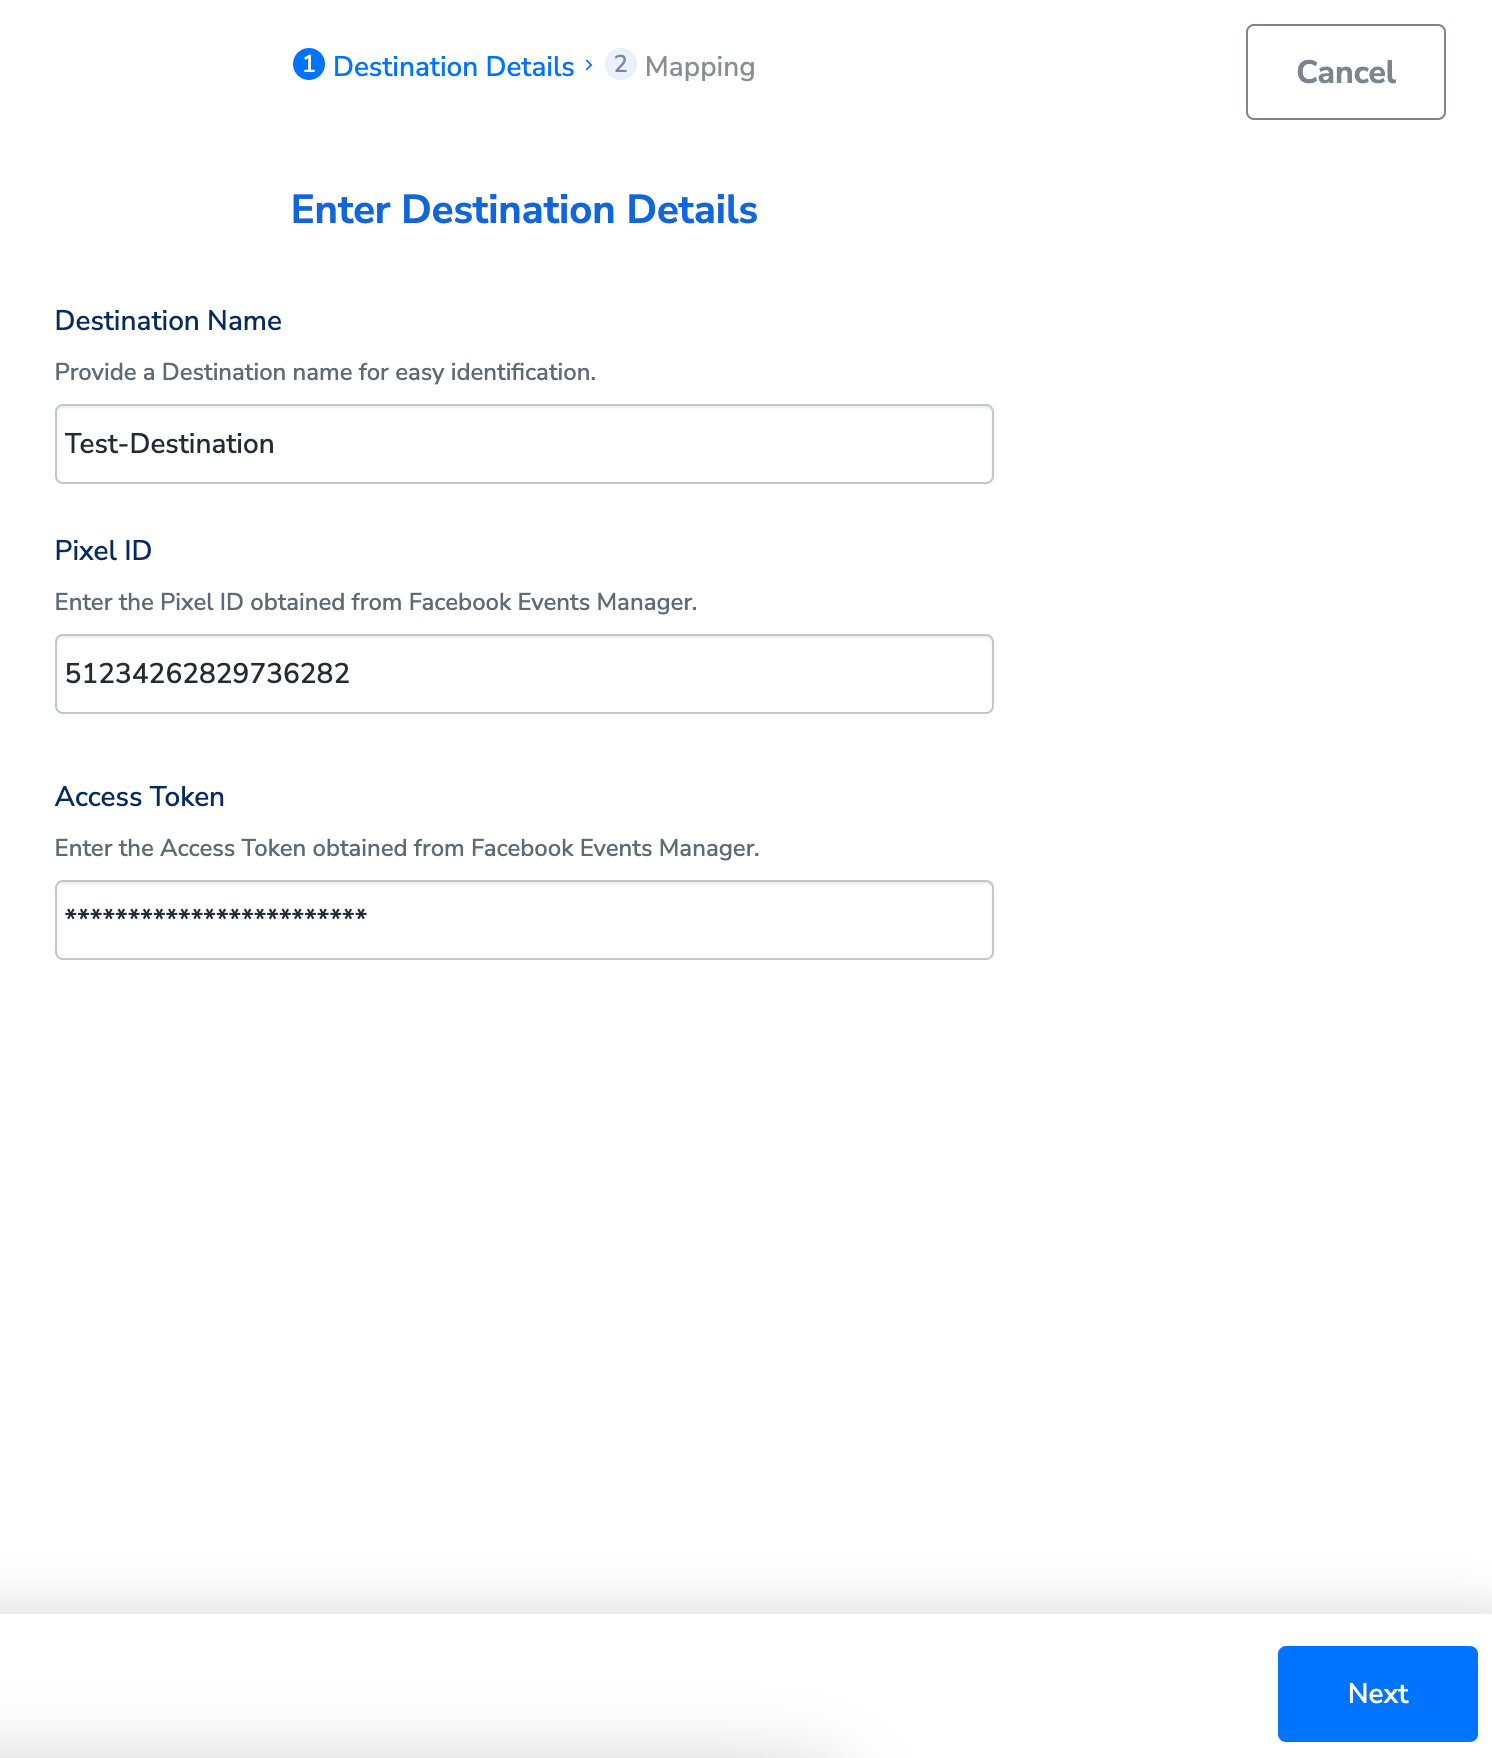
In the mapping screen that appears, under Choose your Action, you can either choose Stream events to Facebook Conversions API or Send offline data to FB Enhanced CAPIas the action based o your use case for sending data from the workflow created in Journeys.a. If you choose Stream events to Facebook Conversions API as the action, then, under Map the Fields, certain fields like Email, Phone, First Name, Last Name and so on, which are relevant to Conversions API auto populates. You can map the Zeotap Catalogue fields to the appropriate Conversions API fields (Destination fields).If the suggested object properties do not suit your requirements, then you can add custom data that can then be mapped to the relevant Zeotap field and sent to Facebook. Note that Custom properties can be used with both standard and custom events. For more information about Standard and Custom events, refer here.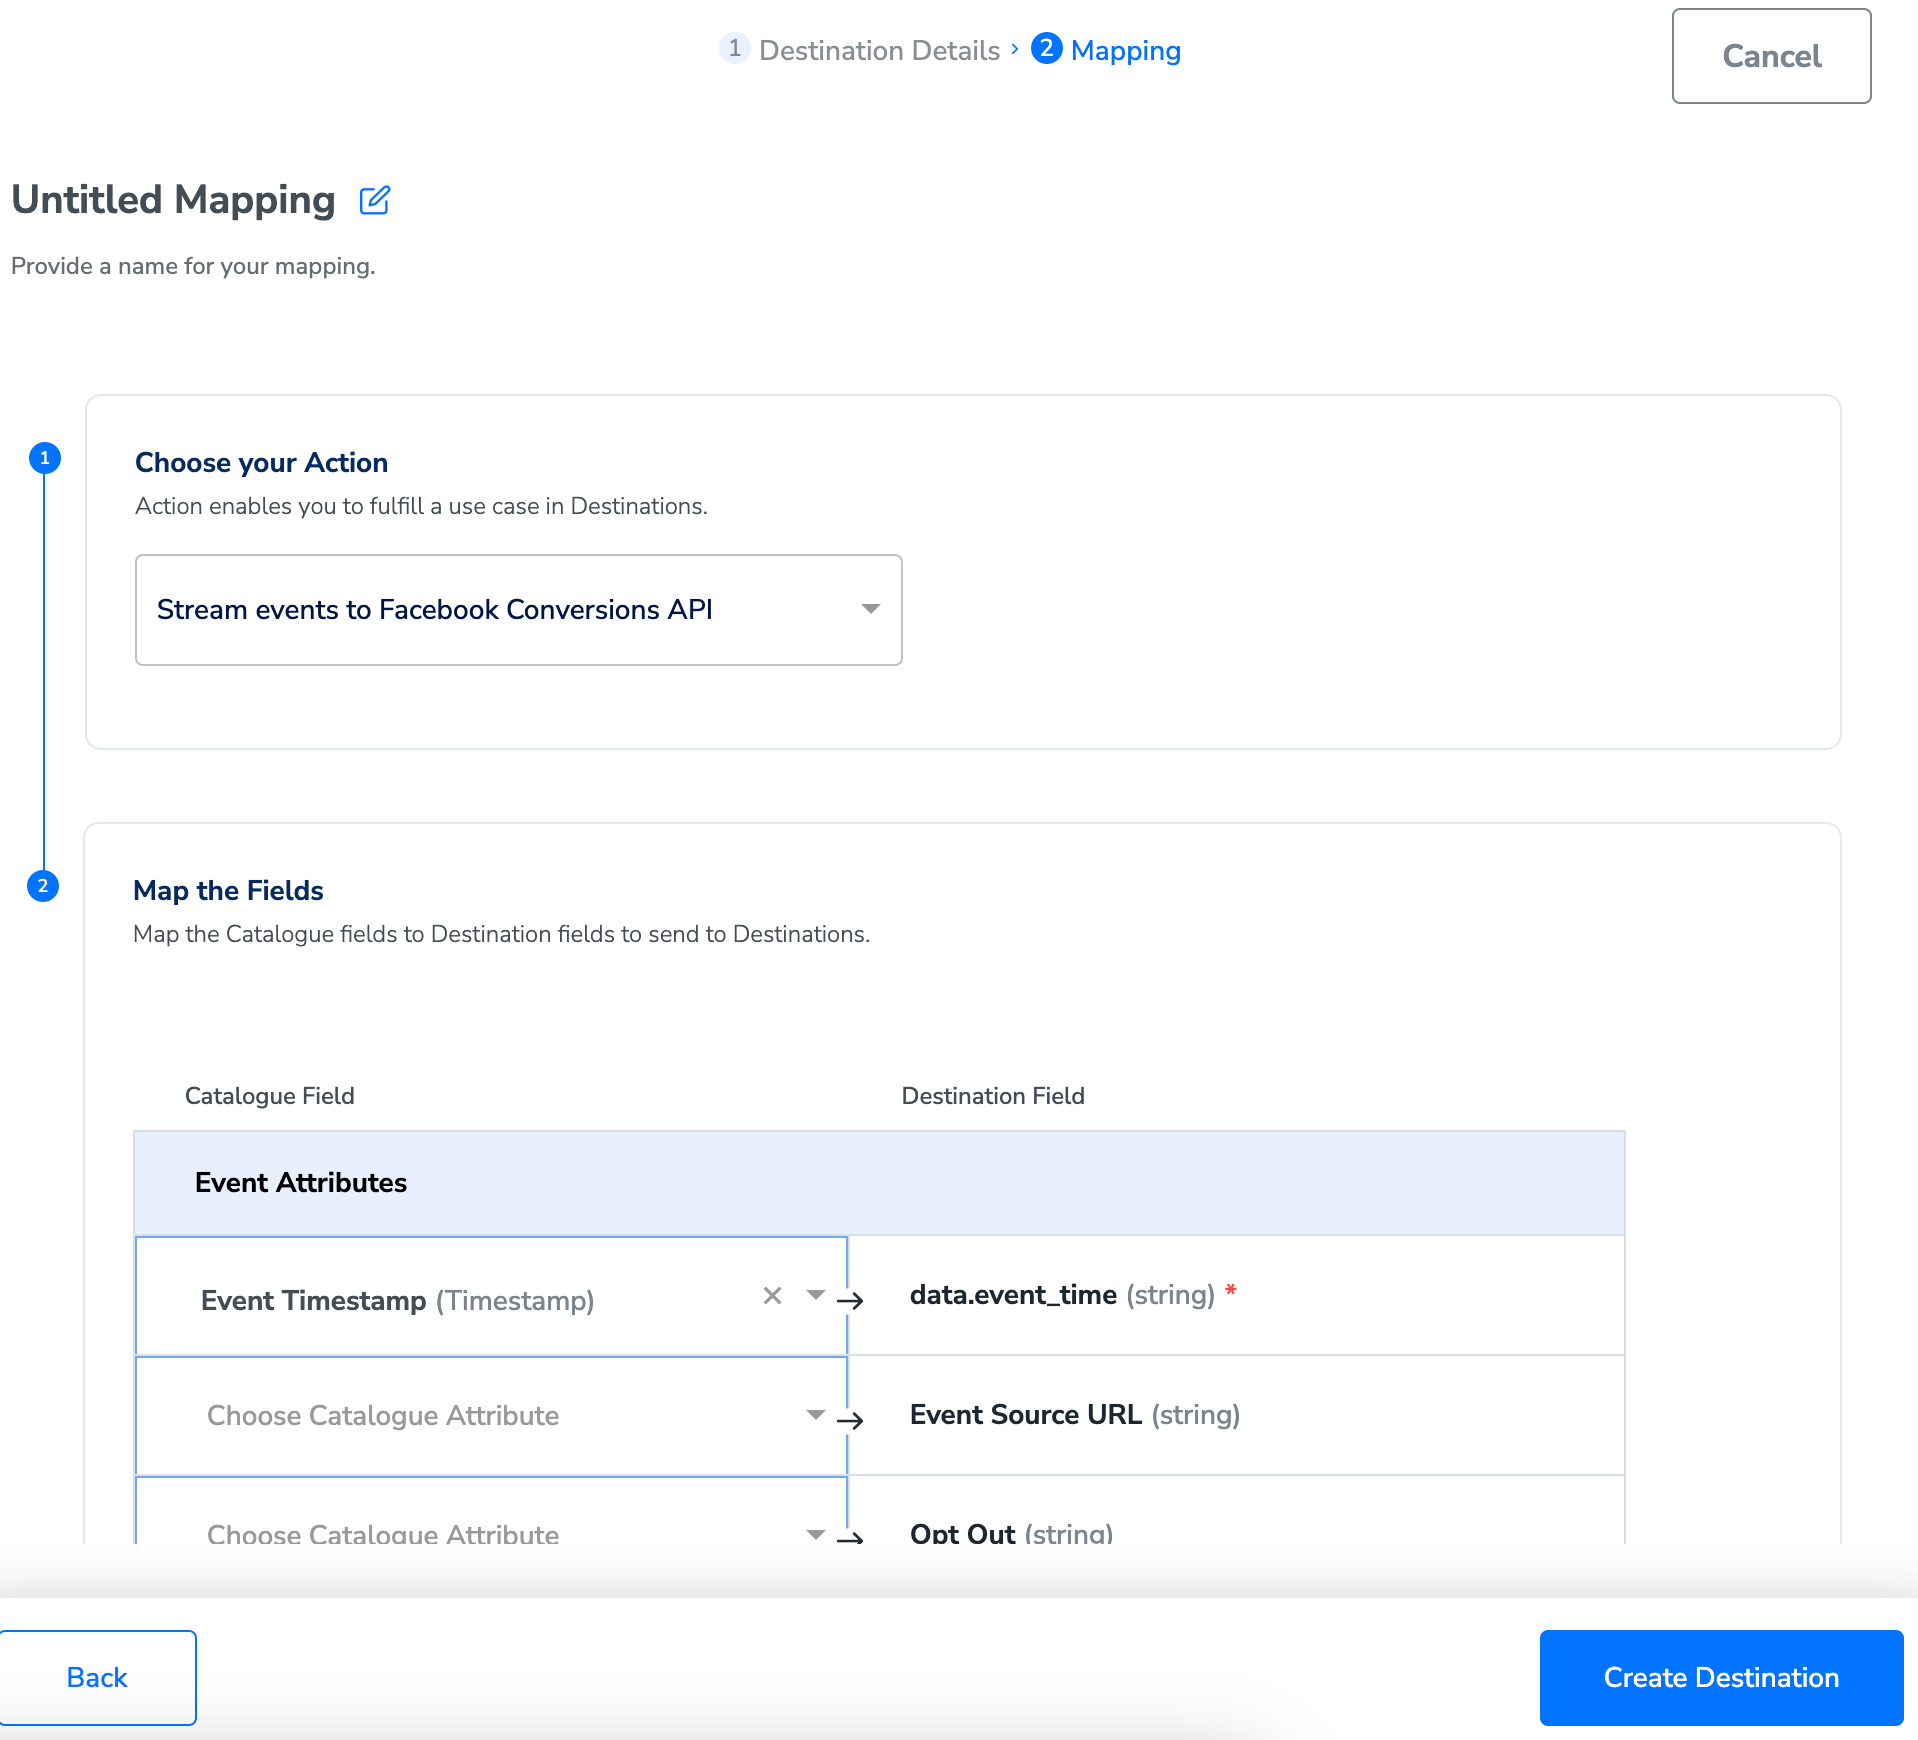
Once the mapping is complete, click Create Destination. The destination is created and made available for activation on Journeys, which you can be used send the events and parameters (customer, server and custom parameters) to the Conversions API. Note that you must map the following mandatory fields to establish a working connection with Facebook Conversions API.
| Parameter | Type |
|---|---|
| Event Source URL | Server event |
| Client User Agent | Customer information |
Activate the Destination on Journeys
After creating a destination, next, you need to link it in the Send to Destination node within the workflow, as explained below.
Under the Destination Details tab, the Pixel ID and Access Token fields are automatically populated based on the value that you have entered while creating the destination.a. Under Action Source, choose either app or website based on your requirement.i. App events allows you to track actions that occur in your mobile app or web page such as app installs and purchase events. By tracking these events you can measure ad performance and build audiences for ad targeting. The following are the three types of App Events: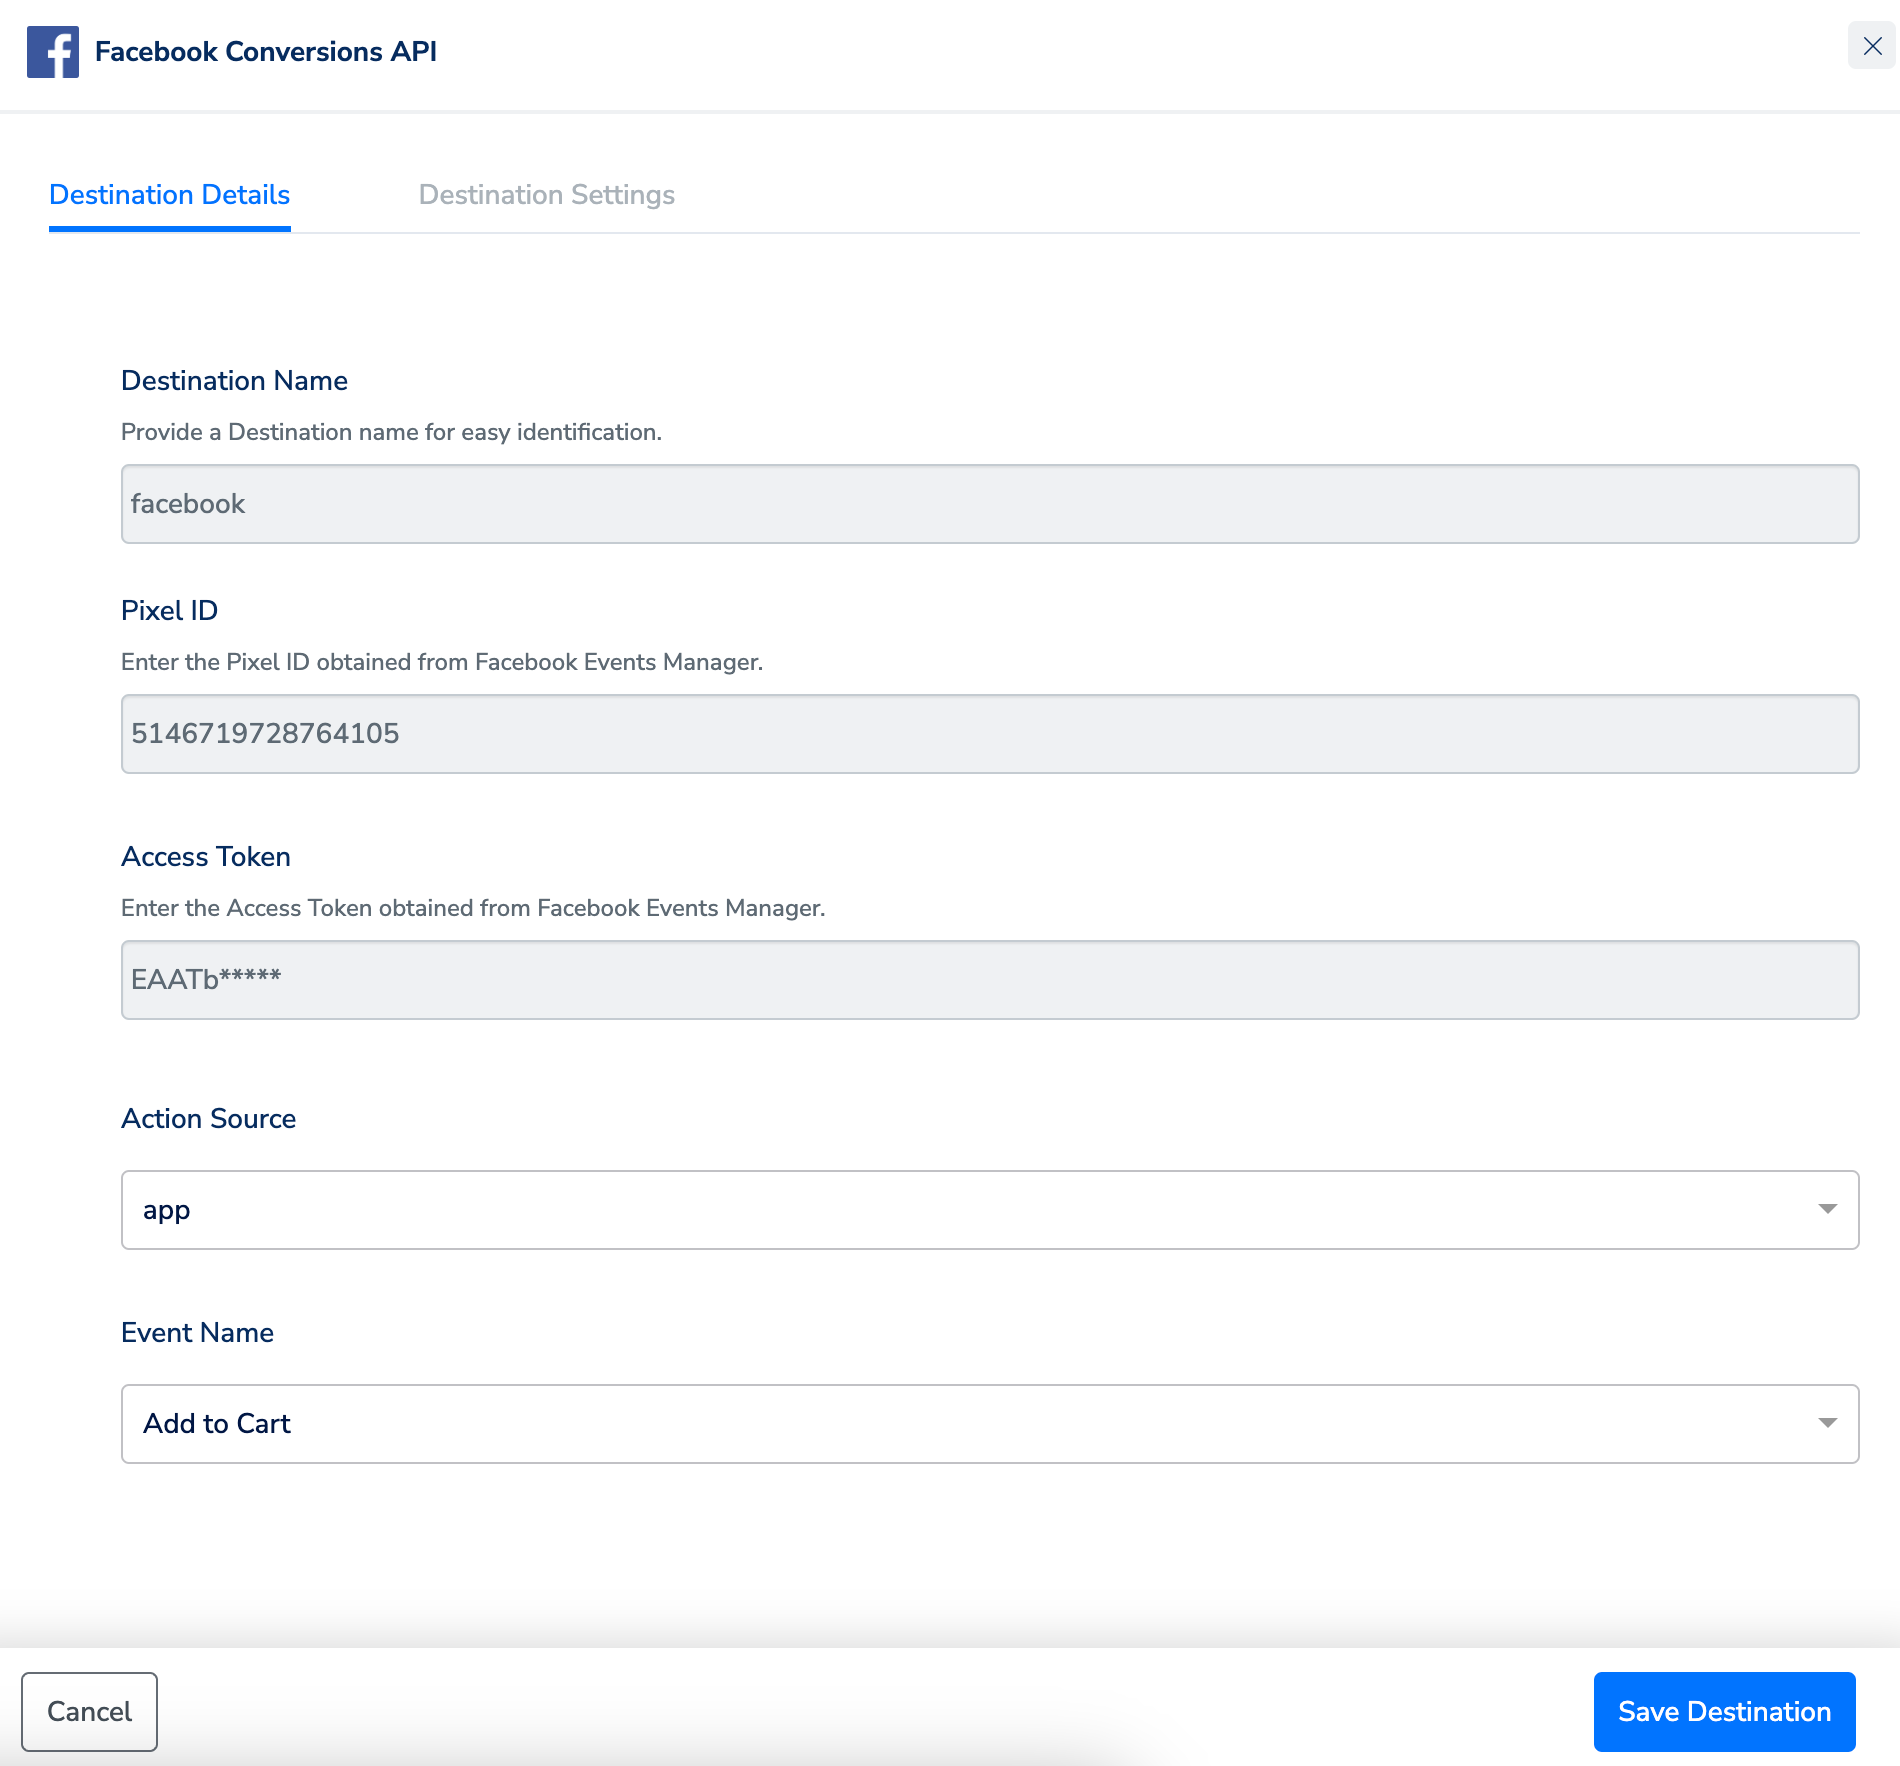
- Automatically Logged Events - The Facebook SDK can automatically log app installs, app sessions, and in-app purchases
- Standard Events - Popular events that Facebook has created for you
- Custom Events - Events you create that are specific to your app

Standard Event Names
You can include the following predefined object properties with any standard event or custom event that support them:| Event Name | Description | Object Properties |
|---|---|---|
| AddPaymentInfo | This indicates that payment information is added in the checkout flow. | Optional Properties -Content Category, Content Ids, Currency, Value |
| AddToCart | This indicates that a product is added to the shopping cart. | Optional Properties -Content Ids, Content Name, Currency, Value |
| AddToWishlist | This indicates that a product is added to a wish list. | Optional Properties -Content Name, Content Category, Content Ids, Currency, Value |
| CompleteRegistration | This indicates that a registration form is completed. | Optional Properties -Content Name, Currency, Status, Value |
| Contact | This indicates that a person has initiated contact with your business through telephone, SMS, email, chat and so on. | |
| CustomizeProduct | This indicates that a person has customised a product. | |
| Donate | This indicates that a person has donated funds to your organisation or cause. | |
| FindLocation | This indicates that a person searches for a location of your store through a website or app, with the intention to visit the physical location. | |
| InitiateCheckout | This indicates that a person has initiated the checkout flow. | Optional Properties -Content Category, Content Ids, Currency, Num Items, Value |
| Lead | This indicates that a sign-up is completed. | Optional Properties -Content Category, Content Name, Currency, Value |
| Purchase | This indicates that a purchase is made or the This indicates that checkout flow is completed. | Mandatory Properties -Currency, ValueOptional Properties -Content Ids, Content Name, Num Items |
| Schedule | This indicates that a person has booked an appointment to visit one of your locations. | |
| Search | This indicates that a search is made. | Optional Properties -Content Category, Content Ids, Currency, Search String, Value |
| StartTrial | This indicates that a person has started a free trial of a product or service you offer. | Optional Properties -Currency, Predicted ltv, Value |
| SubmitApplication | This indicates that a person has applied for a product, service or program you offer. | |
| Subscribe | This indicates that a person has applied to start a paid subscription for a product or service you offer. | Optional Properties -Currency, Predicted ltv, Value |
| ViewContent | This indicates that a person has visited the web page you care about (for example, a product page or landing page). Note that ViewContent informs you if someone visits a web page’s URL, but not what they see or do on that page. | Optional Properties -Content Ids, Content Category, Content Name, Currency, Value |
Event Parameters
The event parameters include all the necessary event data parameters along with other data parameters that the Conversions API requires to optimise ads delivery and attribution.Customer Parameters
Note that sending additional customer information parameters may increase the Event Match Quality. The events that are matched can exclusively be utilised for ad delivery optimisation and attribution. However, unmatched events cannot be utilised for attribution or ad delivery optimisation but can still be used for fundamental measurement. The following are examples of high-quality customer information parameters :- email address (em)
- IP address (Client IP Address)
- name (fn and ln)
- phone number (ph)
| Customer Information Parameter | Description |
|---|---|
| • This indicates the email address of the user. • Example: [email protected] | |
| Phone Number | • This indicates the phone number of the user. • Example: 15557893473 |
| First Name | • This indicates the first name of the user. • Example: john |
| Last Name | • This indicates the last name of the user. • Example: paul |
| Date of Birth | Ensure that Date of Birth is ingested to Zeotap in the format of YYYYMMDD. • Example: 19911112 for November 12, 1991 |
| Gender | • This indicates the gender of the user in the form of an initial. • Options are: • f for female, • m for male |
| City | • This indicates the city without space or punctuation. • Example: Paris |
| State | • This indicates the US State abbreviations. • Example: az |
| Zip Code | • This indicates the Zip code with no spaces and dash. • Only the first 5 digits of US zip codes are considered. • Use the area, district and sector format for the UK. • Example: • U.S zip code: 94035, • Australia zip code: 1987, • France zip code: 75018, • UK zip code: m11ae |
| Country | • This indicates the two-letter country code. • Example: us |
| External ID | • This indicates any unique ID from the advertiser, such as loyalty membership IDs, user IDs and external cookie IDs. • If an External ID is sent through other channels, then it must be in the same format as sent through the Conversions API. If you are sending a hashed External ID in the pixel, then ensure that it is ingested into Zeotap as well. |
| Client IP Address | • The IP address of the browser corresponding to the event must be a valid IPV4 or IPV6 address. IPV6 is preferable over IPV4 for IPV6-enabled users. • The Client IP Address user data parameter must never be hashed. • No spaces must be included. • Always provide the real IP address to ensure accurate event reporting. • Example: • IPV4: 168.212.226.204, • IPV6: 2001:0db8:85a3:0000:0000:8a2e:0370:7334 |
| Client User Agent | • This indicates the user agent for the browser corresponding to the event. The Client User Agent is required for website events shared using the Conversions API. • Example: • Mozilla/5.0 (Windows NT 10.0; Win64; x64) • AppleWebKit/537.36 (KHTML, like Gecko) • Chrome/87.0.4280.141 • Safari/537.36 |
| Click ID | • Value is stored in the _fbc browser cookie under your domain. • The format is fb.${subdomain_index}.${creation_time}.${fbclid}.• Example: fb.1.1554763741205.AbCdEfGhIjKlMnOpQrStUvWxYz1234567890 Ensure that the Click ID is ingested into Zeotap. |
| Browser ID | • Value is stored in the _fbp browser cookie under your domain. • The format is fb.${subdomain_index}.${creation_time}.${random_number}.• Example: fb.1.1596403881668.1116446470 Ensure that the Browser ID is ingested into Zeotap. |
Server Event Parameters
These parameters consist of all the required server data parameters that the Conversions API uses for ads attribution and/or ads delivery optimisation.| Event Name | Type | Description | Required |
|---|---|---|---|
| Event Time | integer | This is a Unix timestamp in seconds indicating when the actual event occurred. | |
| Event Source URL | string | This is the browser URL where the event happened. The URL must begin with http:// or https:// and must match the verified domain.The Event Source URL is required for website events shared using the Conversions API. | Mandatory |
| Opt Out | boolean | This is a flag that indicates that you must not use this event for ads delivery optimisation. | Optional |
| Event Id | string | This ID can be any unique string chosen by the advertiser.The Event Id and Event Name parameters are used to deduplicate events sent by both web (through the Facebook Pixel) and the Conversions API. Note that while Event Id is marked optional, it is recommended for event deduplication. | Optional |
| Action Source | string | Zeotap sends the website as the action source, enabling tracking of conversions made on your website. |
Custom Data Parameters
This table lists the parameters to send additional data for ads delivery optimisation.| Parameter | Description |
|---|---|
| Content Category | This indicates the category of the content associated with the event. Example: ‘grocery’ |
| Content Ids | This indicates the content IDs associated with the event, such as product SKUs for items in an AddToCart event.Example: [‘ABC123’]Note: As Zeotap does not support lists, we send a single object array to Facebook. |
| Content Name | This indicates the name of the page or product associated with the event.Example: ‘lettuce’ |
| Currency | This parameter is required for purchase events.This indicates the currency for the value specified, if applicable. Currency must be a valid ISO 4217 three-digit currency code.Example: ‘USD’ |
| Num Items | Use only with InitiateCheckout events. This indicates the number of items that a user tries to buy during checkout.Example: ‘4’ |
| Order Id | This indicates the order ID for this transaction as a string.Example: ‘order1234’ |
| Predicted ltv | This indicates the predicted lifetime value of a conversion event.Example: 432.12 |
| Search String | Use only with Search events. This indicates a search query made by a user.Example: ‘lettuce’ |
| Satus | Use only with CompleteRegistration events. This indicates the status of the registration event as a string.Example: ‘registered’ |
| Value | This parameter is required for purchase events. This indicates a numeric value associated with this event and can be a monetary value or a value in some other metric.Example: 142.54 |
Verify the Setup
For information about how to verify your setup, refer here.Best Practice
One of the best practices for integrating with the Conversions API is outlined below:Understanding Baseline Requirements for Matching
An event is considered invalid if it only includes customer information parameters that consist of one of the following combinations, (or a subset thereof):- ct + country + st + zp + ge + client_user_agent
- db + client_user_agent
- fn + ge
- ln + ge