In the window that appears, enter the following details:a. Enter the Audience Name and Description to help you identify the Audience. Ensure that the Audience name is limited to a maximum of 40 characters and does not contain any special characters.b. Choose the folder that you want to associate with the audience. If the desired folder is not available, then you can also create a new folder and choose that for your audience. To know more about the different options available in folders and how to work with them, refer here.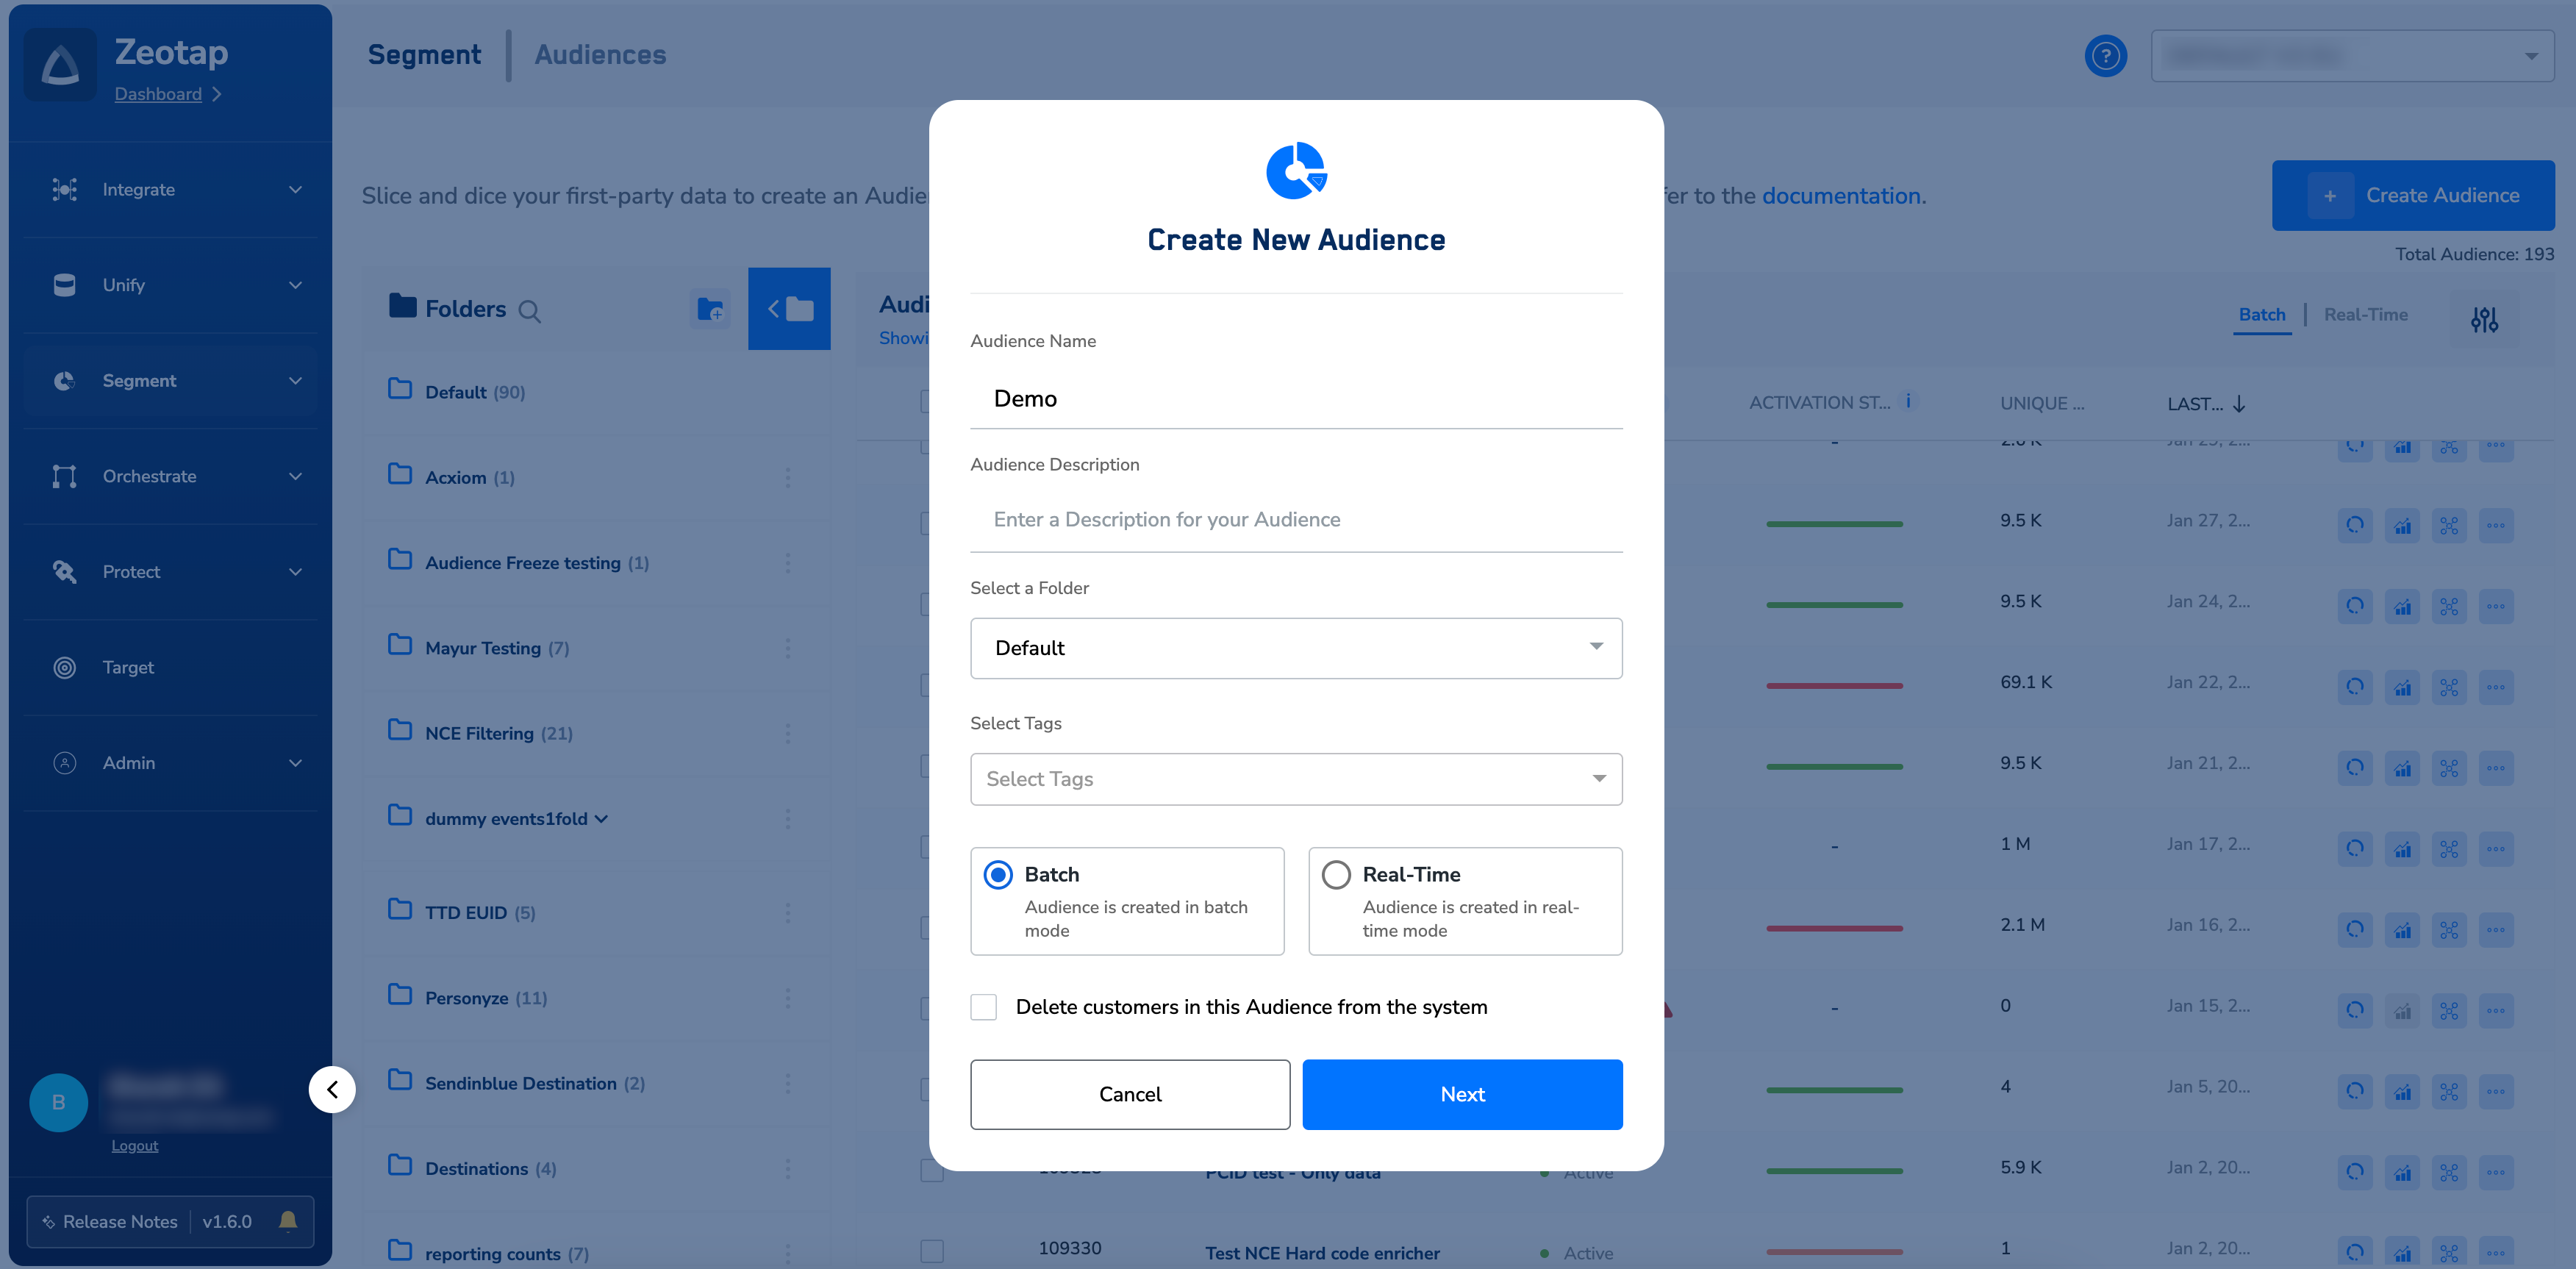


Note:Tags are labels assigned to specific audiences to categorise them based on common characteristics or interests. These tags can be used to filter and search for specific audiences, making it easier to locate and manage them. For example, a tag of
High Value can be applied to audience that have a higher likelihood of converting or generating revenue.The next step is to build your Audience by specifying the criteria. You can do so either by using our AI-based Audience builder known as Ada or you can manually add the conditional blocks for your Audience. To proceed to define your Audience criteria manually, click the Define Your Audience option shown below. To learn about how to use our AI-based Audience builder for building Audience, refer here.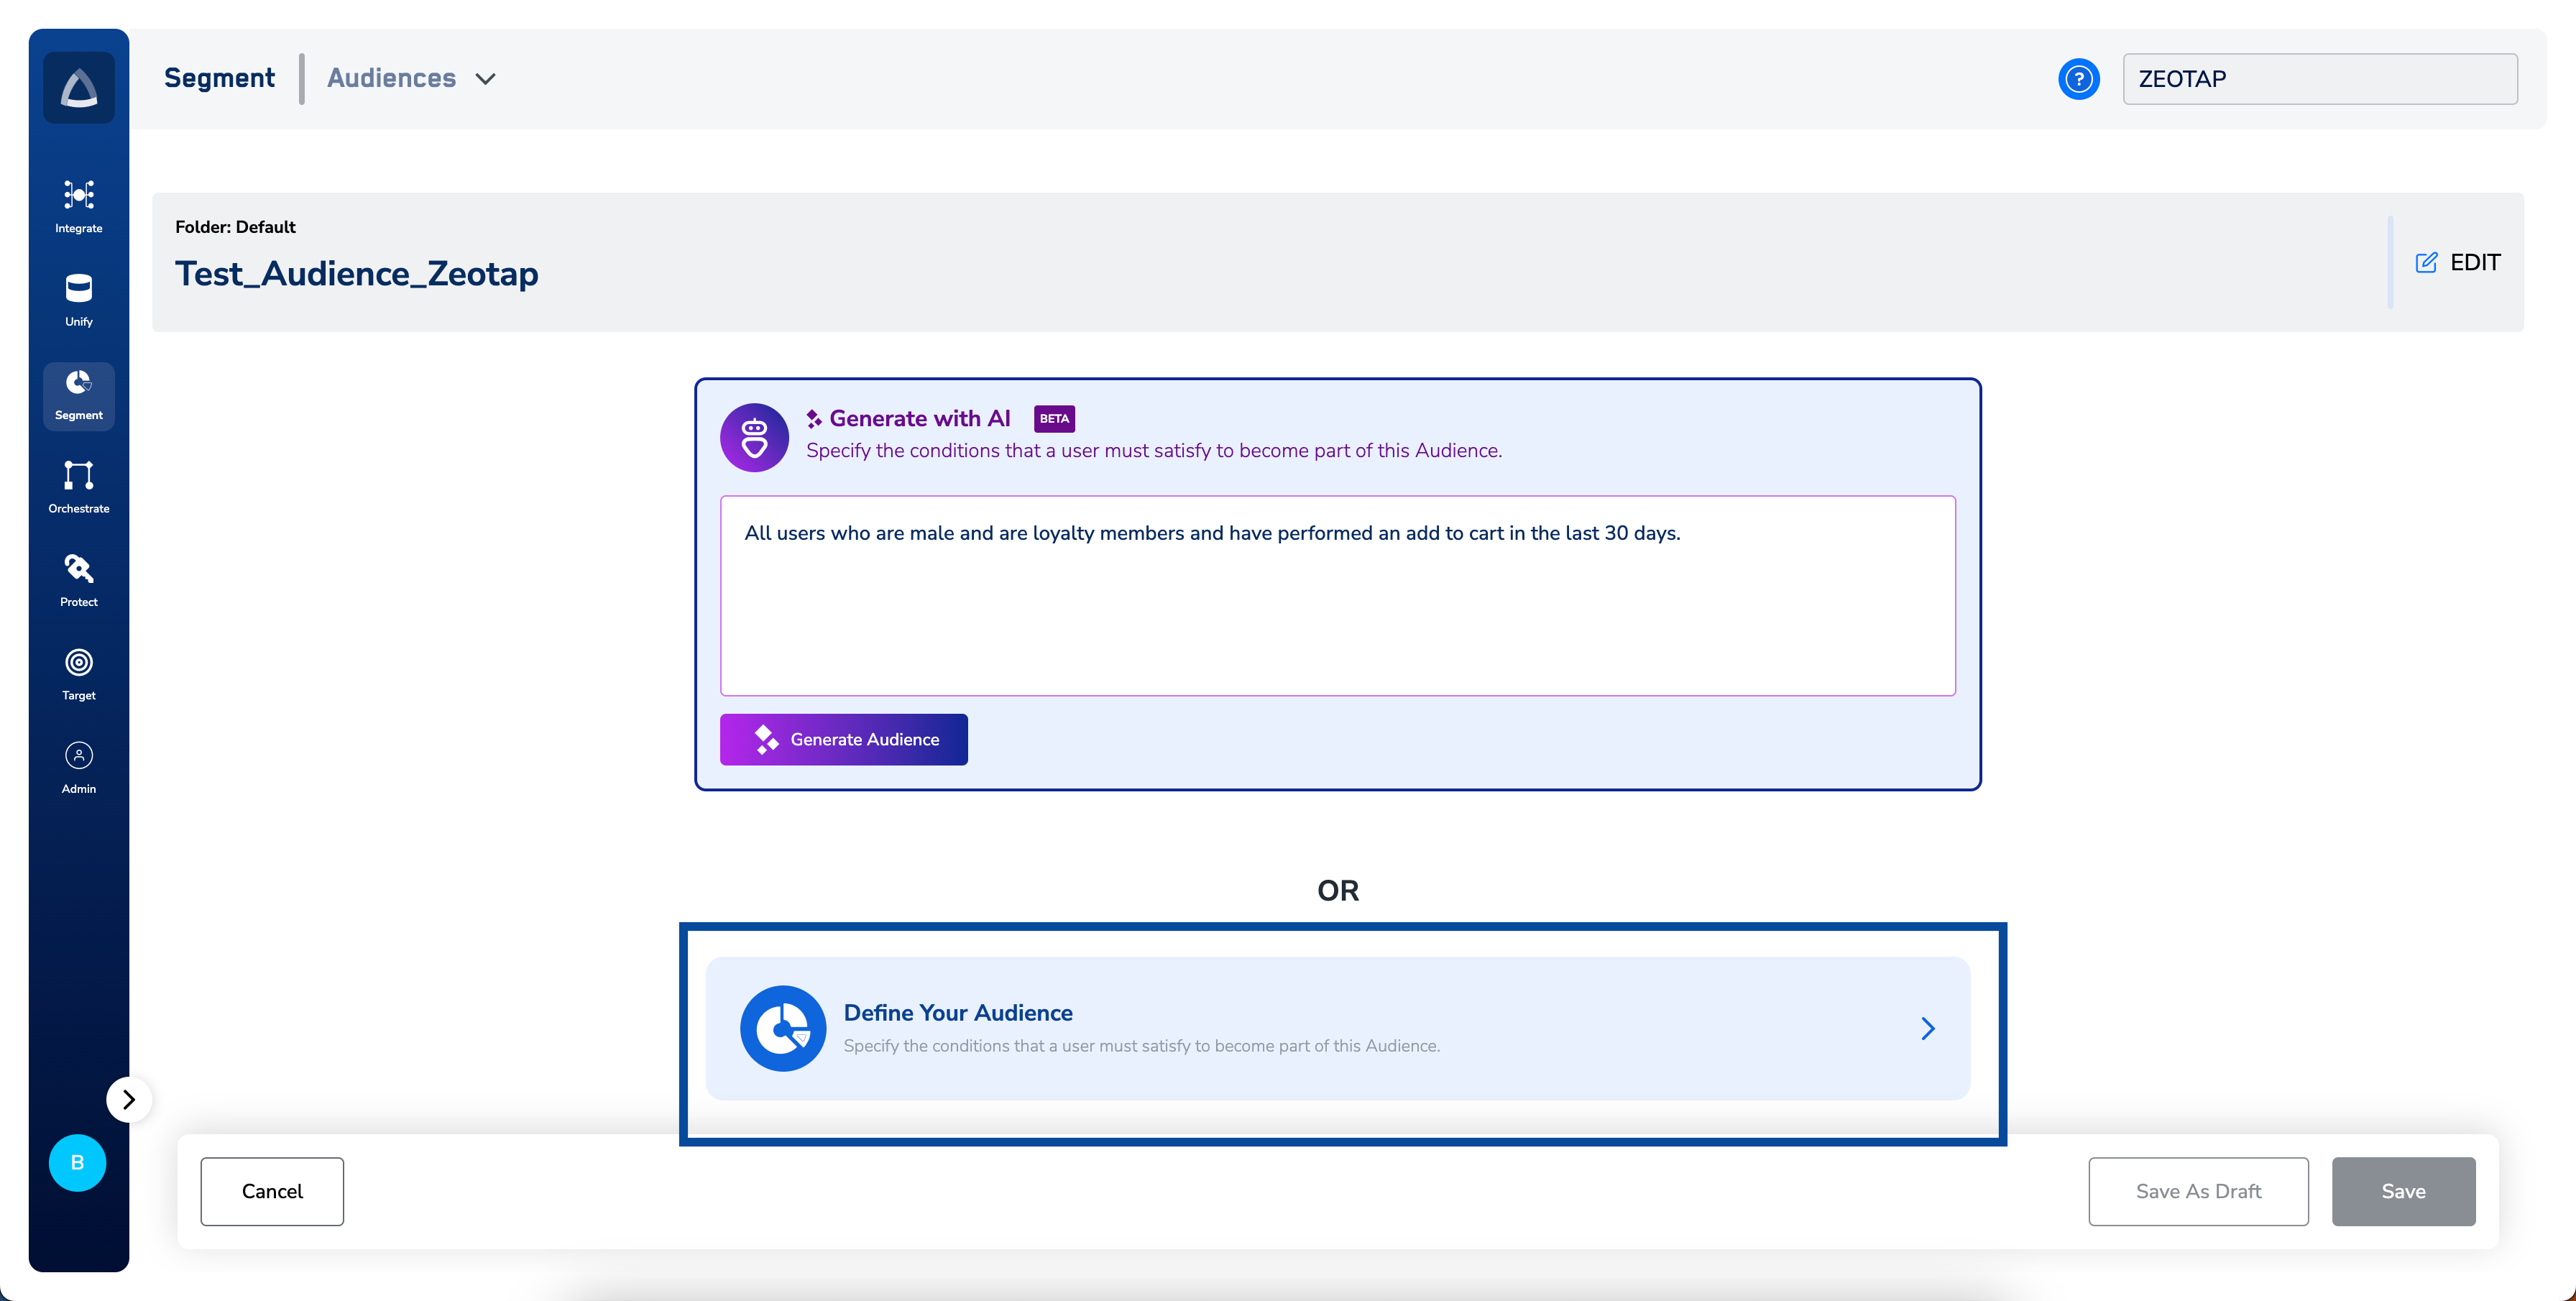
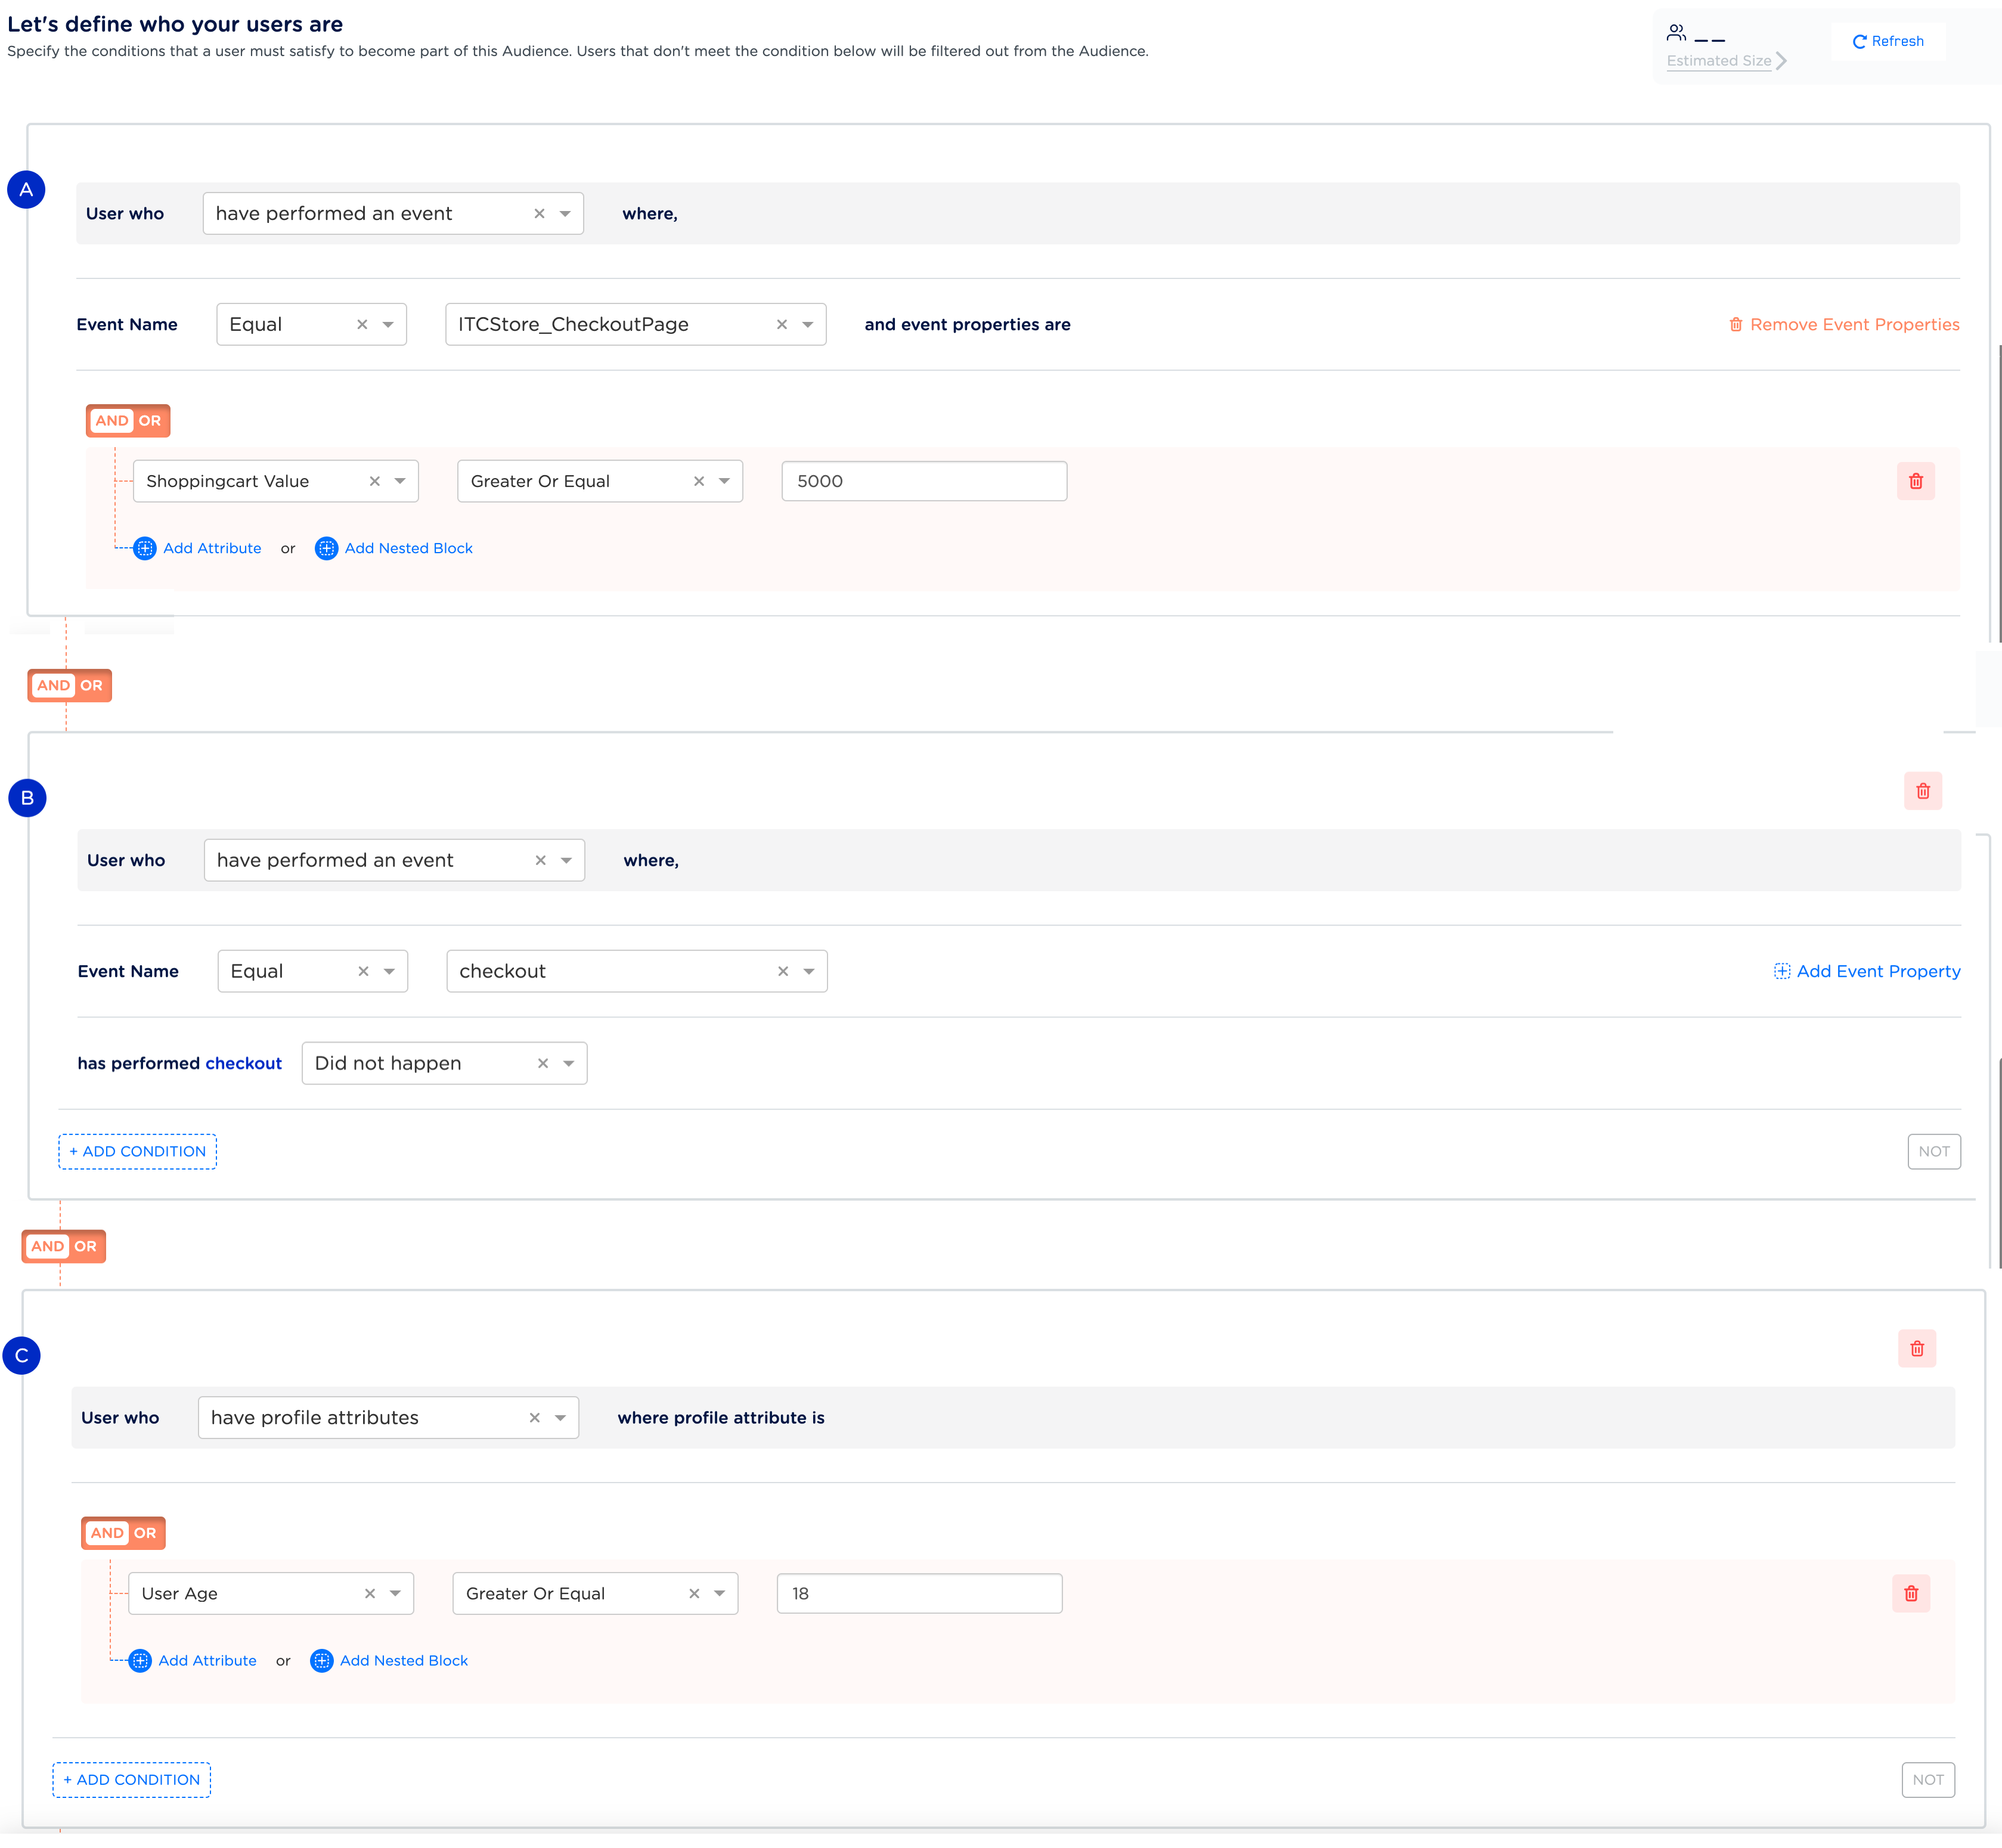
- You can use attributes such as Events, Profile attributes, Calculated attributes, Consent, Marketing preferences and others to define your audience. For example, you aim to target a particular audience of customers who are over 18 years old, who abandoned their cart. However, they showed an interest in a specific product category whose value exceeded 500 euros. You can create this Audience as shown in the image below. Subsequently, this Audience can be targeted with a personalised email campaign through different platforms and encourage them to finalise their purchase.
NoteTo know more about the different attributes available in the product and how to apply them, refer here.
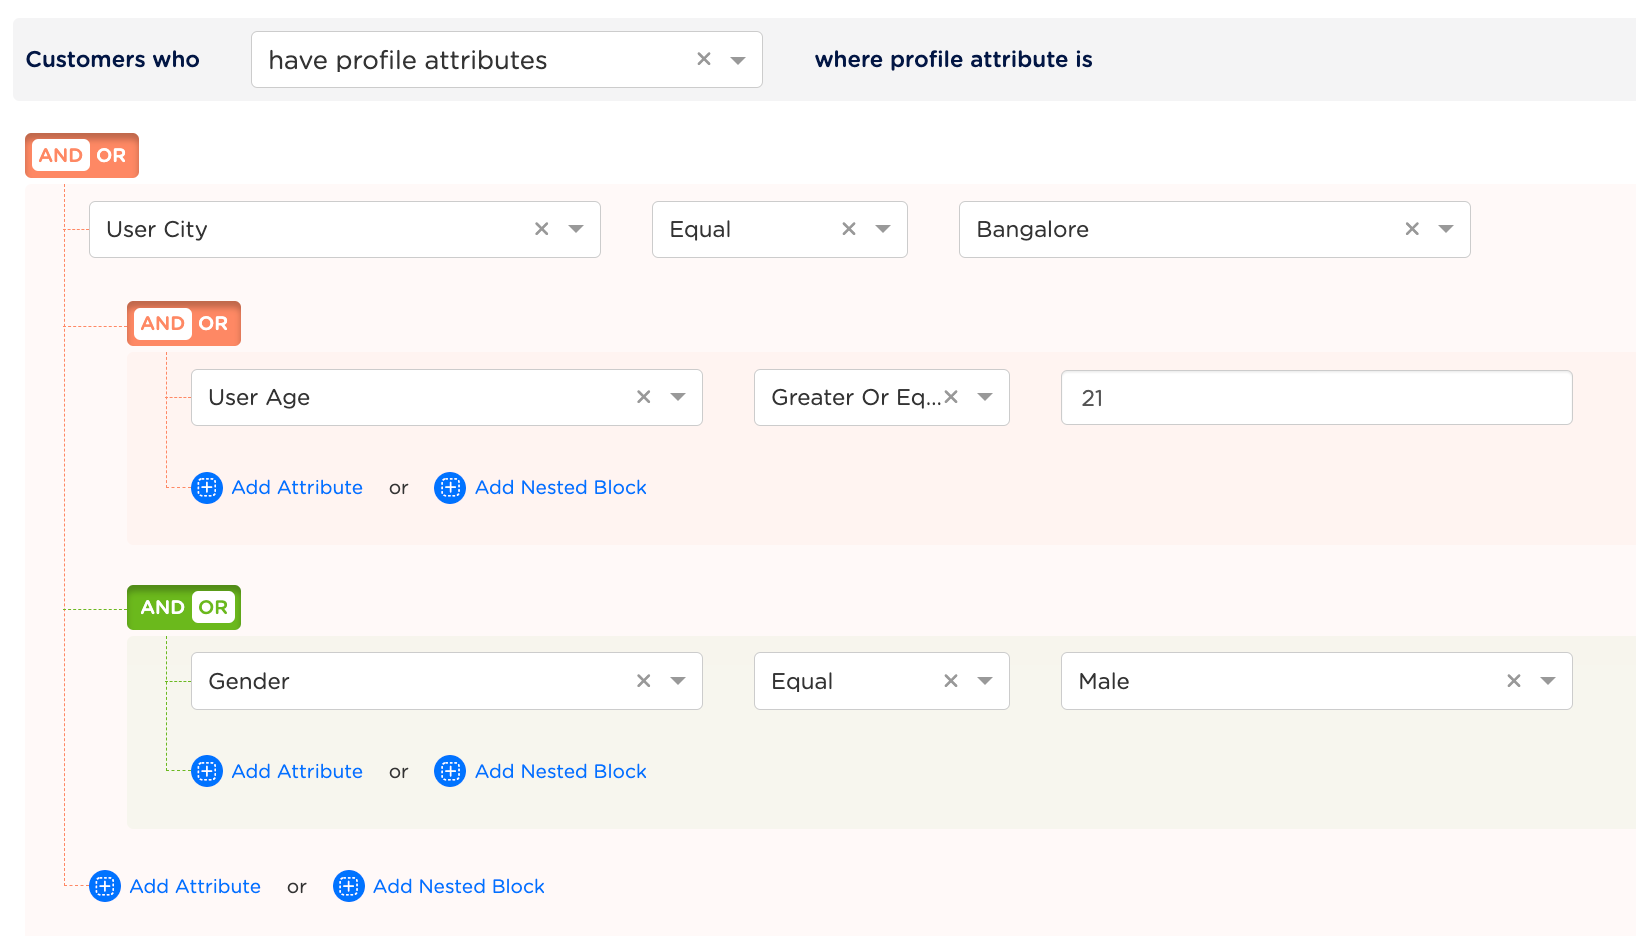
- Note that you can also include nested blocks within the existing blocks to add more conditions. You can add up to five nested blocks as per requirement to refine your Audience filtering. For example below, let’s say you want to add a profile attribute with the condition that the customer’s city is Bangalore. Further, you want to filter your customers who are either above 21 years of age or whose gender is male. To achieve this, you can add nested blocks as shown below. Similarly, based on your use case, you can further filter your Audience by adding more nested blocks with AND/OR/NOT operators between them. For more information about the operators available in Audience, refer here.
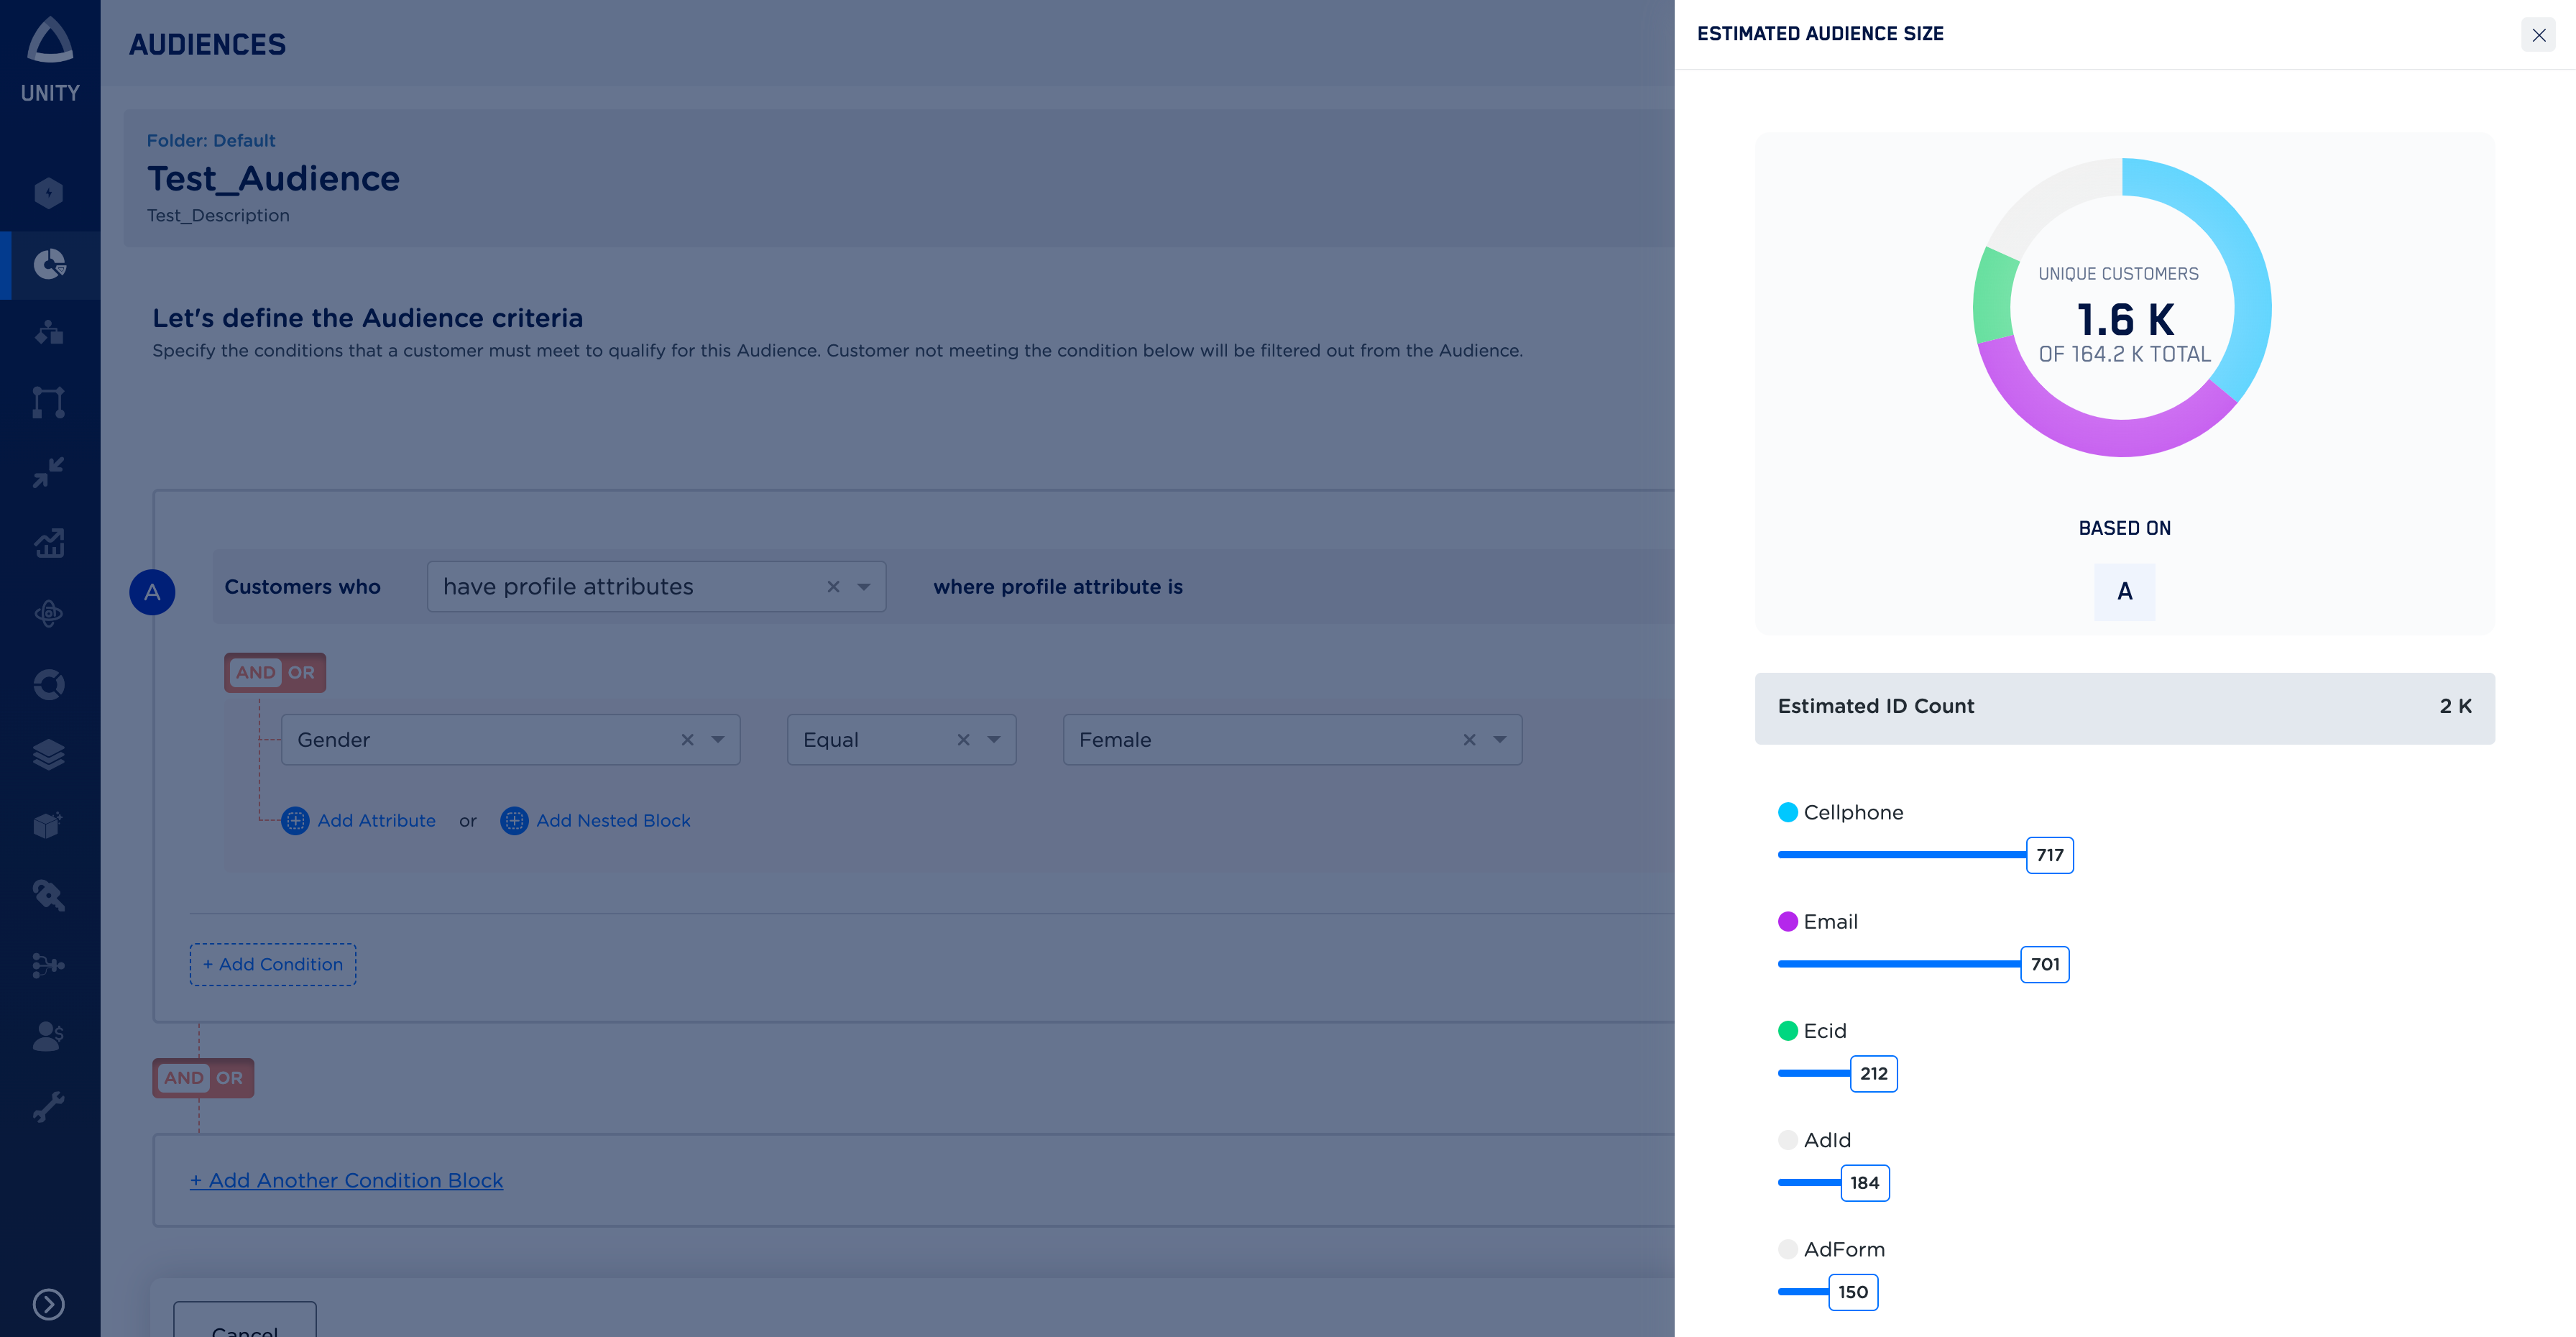
Once you have defined your audience, you can click Refresh to obtain the estimated audience size. This option is only available when you are creating batch audience.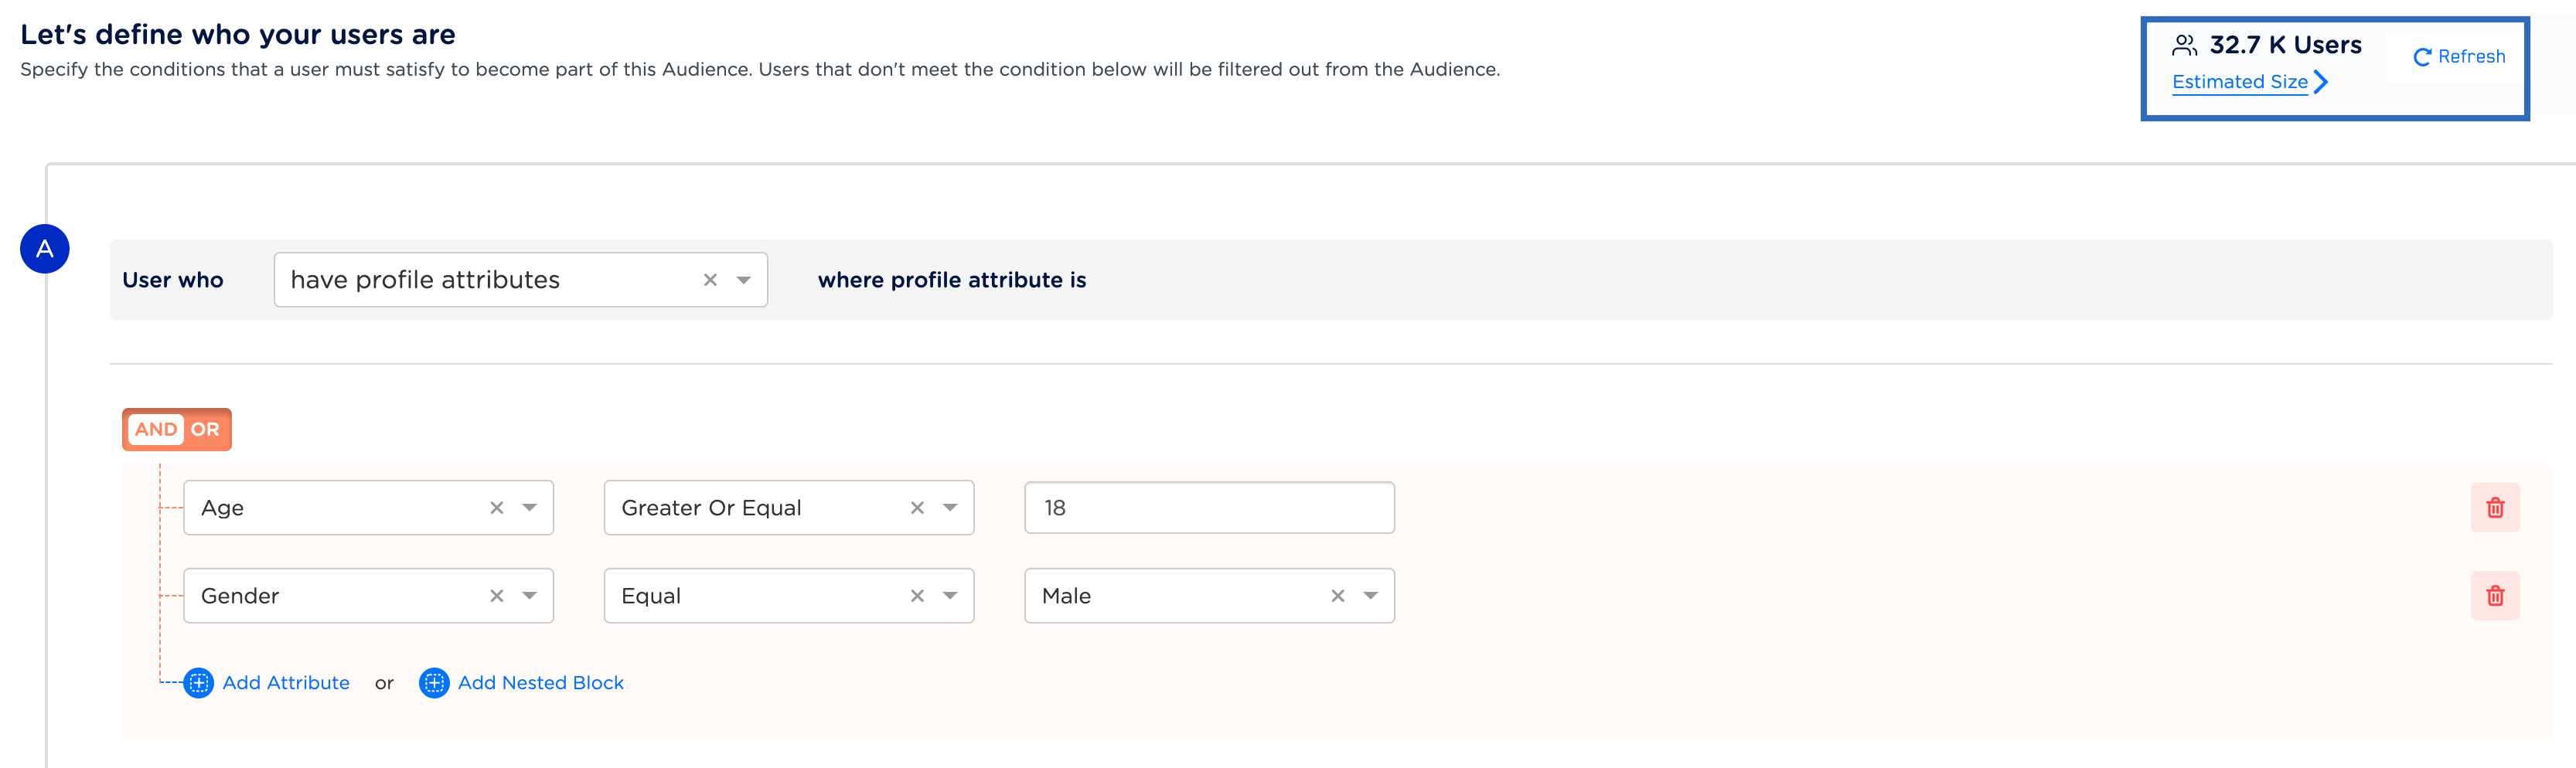
Click Check Estimates to view the unique customer count that is included in your audience. This option is only available when you are creating batch audience.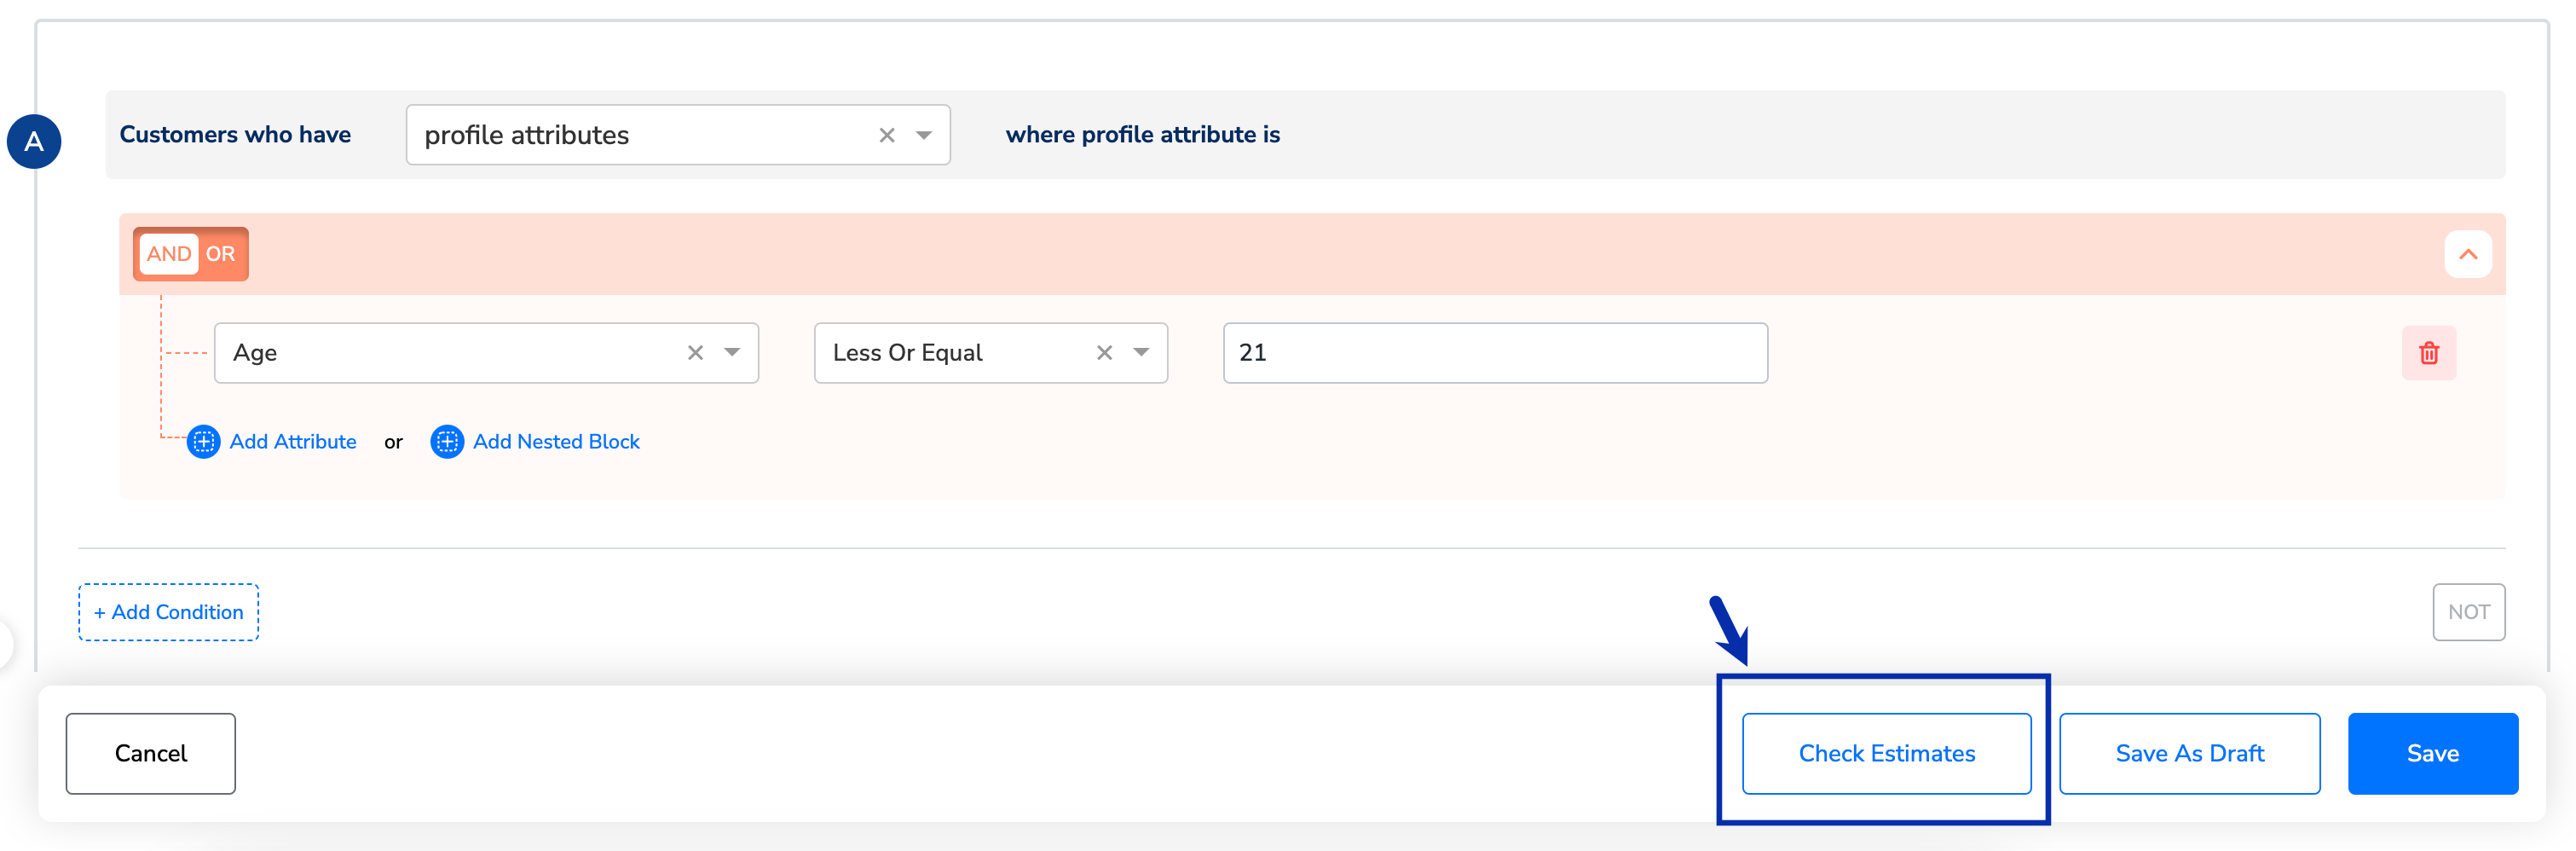
Once you have added the required attributes to define your audience and checked the estimates, you can click one of the following options:
- Cancel – This option allows you to cancel the audience creation process and take you to the Audience listing page.
- Save As Draft – This option allows you to save your audience as a draft and revisit it later for further modifications. Also, this action ensures that all the information about your Audience like tags, folder, attributes and other details are preserved for future reference. Once you click this option, you are redirected to the Audience listing page.
- Save – This option saves the audience and starts the process of audience calculation.
| Option | Batch Audience | Real-Time Audience |
|---|---|---|
| Check Estimates | ✅ | ❌ |
| Refresh Estimated Size | ✅ | ❌ |
| Save as Draft | ✅ | ✅ |
| Save | ✅ | ❌ |
| Activate Now | ✅ | ✅ |
| Activate Later | ✅ | ❌ |
| Cancel | ✅ | ✅ |
| Enable Membership | ✅ | ❌ |
| Set A/B Test | ✅ | ❌ |
Next steps depend on whether you are creating a Batch Audience, creating a Real-Time Audience, or deleting users from an audience. Follow the appropriate steps based on your use case.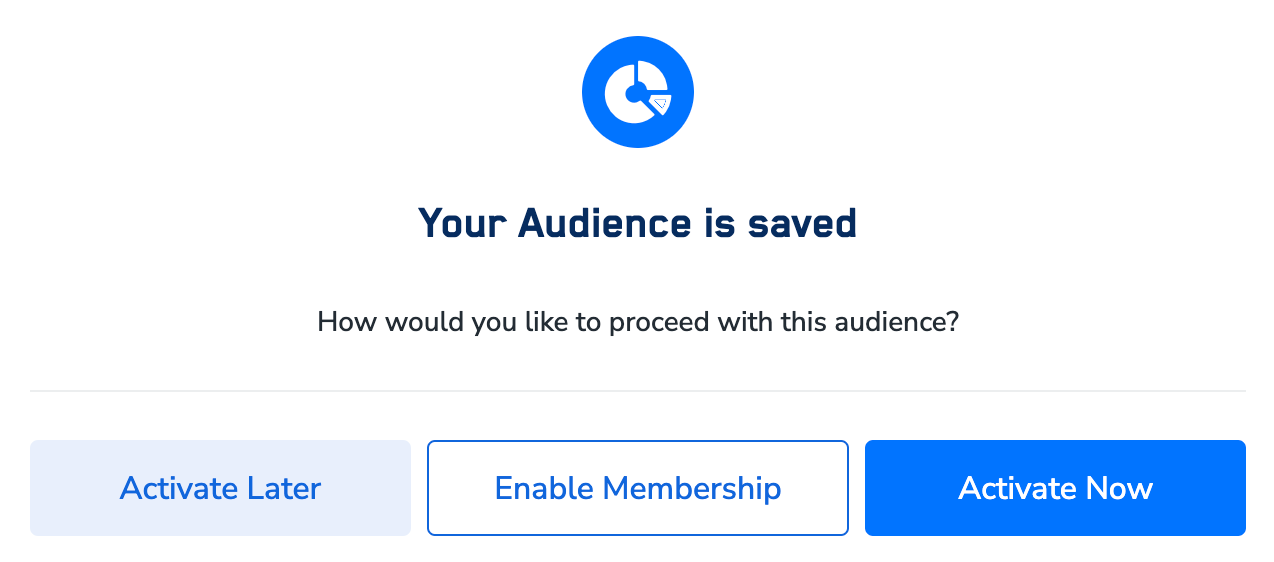
- For Batch Audience creation, after you click Save, a window appears prompting you to choose one of the following options:
- Activate Later - This option redirects you to the Audience listing page, allowing you to activate your audience at a later time.
- Enable Membership - This option takes you to a window, where you can set the refresh frequency for your Audience without it being linked to a Destination. For more information about Membership, refer here.
-
Activate Now - Selecting this option takes you to a screen where you can either choose to enable A/B testing on the Audience or activate the created audience by linking it to a specific Destination.
- Set A/B Test – This functionality is exclusively available for users who have opted for it. Selecting this option takes you to a screen where you can split the audience into two or more variations. For more information about AB testing and its application, refer here.
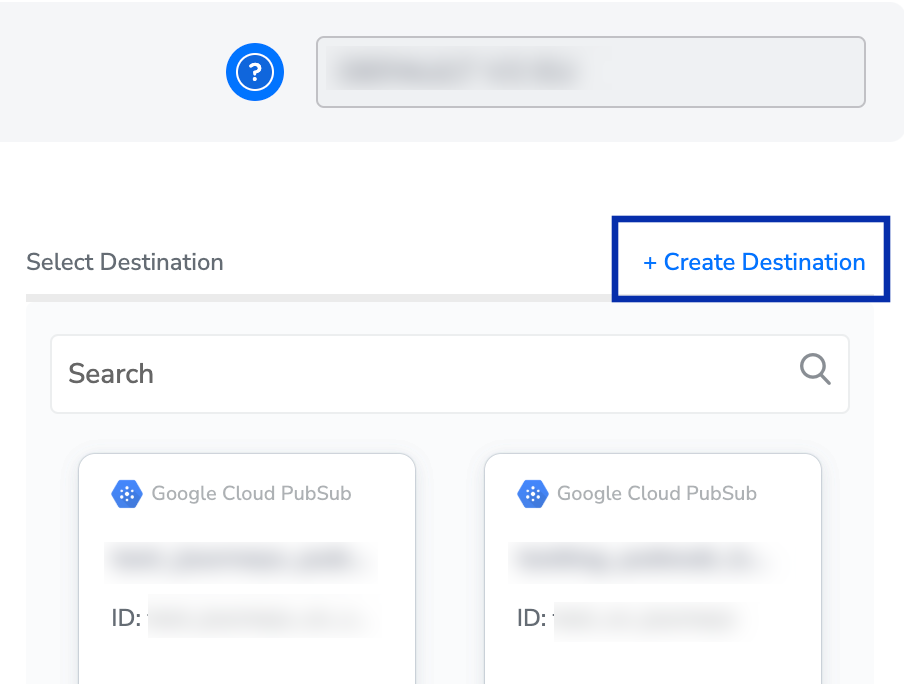
- Link to Destination – This functionality helps you to activate the created Audience by linking to a Destination. For step-by-step instructions on how to activate an Audience, refer here.
-
For Real-time Audience creation, you are prompted to choose one of the following options in the window that appears:
- Cancel – This option allows you to cancel the audience creation process and take you to the Audience listing page.
- Save as Draft – This option allows you to save your audience as a draft and revisit it later for further modifications. Also, this action ensures that all the information about your Audience like tags, folder, attributes and other details are preserved for future reference. Once you click this option, you are redirected to the Audience listing page.
- Activate – This functionality helps you to activate the created Audience by linking to a destination. To access the complete list of destinations that we support, refer here.
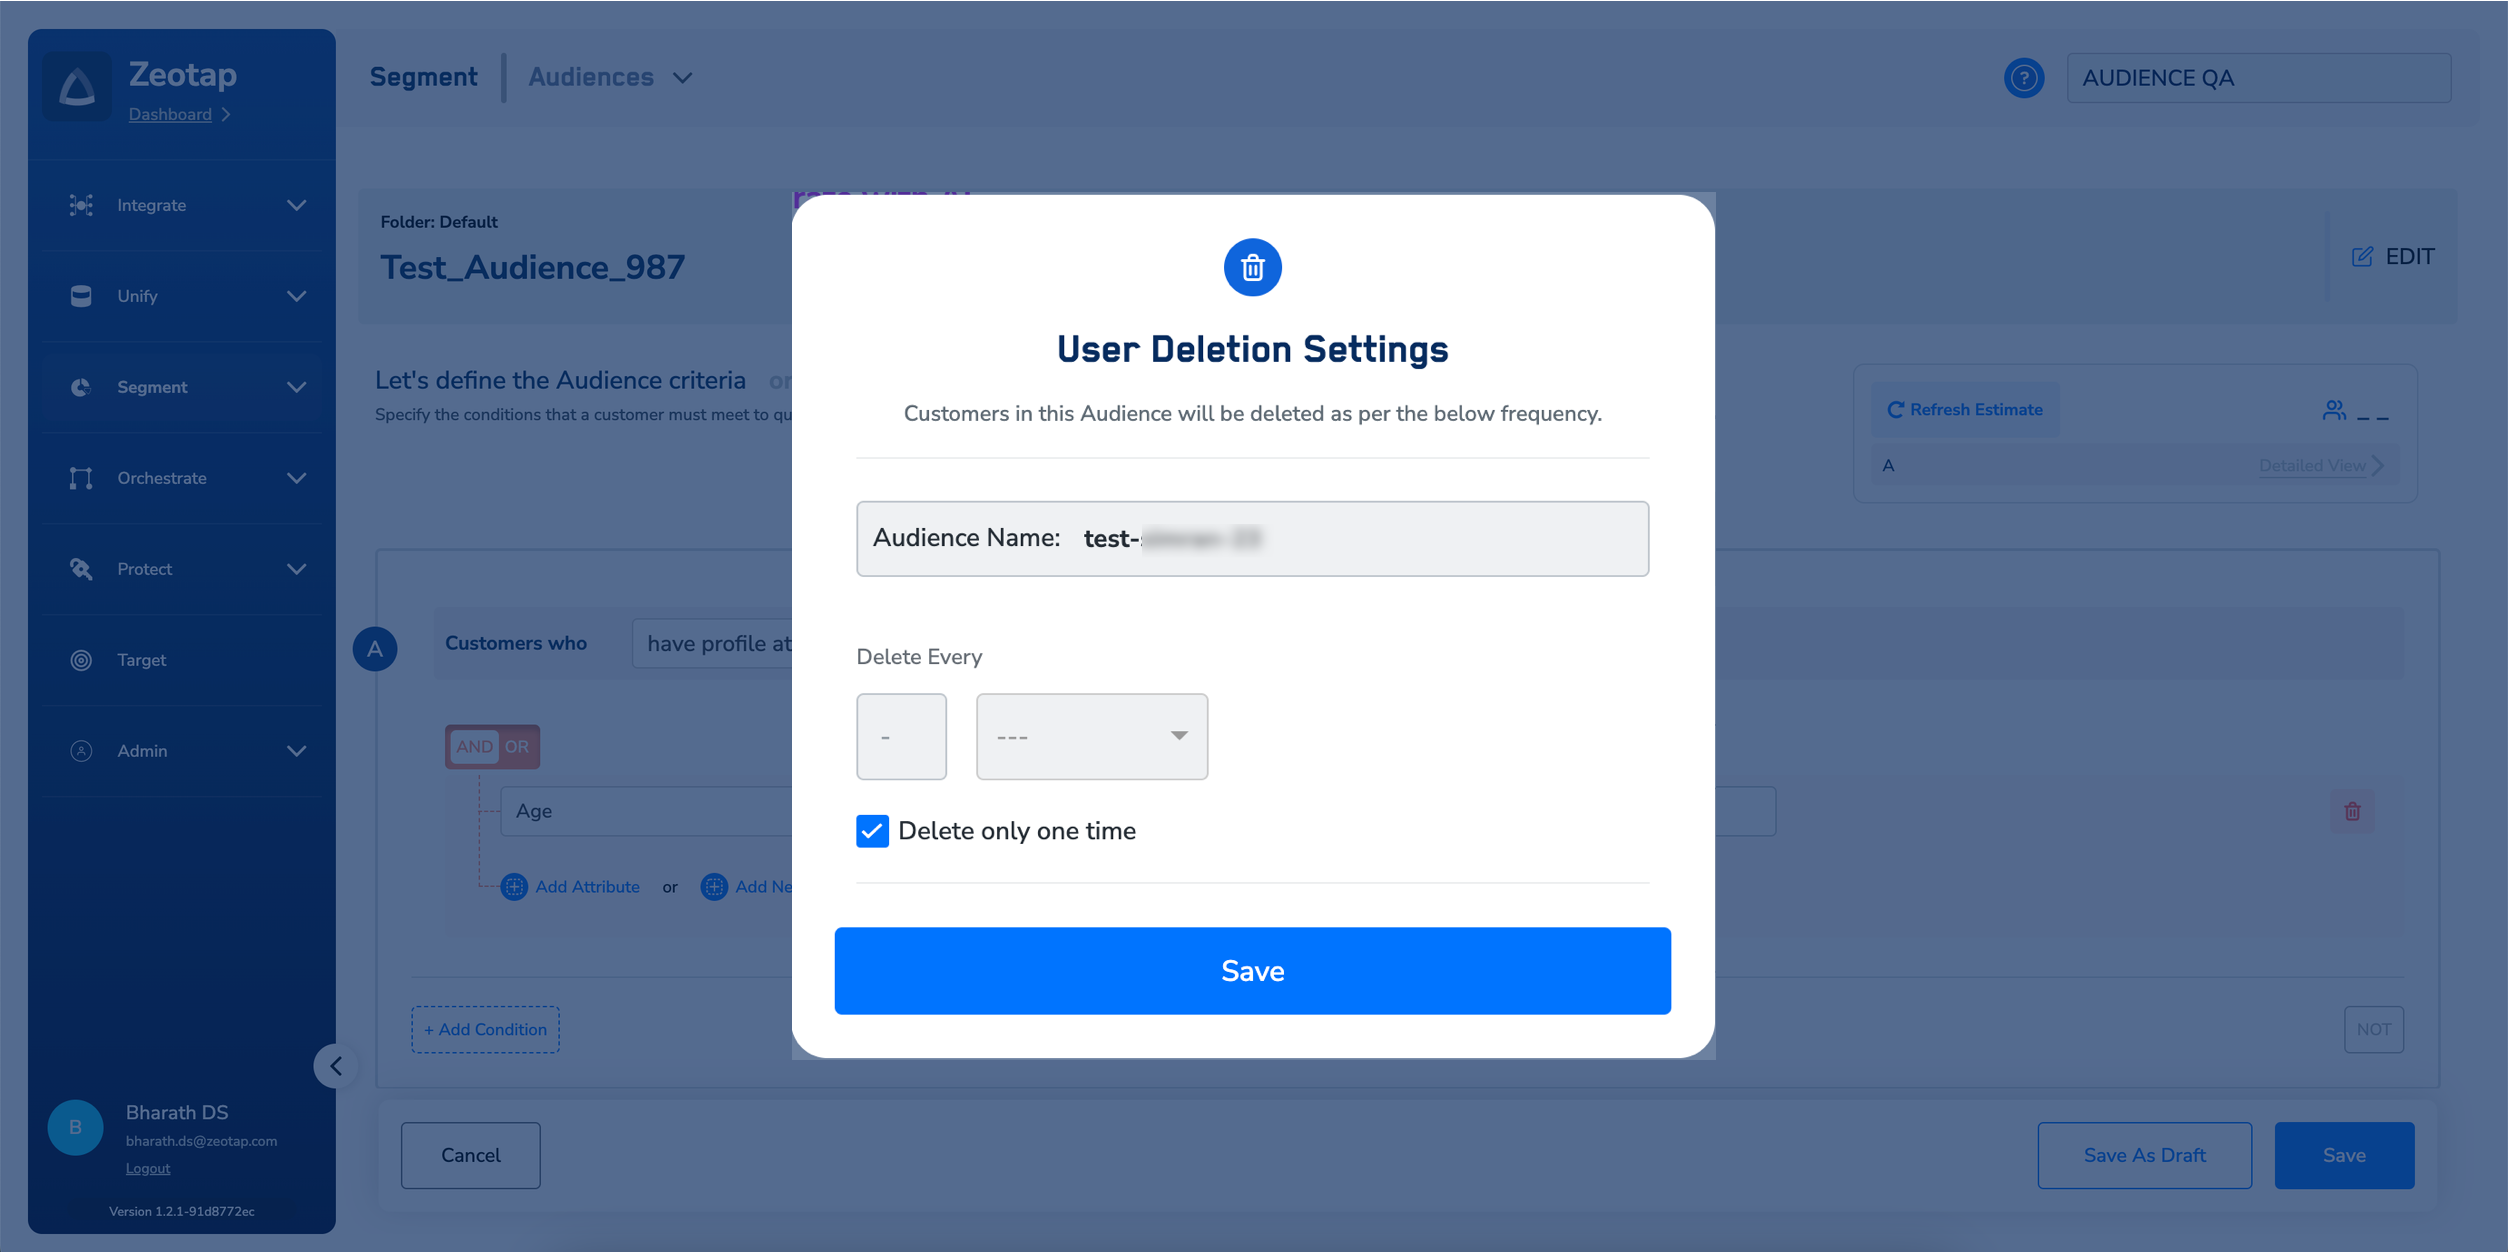
- For deleting users from the Audience–If you have selected the Delete customers in this Audience from the system checkbox while creating the Audience, then a window appears upon clicking Save. This window allows you to set the frequency for deleting the customers qualifying for the Audience. Selecting the Delete only one time checkbox deletes customers who qualify for the Audience only once. However, if you want to delete customers at specific intervals, then set a frequency for your Audience under the Delete Every option.