- Concatenate – Allows you to add a prefix or suffix to a Catalogue field.
- Timestamp – Allows you to add a timestamp to indicate the upload time of a data record.
- Custom Enricher – Allows you to apply custom transformations such as hashing, formatting, value mapping and more to modify field values.
- JavaScript – Allows you to apply a custom JavaScript function to a field, including reshaping or filtering a list of objects before sending it to a destination.

1. Concatenation Enricher
Use the Concatenation Enricher to modify Catalogue field names by adding a prefix or suffix based on your requirements. For example, if you are sending customer IDs to a destination platform that requires a specific naming convention, you can add the prefixcrm_ to distinguish these fields (crm_customer_id). This helps align with the platform’s schema and prevents conflicts with existing fields.
Use Cases
- Add a prefix to distinguish fields sent to a destination platform. For example, if you are sending customer purchase history to an analytics tool, you can add the prefix
retail_tofields such asretail_total_spentto avoid naming conflicts. - Append a suffix to indicate transformed data. For example, if you are converting a timestamp to a different timezone, you can append
_convertedto indicate the transformation (e.g.,event_time_converted). - Combine multiple fields into a single string for compatibility with destination platform requirements. For example, if you are exporting customer full names to a platform that only supports a single name field, you can concatenate
first_nameandlast_nameintofull_name.
Note:You can add multiple prefixes and suffixes to the Catalogue field and drag them to reorder the concatenation as needed. Note that you cannot add a Concatenation enricher to the parent field of the Object/List of Object.
Using Concatenation Enricher in Destination Mapping
Perform the following steps to use this enricher in the Destination Mapping screen: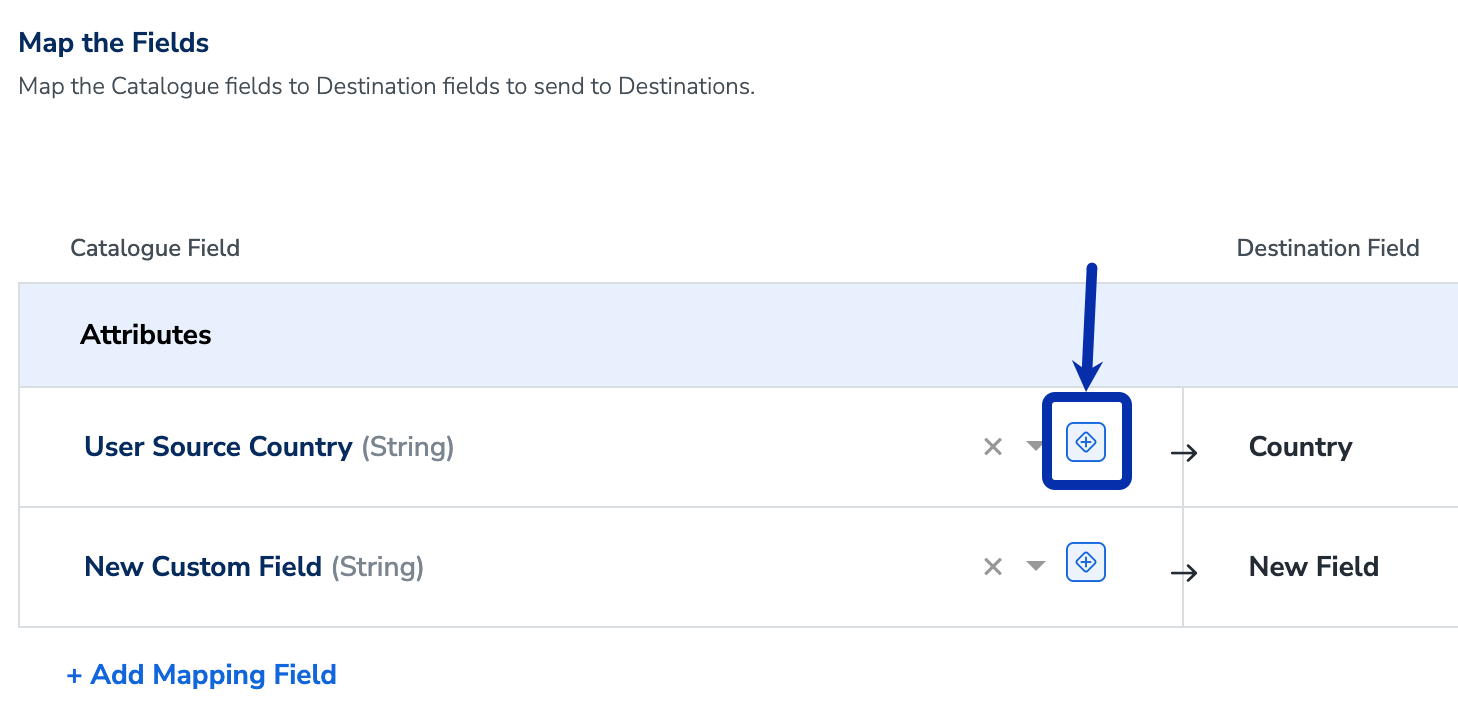
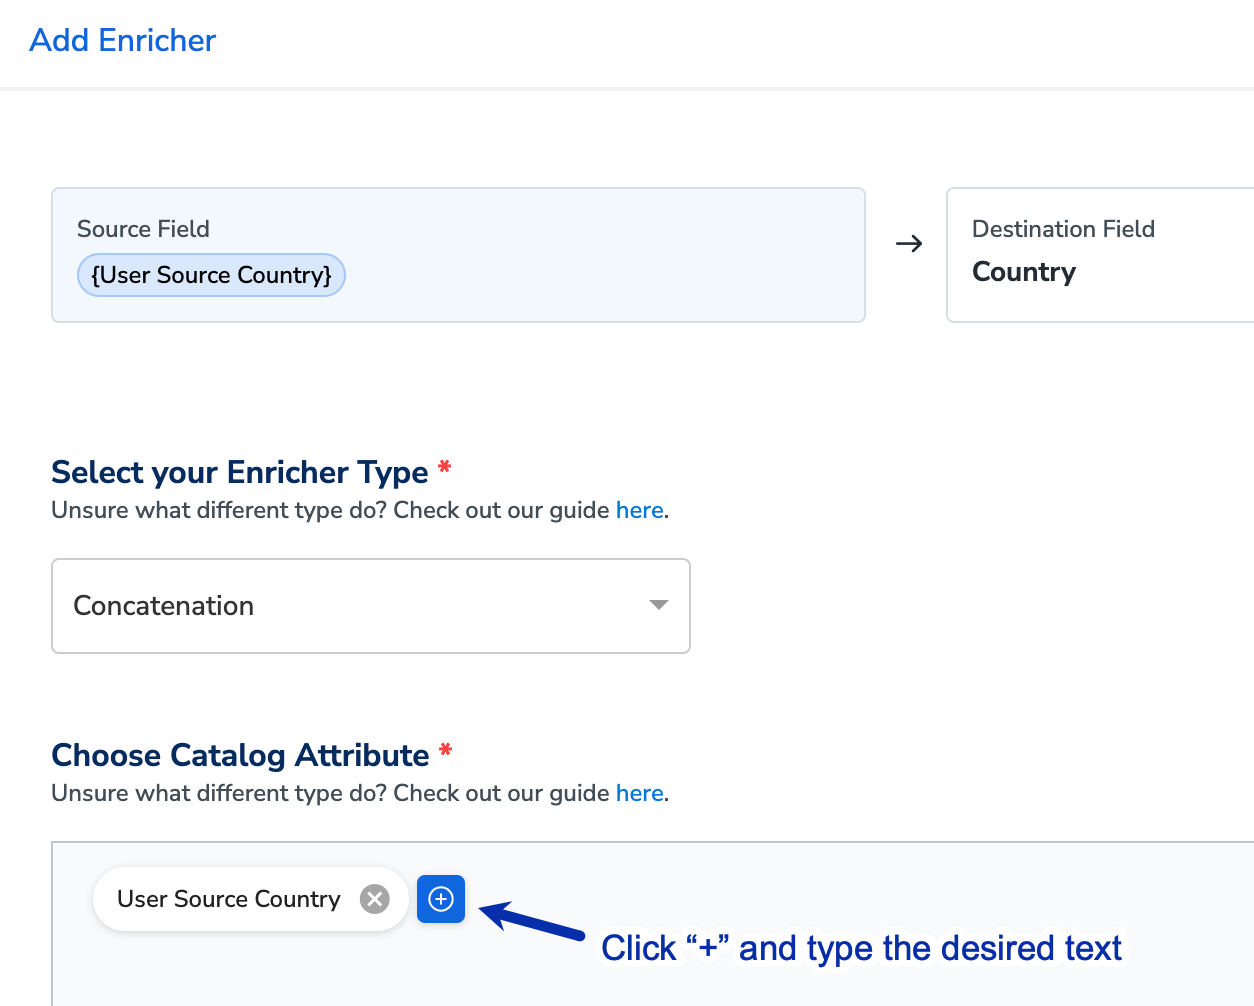
Click + to add the desired text as a prefix or suffix, then press Enter.
- Drag and drop the added text to reorder it as a prefix or suffix as needed.
- You can add multiple prefixes or suffixes.
2. Timestamp Enricher
Use the Timestamp Enricher to add a timestamp indicating the upload time of a specific column when sending data from Zeotap CDP to a destination platform. This helps track data freshness, ensures accurate reporting, and supports time-sensitive processing. For example, if you are sending user activity logs to an analytics platform, you can add a timestamp column to indicate when each record was ingested.Use Cases
- Enable time-sensitive processing by external platforms – If a marketing automation tool needs to trigger campaigns based on the latest user interactions, adding a timestamp ensures that actions are taken on the most recent data.
- Maintain audit logs for compliance and reporting – If you need to track when user data is sent to an external platform for regulatory compliance, adding a timestamp provides a clear audit trail for reporting and verification.
- Optimise real-time bidding (RTB) in advertising platforms – If you are sending audience segments to an advertising platform for RTB, adding a timestamp ensures that bids are placed based on the most up-to-date audience data.
- Improve attribution modeling in analytics platforms – If an analytics tool is calculating conversion paths, adding a timestamp helps accurately attribute actions to the correct time period, improving the accuracy of performance reports.
- Synchronise data processing in ETL pipelines – If a destination platform processes data in batches, adding a timestamp ensures that records are correctly sequenced and processed in the intended order.
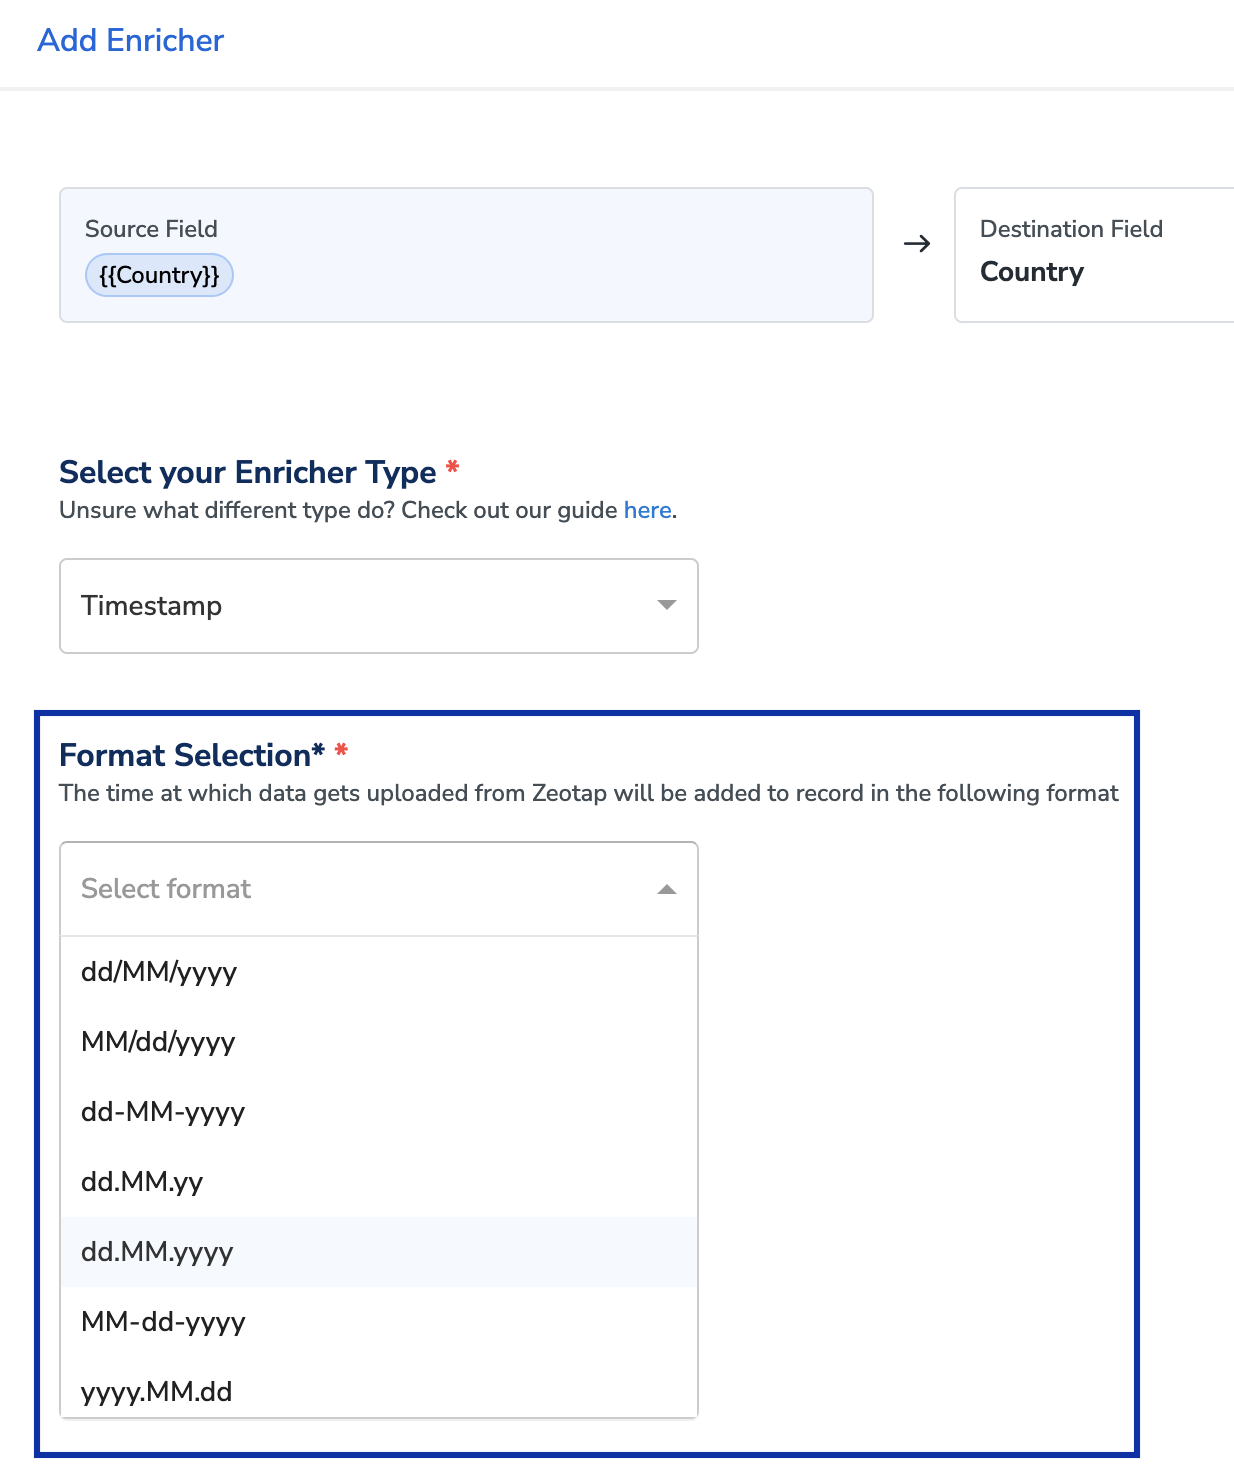
Using Timestamp Enricher in Destination Mapping
Add a timestamp to indicate the upload time of a specific column from Zeotap CDP to the platform. To use this feature, perform the following steps: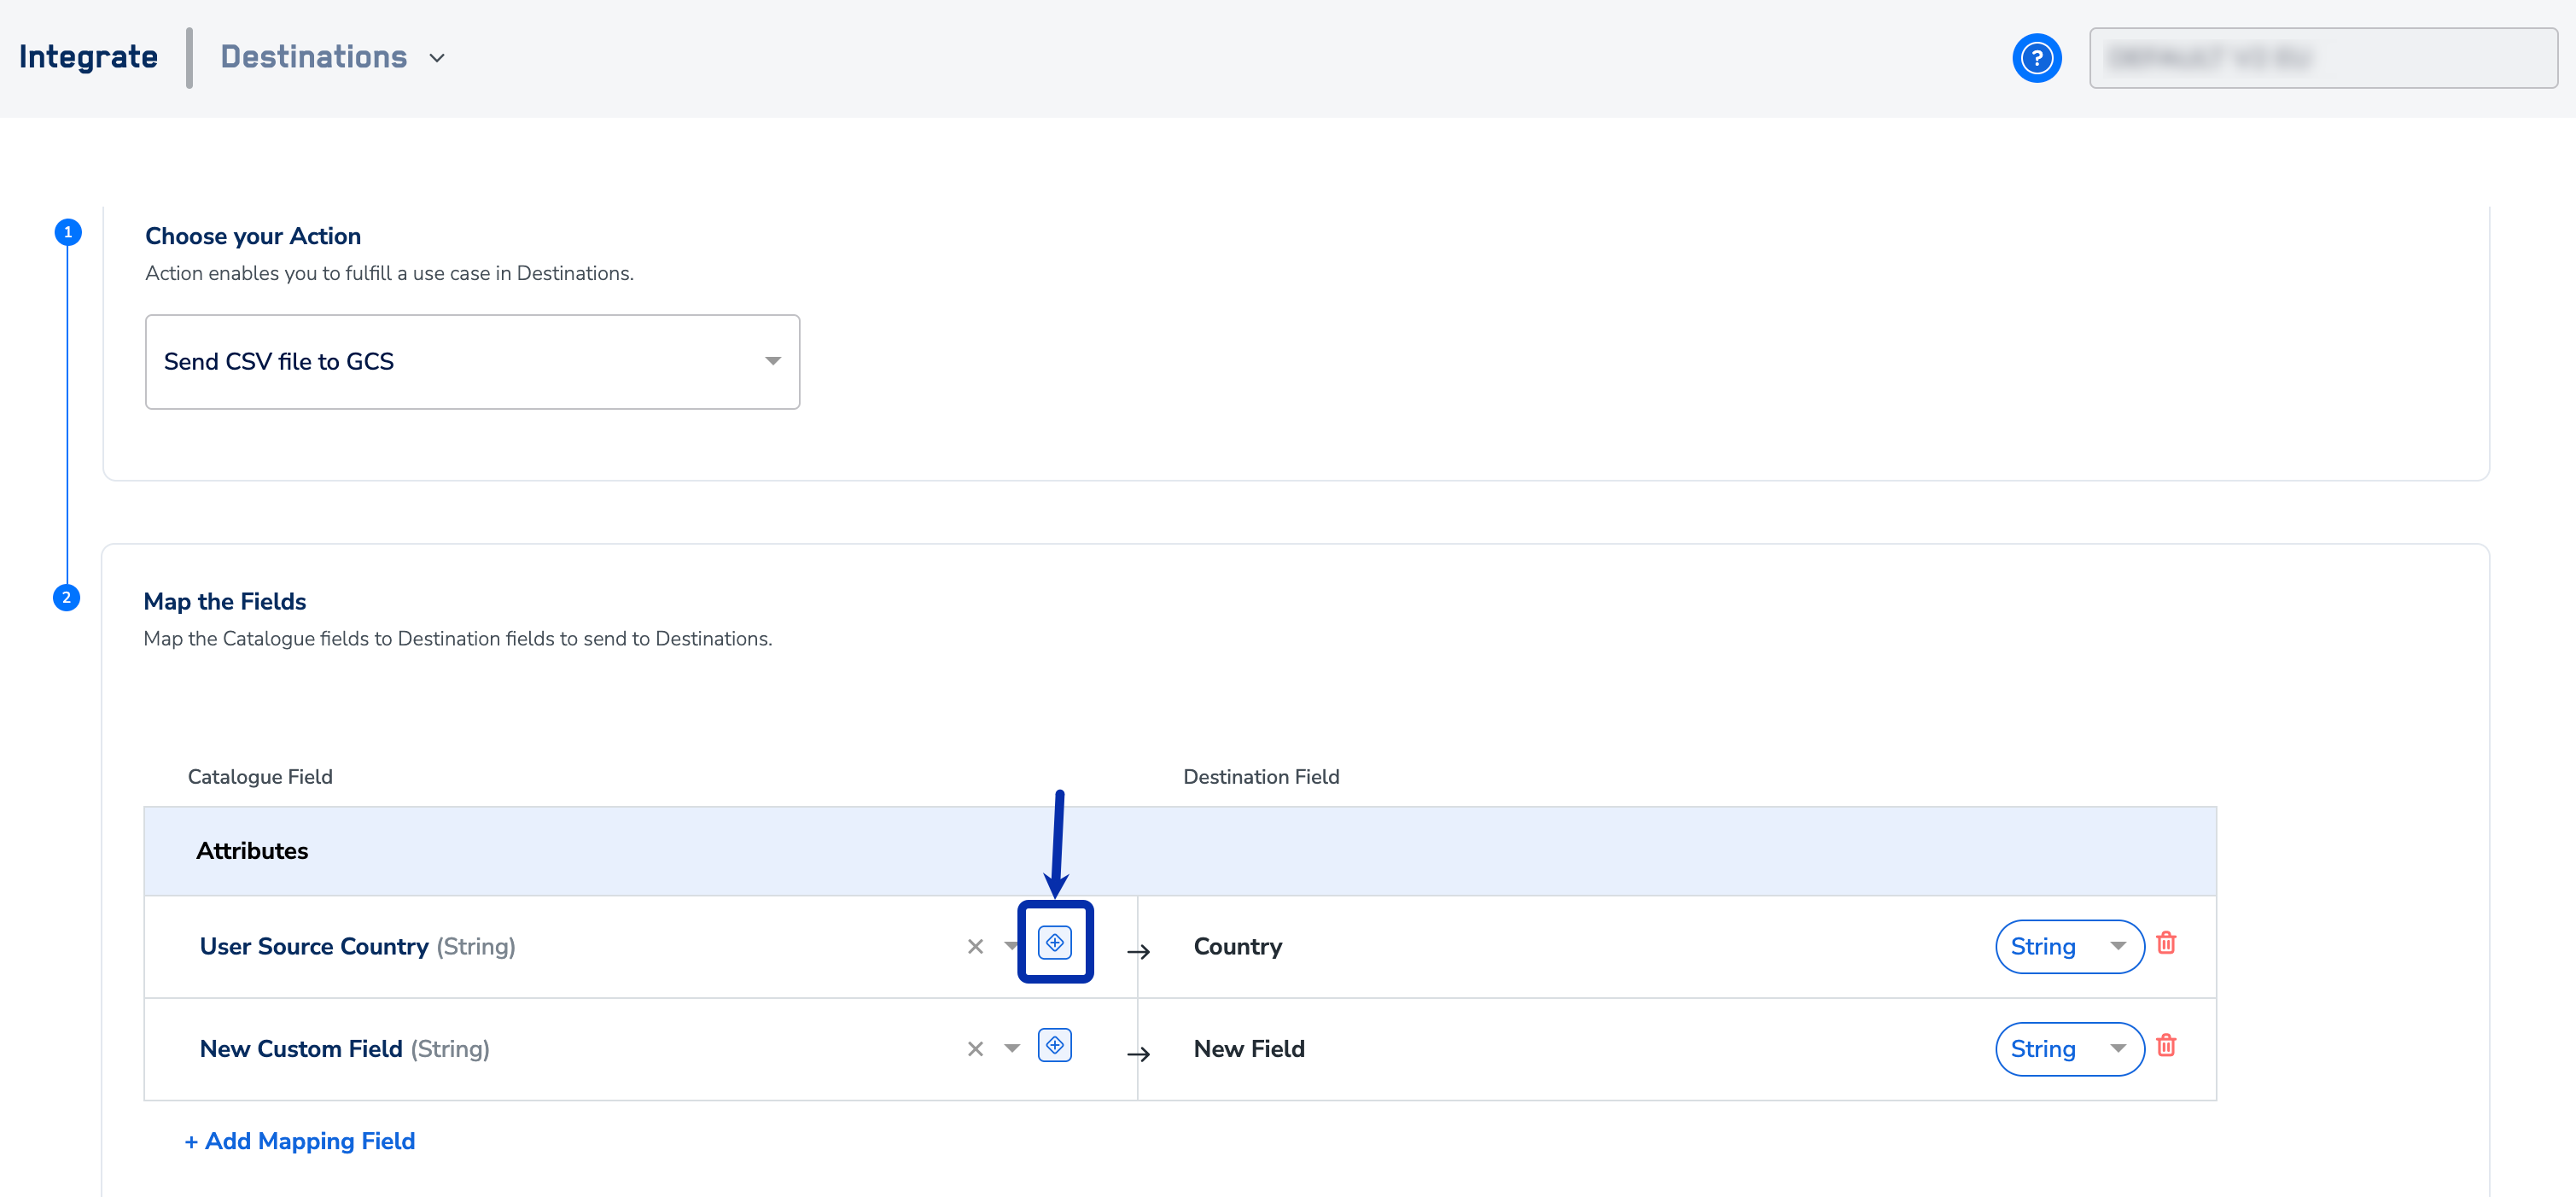
3. Custom Enricher
Use the Custom Enricher to modify catalogue field values before sending data from Zeotap CDP to a destination platform. This feature enables data transformations such as formatting, mapping, and computation and so on for better usage of data on the destination platform. For example, if a destination platform requires hashed user IDs for security purposes, use the Custom Enricher to apply SHA-256 hashing before sending the data.Build Your Own Directive (BYOD)
You can define your own directives using CDAP Wrangler Directives and Apache Commons JEXL expression, which allow operations such as formatting, mapping, hashing, extracting data and more. Perform the following steps to build your own directive suitable for your requirement:- Identify the transformation requirement– Determine the business need, such as standardising text, applying encryption, or extracting specific data.
- Select the appropriate directive– Refer to the list of commonly used CDAP Wrangler Directives and Apache Commons JEXL expression to choose the correct functions as required for your use case.
- Customise the directive for Zeotap CDP– Let’s say you want to use the cut-character directive to extract the first three characters of a field value. In this case, the format of the directive is as below.
cut-character <source> <destination> <type> <range|indexes>
-
To use this directive in the Destination Mapping screen in Zeotap CDP:
- Replace
<source>with the Zeotap Catalogue’s Database Name (refer to the image below). - Replace
<destination>with theCustom Destination Field Name(refer to the image below). - Define the
<type>as character. - Specify the
<range|indexes>to extract the required substring.
cut-character <Zeotap Catalogue’s DB Name> <Custom Destination Field Name> character 1-3 - Replace
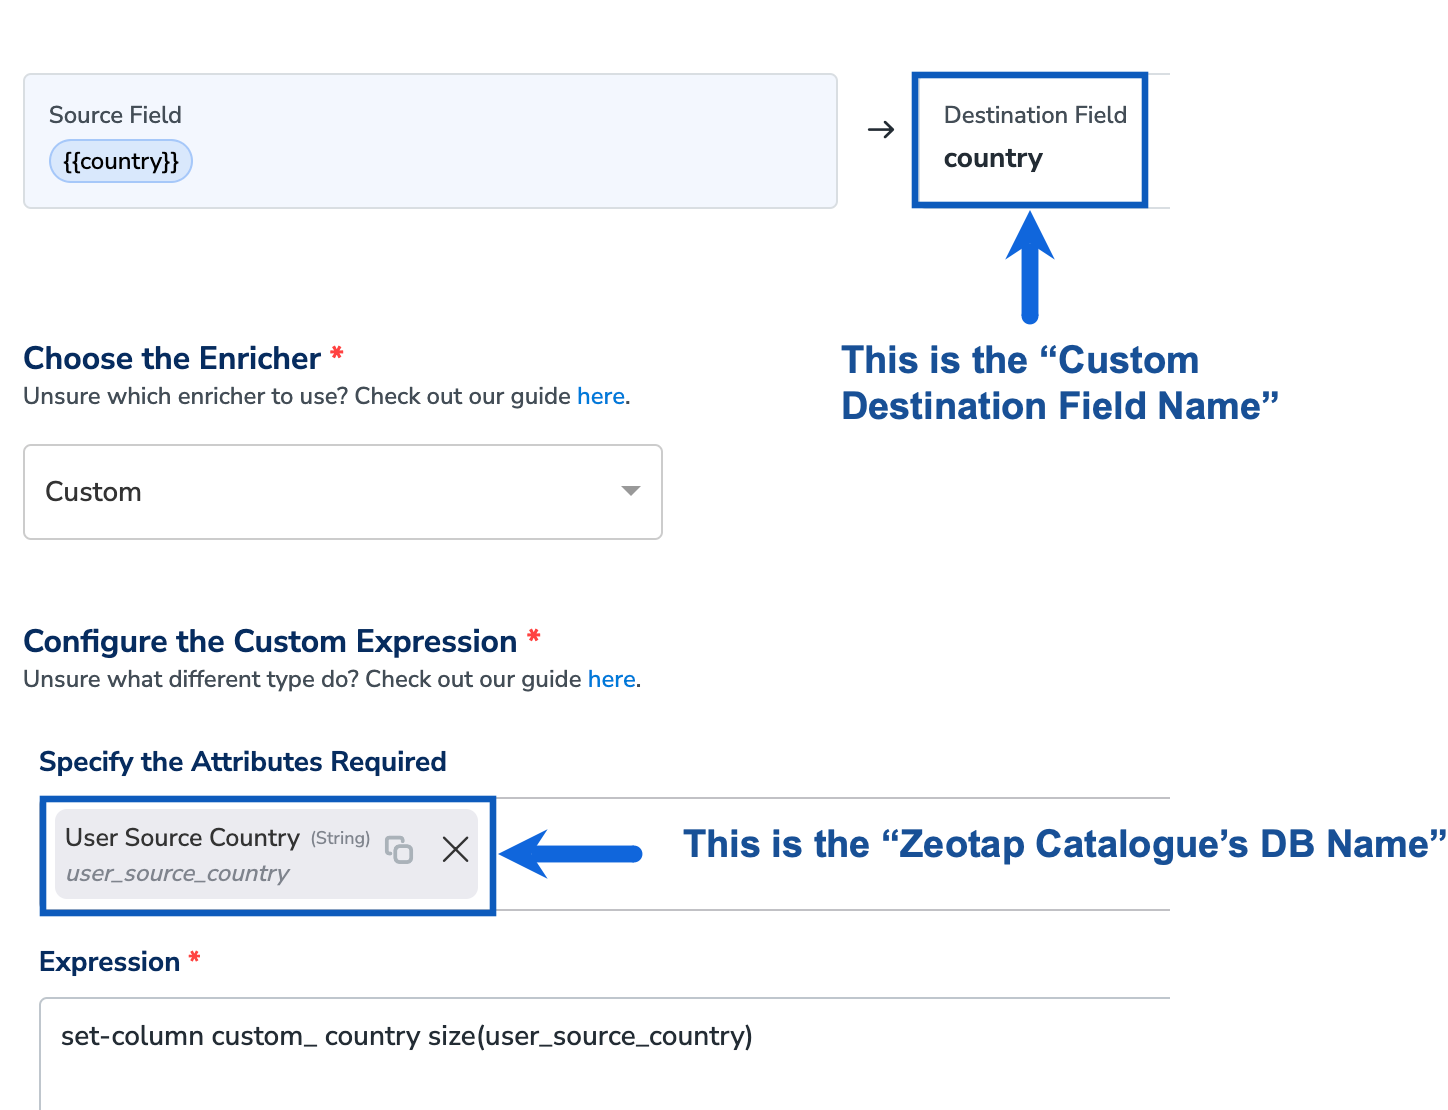
- Apply the required prefix– To align with Zeotap CDP’s conventions, add the
custom_prefix to<Custom Destination Field Name>.
cut-character <Zeotap Catalogue’s DB Name> custom_<Custom Destination Field Name> character 1-3
After replacing the placeholders with actual field names, the directive becomes:
cut-character user_source_country custom_ country character 1-3
- Use the the final directive in the Expression field as shown below and click Save. This extracts the first three characters of a user source country value.
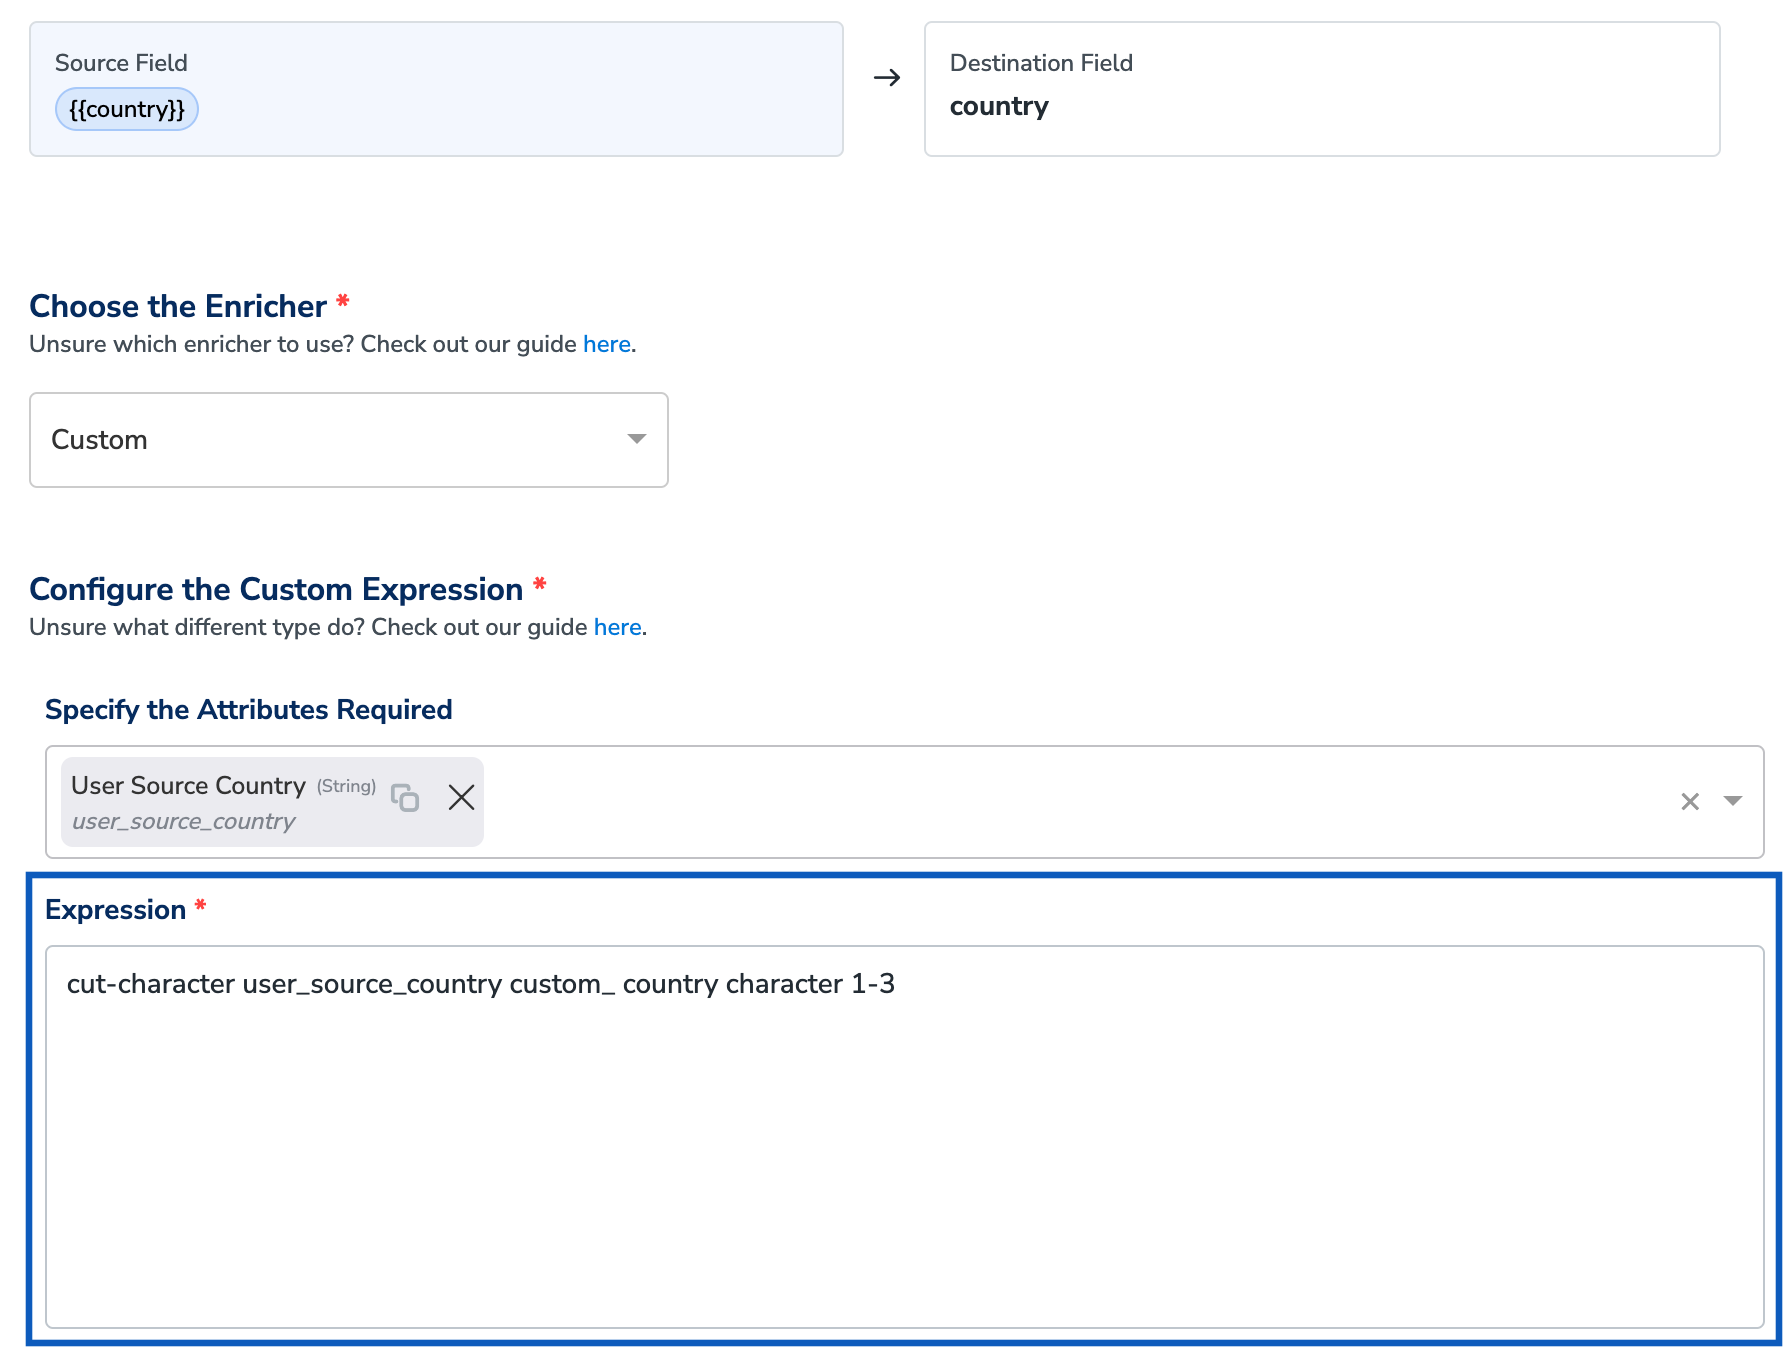
- Similarly, you can build your own custom directive specific to your use case.
Note:You need a basic understanding of CDAP Wrangler Directives and Apache Commons JEXL expression for building simple transformations, such as renaming fields or extracting substrings and so on. However, for advanced use cases, such as applying conditional logic or complex data transformations, a strong understanding is recommended. If you need assistance, reach out to our support team for guidance.
Common Use Cases for Custom Enrichers
Below you can find some examples of using the directives for Custom Enricher.- Use Case 1: Calculate and Send the Count
- Use Case 2: Hash User Data for External Analytics Platforms
- Use Case 3: Trim Long Names to Meet Destination Platform Limits (String Subsetting)
- Use Case 4: Normalise Subscription Status for Destination Compatibility
Before you Begin
For all directives used from CDAP Wrangler Directives, ensure that you replace the placeholders as shown below before using them in the Destination Enrichers screen.- Replace
<source>with the Zeotap Catalogue’s Database Name (refer to the image below). - Replace
<destination>with theCustom Destination Field Name(refer to the image below).
Use Case 1: Calculate and Send the Count
Let’s say you wish to extract the total count of a user’s preferred product categories. Some platforms require this numerical value to personalise recommendations based on user preferences. For example, if a user has selected [“Electronics”, “Fashion”, “Books”], the enriched output is 3, indicating the number of chosen categories. To achieve this, use the following directive in the Custom Enricher:set-column custom_<Custom Destination Field Name> size(<Zeotap Catalogue’s DB Name>)
- Replace
<Custom Destination Field Name>with the corresponding field name in the destination platform. - Replace
<Zeotap Catalogue’s DB Name>with the attribute name in the Zeotap database.
Use Case 2: Hash User Data for External Analytics Platforms
Let’s say you want to anonymise user data before sending it to an external analytics platform. Some platforms require hashed identifiers to protect user privacy while enabling analysis. By applyingSHA-256 hashing, you can ensure that sensitive data remains secure while still being useful for analytical purposes.
For example, if a customer ID is “123456789”, the enriched output is its SHA-256 hashed value, making it untraceable while maintaining uniqueness for analysis.
To achieve this, use the following directive in the Custom Enricher:
set-column custom_<Custom Destination Field Name> <Zeotap Catalogue’s DB Name> hash custom_<Custom Destination Field Name> SHA-256 true
- Replace
<Custom Destination Field Name>with the corresponding field name in the destination platform. - Replace
<Zeotap Catalogue’s DB Name>with the attribute name in the Zeotap database.
Use Case 3: Trim Long Names to Meet Destination Platform Limits (String Subsetting)
Let’s say you want to ensure that customer names comply with the character limit enforced by the destination platform. If the platform only allows a limited number of characters for first names, longer names might be truncated incorrectly or cause data ingestion errors. For example, if the original first name is “Jonathan”, but the platform allows only three characters, you can trim the name to “Jon” while maintaining readability. To achieve this, use the following directive in the Custom Enricher:set-column custom_<Custom Destination Field Name> <Zeotap Catalogue’s DB Name>!=null ? name : ''
cut-character custom_<Custom Destination Field Name> custom_<Custom Destination Field Name> 1-3
- Replace
<Custom Destination Field Name>with the corresponding field name in the destination platform. - Replace
<Zeotap Catalogue’s DB Name>with the attribute name in the Zeotap database.
Use Case 4: Normalise Subscription Status for Destination Compatibility
Let’s say you want to standardise subscription status values before sending them to the destination platform. Different data sources may store subscription statuses in varying formats, which can lead to inconsistencies in downstream systems. For example, if one source records the status as “subscribed” while another records it as “active”, the destination platform might not interpret them correctly. To ensure consistency, you can map all active subscription statuses to “true” and inactive ones like “unsubscribed” to “false”. To achieve this, use the following directive in the Custom Enricher:set-column custom_<Custom Destination Field Name> (<Zeotap Catalogue’s DB Name>==null ? null : (string:equalsIgnoreCase(<Zeotap Catalogue’s DB Name>, 'unsubscribed') ? 'false' : 'true'))
- Replace
<Custom Destination Field Name>with the corresponding field name in the destination platform. - Replace
<Zeotap Catalogue’s DB Name>with the attribute name in the Zeotap database.
Using Custom Enricher in Destination Mapping
The custom enricher allows you to handle various use cases in a self-serve manner. You can transform data, derive new data points, and add data to the existing dataset. To use this feature, perform the following steps: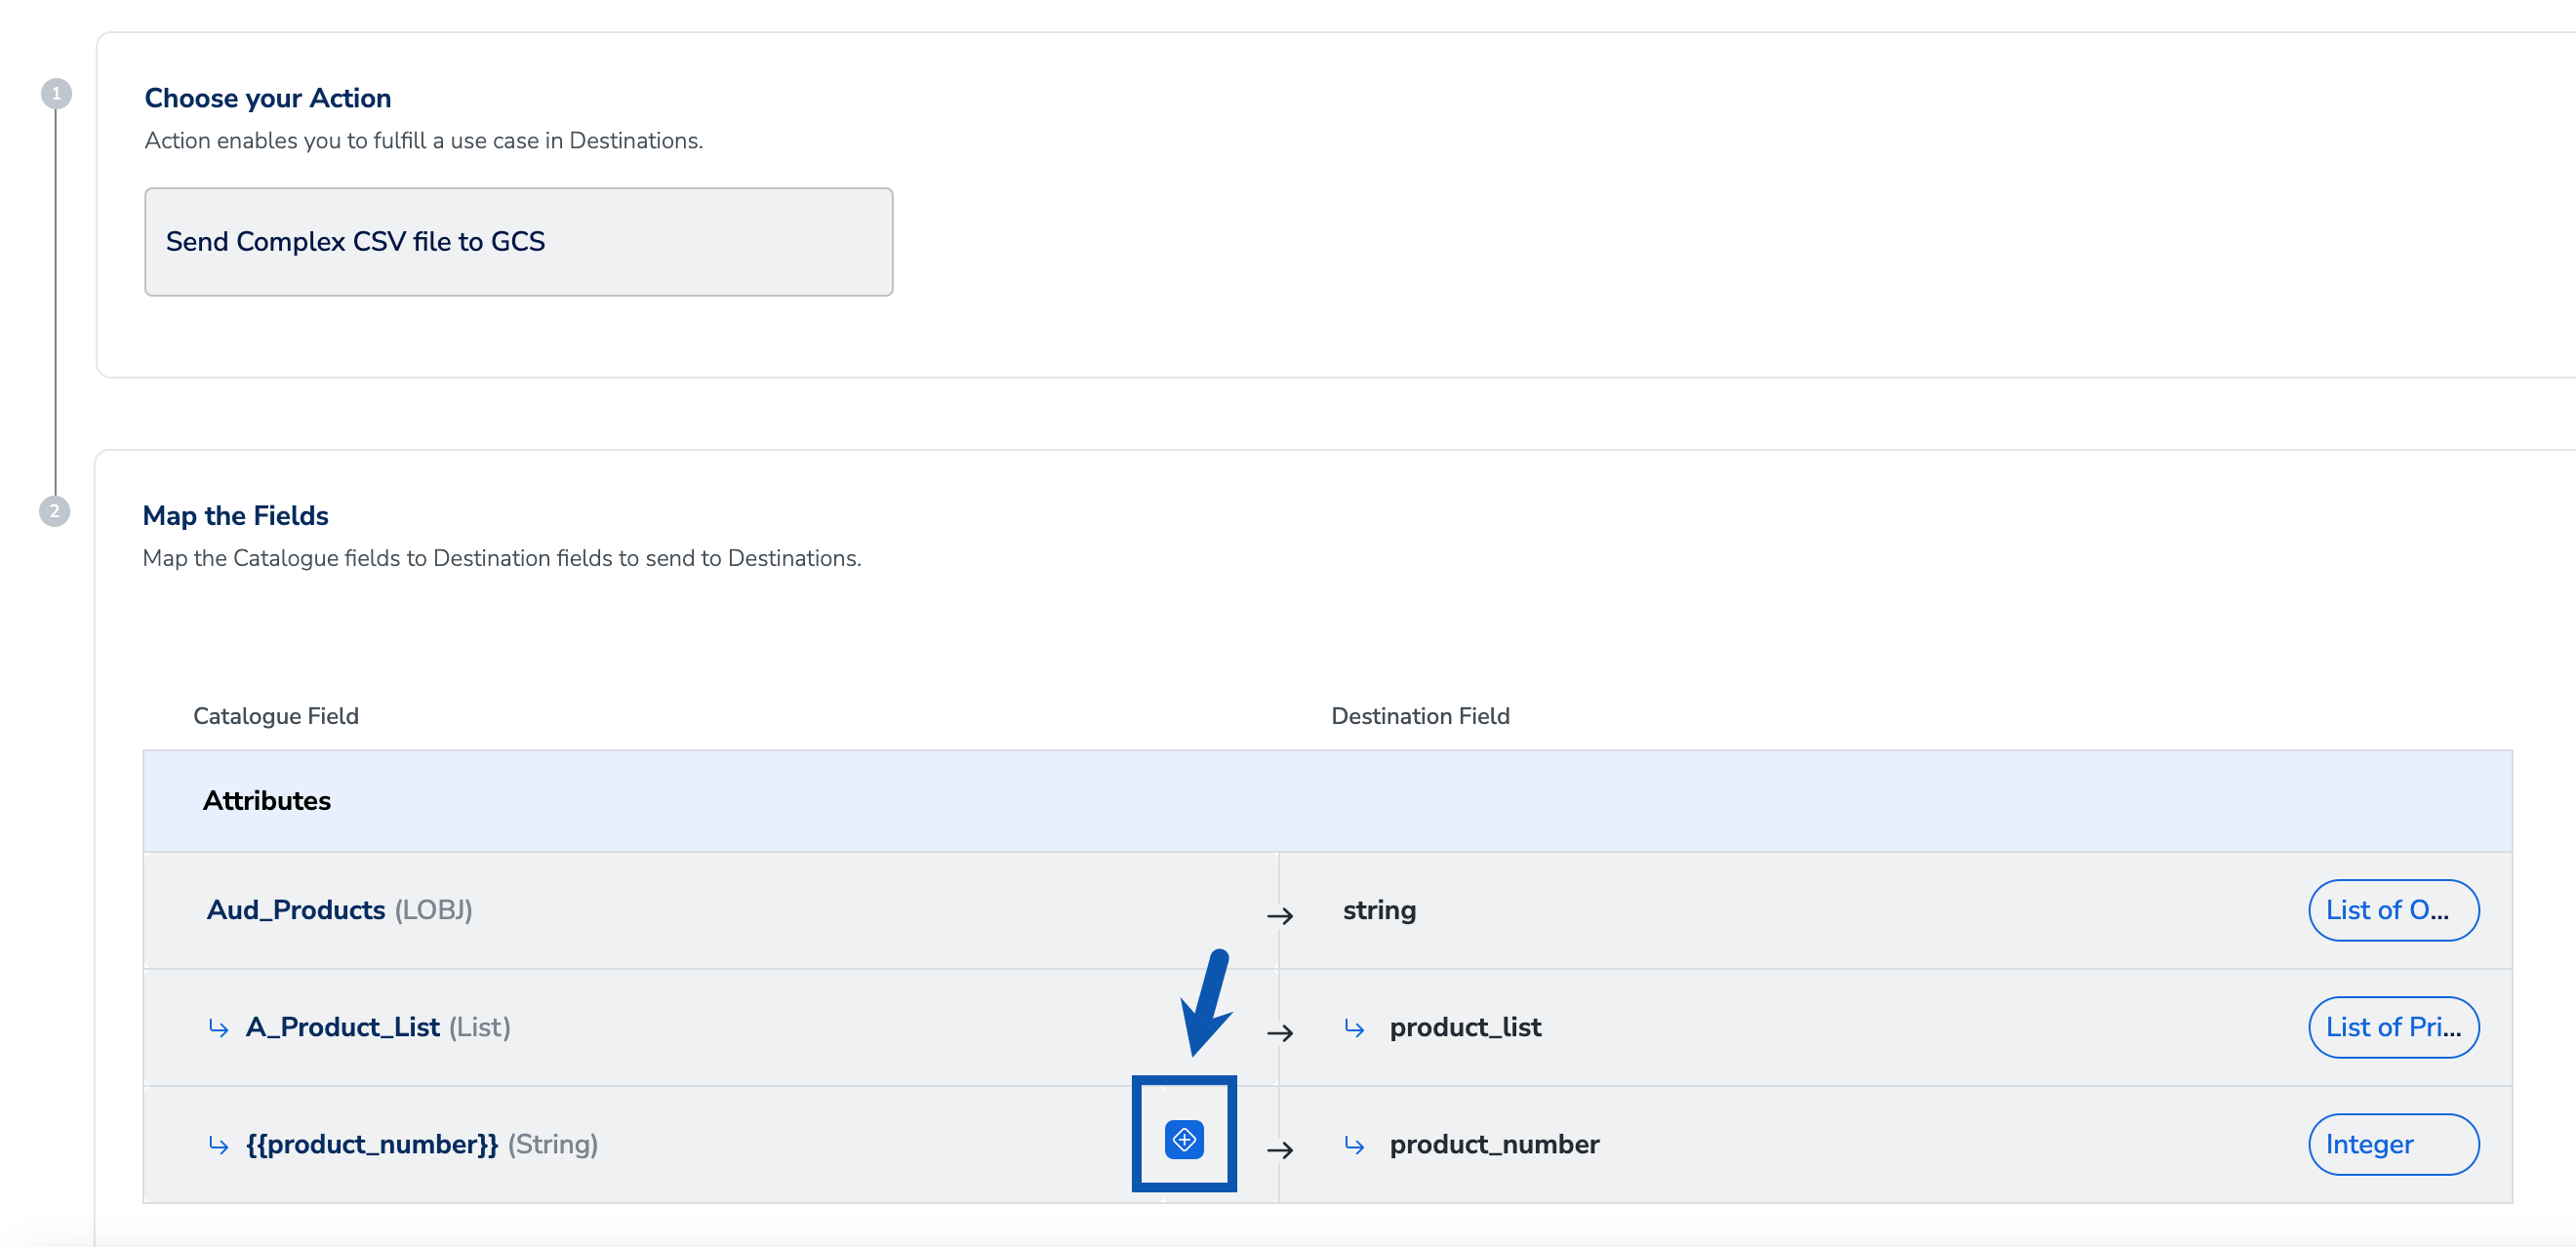
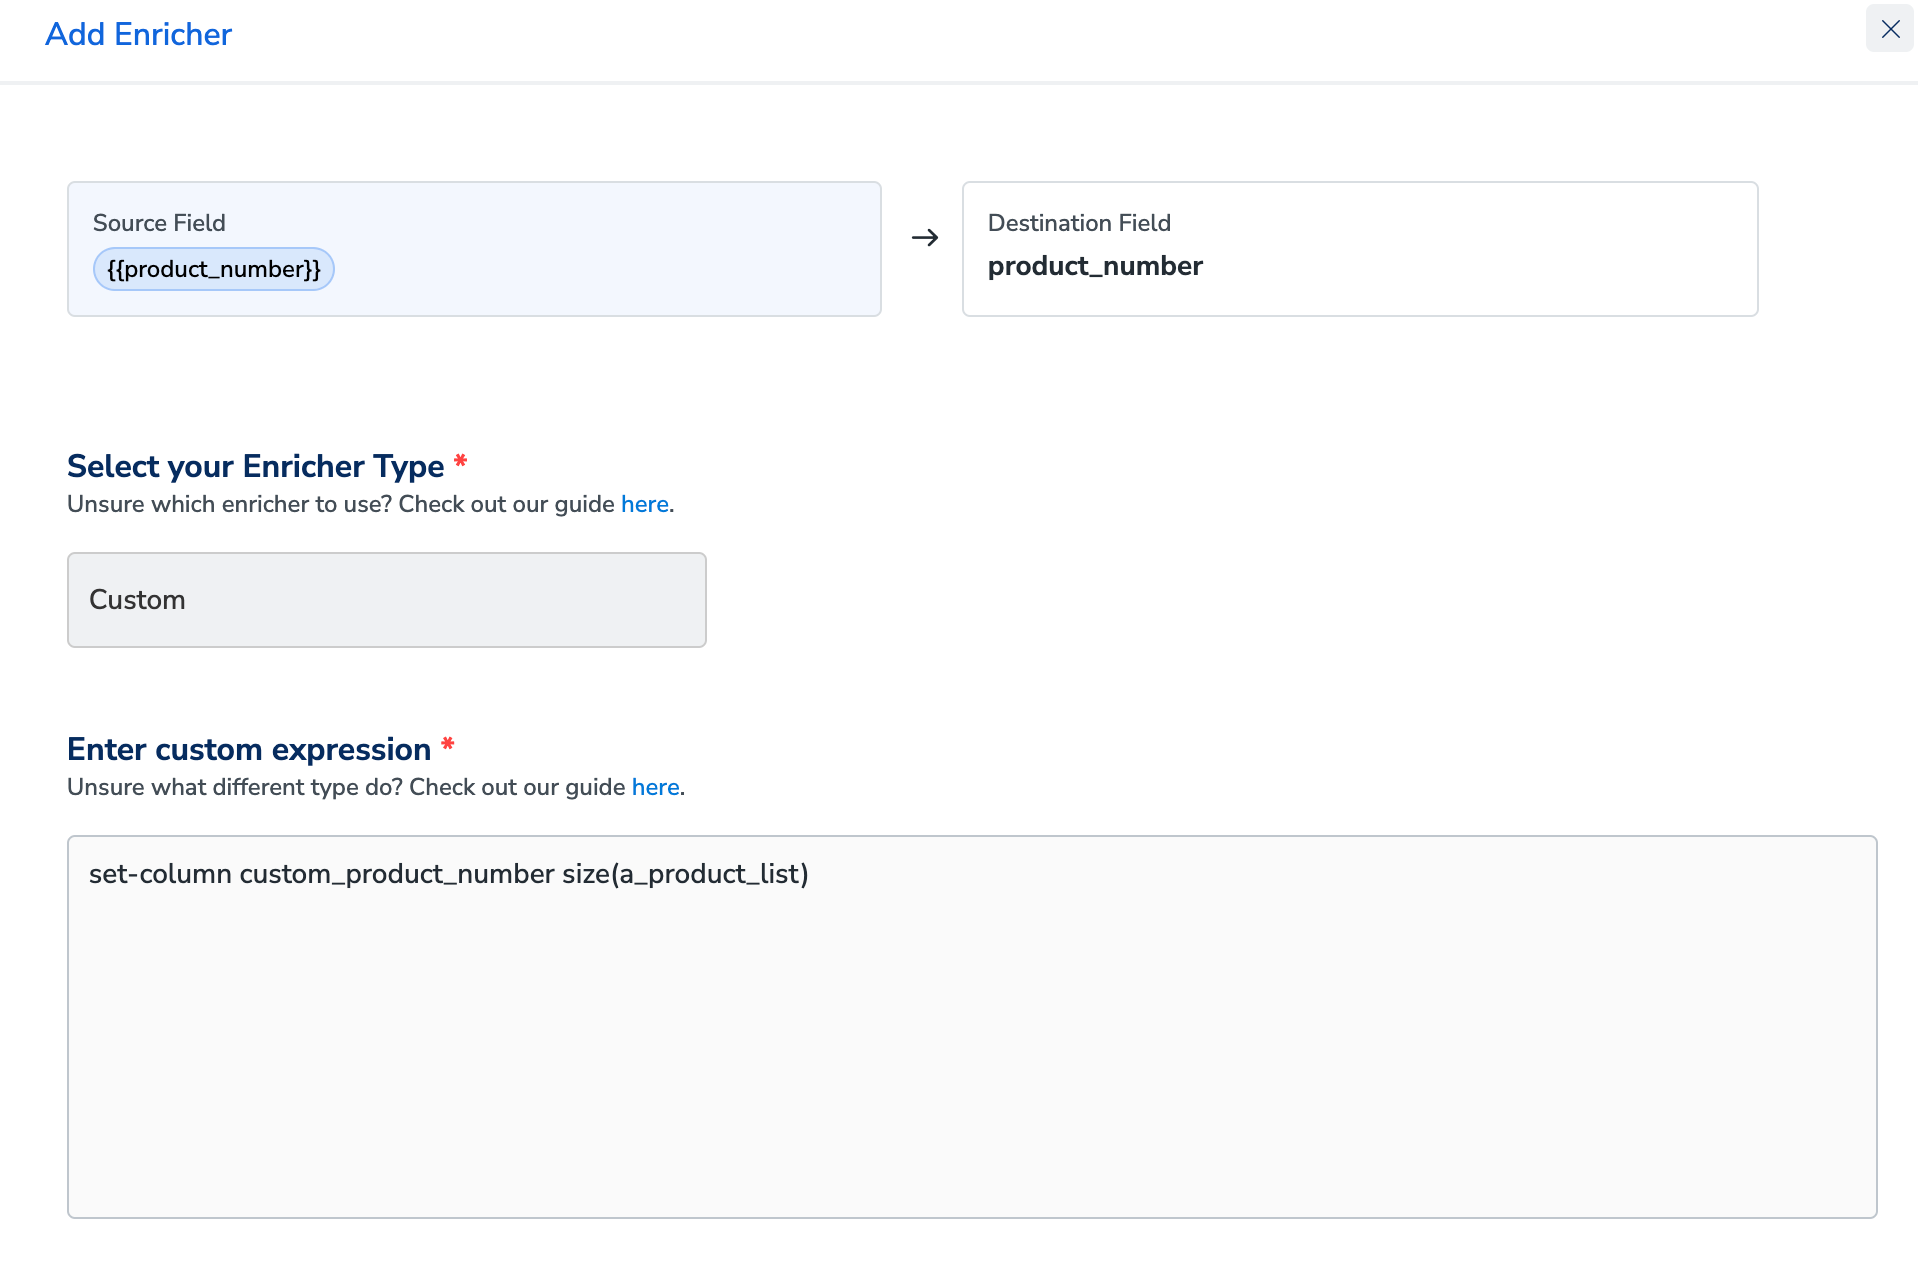
Enter a custom expression under Enter Custom Expression to transform a field, derive new data points, or add data to an existing dataset based on your use case.In the above example, to derive the number of purchased products, we’ve used the following custom expression:Here,
set columnis a standard function.In ``custom_product_number,product_number is the destination field name prefixed with custom_size(a_product_list)fetches the count of items in thea_product_listfield.
4. JavaScript Enricher
Use the JavaScript Enricher when the built-in enrichers and standard mapping settings can’t express the transformation you need — for example, when you must reshape or filter a list of objects before sending it to a destination. You write a JavaScript function namedtx that receives the selected Catalogue field(s), and Zeotap CDP sends whatever the function returns to the destination field.
Use Case: Send Only Specific Objects from a List of Objects
Let’s say a Catalogue field holds a list of objects — for example, a product replenishment list, where each object has aproduct_id and a replenishment_date. You want to send only the IDs of products due for replenishment in the last 30 days, as a single value.
Standard destination filter and mapping settings can’t do this: they filter on a field’s value, not on the individual objects inside a list of objects. In addition, some destinations — such as Emarsys — don’t accept a list of objects at all. The JavaScript Enricher solves both problems: it iterates the list, keeps only the objects that match your condition, and returns a single, destination-friendly value.
Input — the list of objects passed to the function (replenishment_model):
Using the JavaScript Enricher in Destination Mapping
On the Map the Fields screen, click the Add Enricher icon next to the Catalogue field that holds your list of objects.
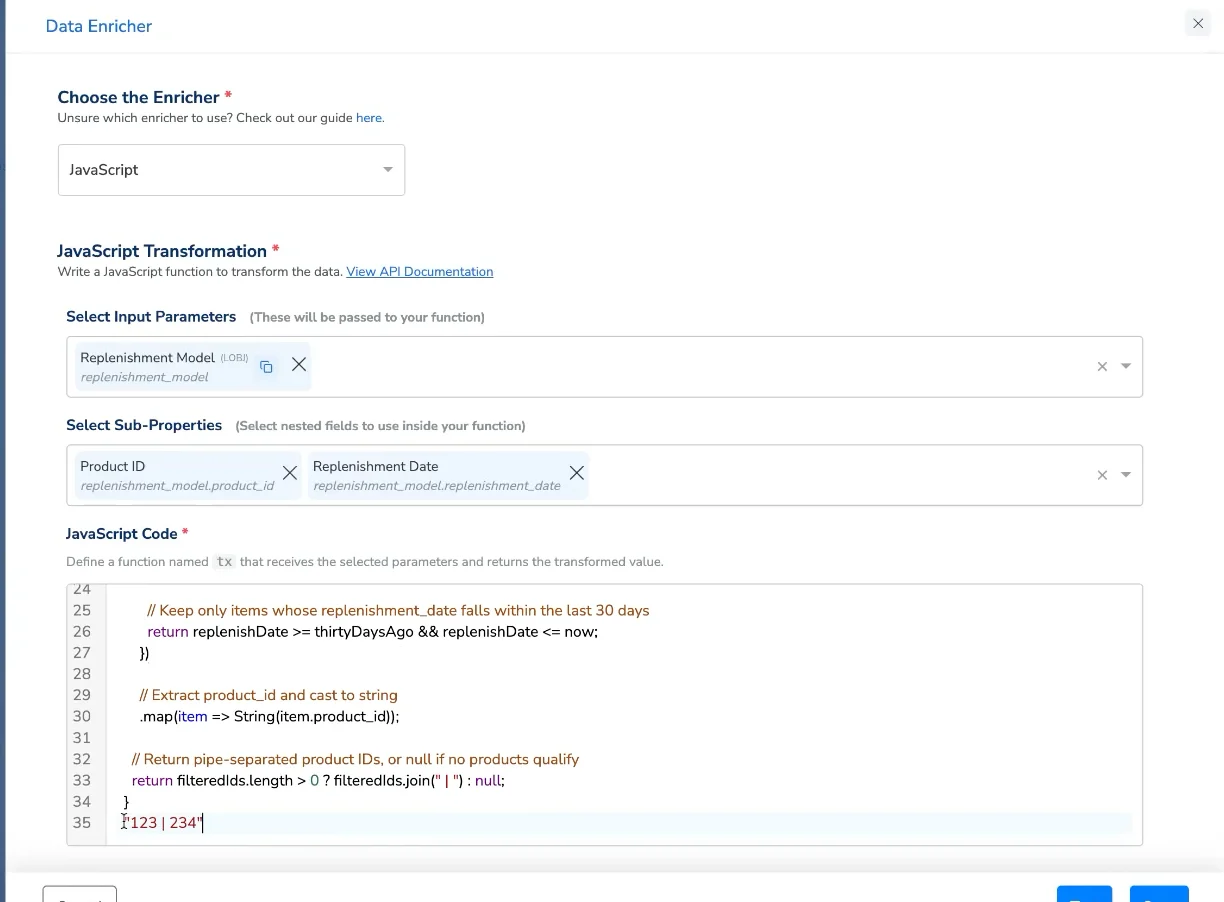
Under Select Input Parameters, choose the field(s) passed to your function. In this example, select the list-of-objects field (
replenishment_model).Under Select Sub-Properties, choose the nested fields you reference inside the function — here,
product_id and replenishment_date.In JavaScript Code, define a function named
tx that receives the selected parameters and returns the transformed value:The function must be named
tx and return a single value (string, number, boolean, or null). Returning null omits the field for that record. Building a JavaScript transformation requires familiarity with JavaScript; for complex logic, reach out to our support team for guidance.FAQs
How can I send only specific objects from a list of objects to a destination (for example, Emarsys)?
How can I send only specific objects from a list of objects to a destination (for example, Emarsys)?
Destination filter and mapping settings filter on a field’s value, not on the individual objects inside a list of objects — and some destinations, such as Emarsys, don’t accept a list of objects at all. Use the JavaScript Enricher to iterate the list, keep only the objects that match your condition, and return a single destination-friendly value (for example, a pipe-separated list of product IDs).