Latest Version
1.3.8Integrate the iOS SDK
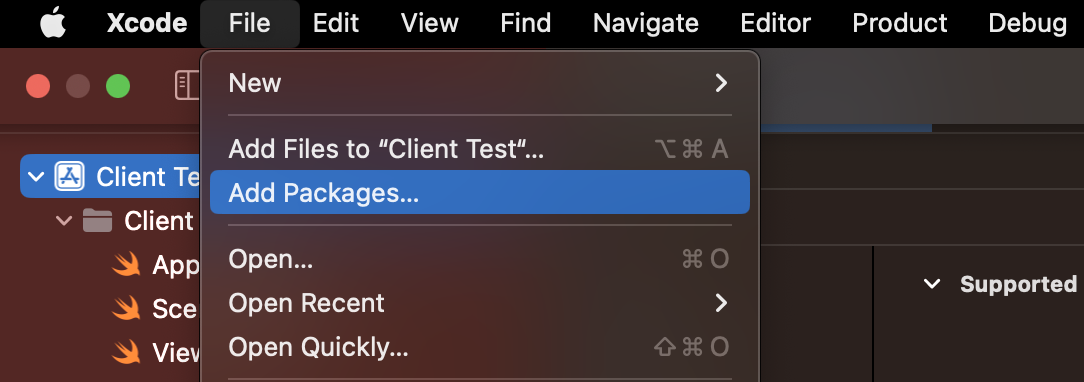
You can integrate the iOS SDK into your project in the following ways:- By an automated process using Swift Package Manager or CocoaPods
- By a manual process, which involves adding the dependencies yourself
Integration Using Swift Package Manager
To integrate theZeotapCollect iOS SDK using Swift Package Manager, perform the following steps:
Note:The SDK version mentioned in the following steps is for reference purposes only. Ensure that you use the most recent version during the setup process.
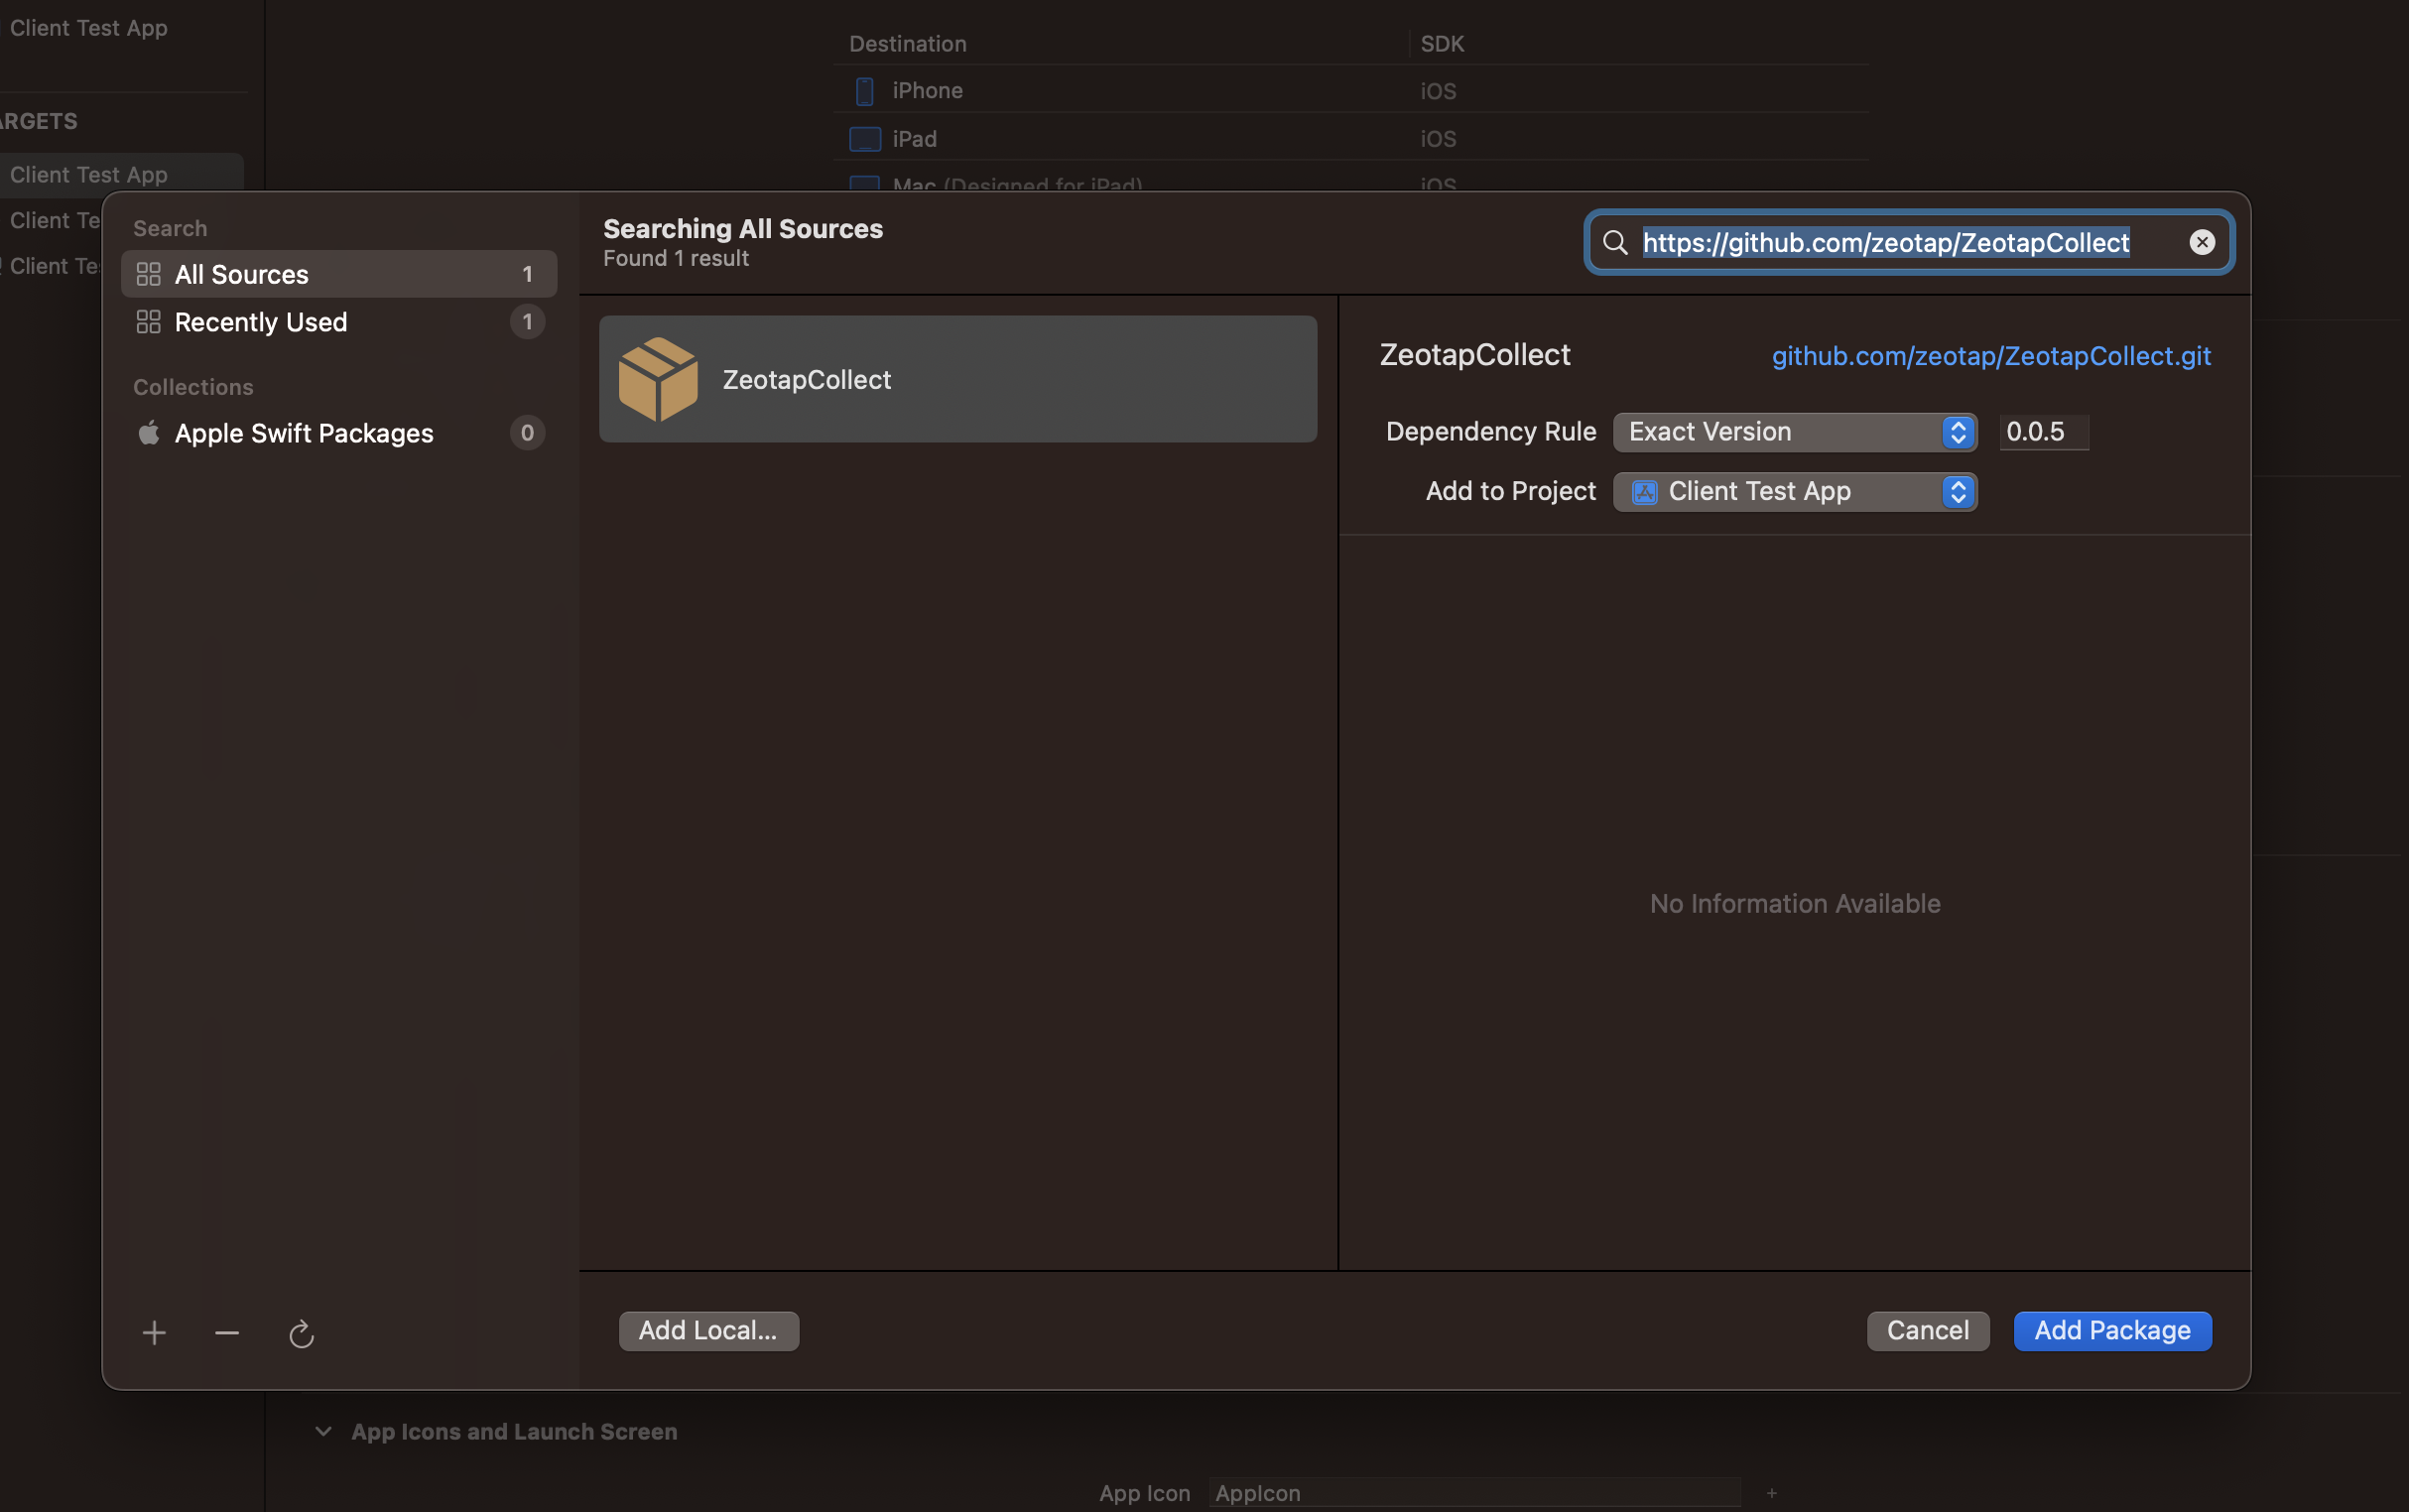
Search for https://github.com/zeotap/ZeotapCollect in the search bar.
Choose Exact Version as the Dependency Rule. The latest version of the SDK auto-populates. In the below image, the version is 0.0.5.
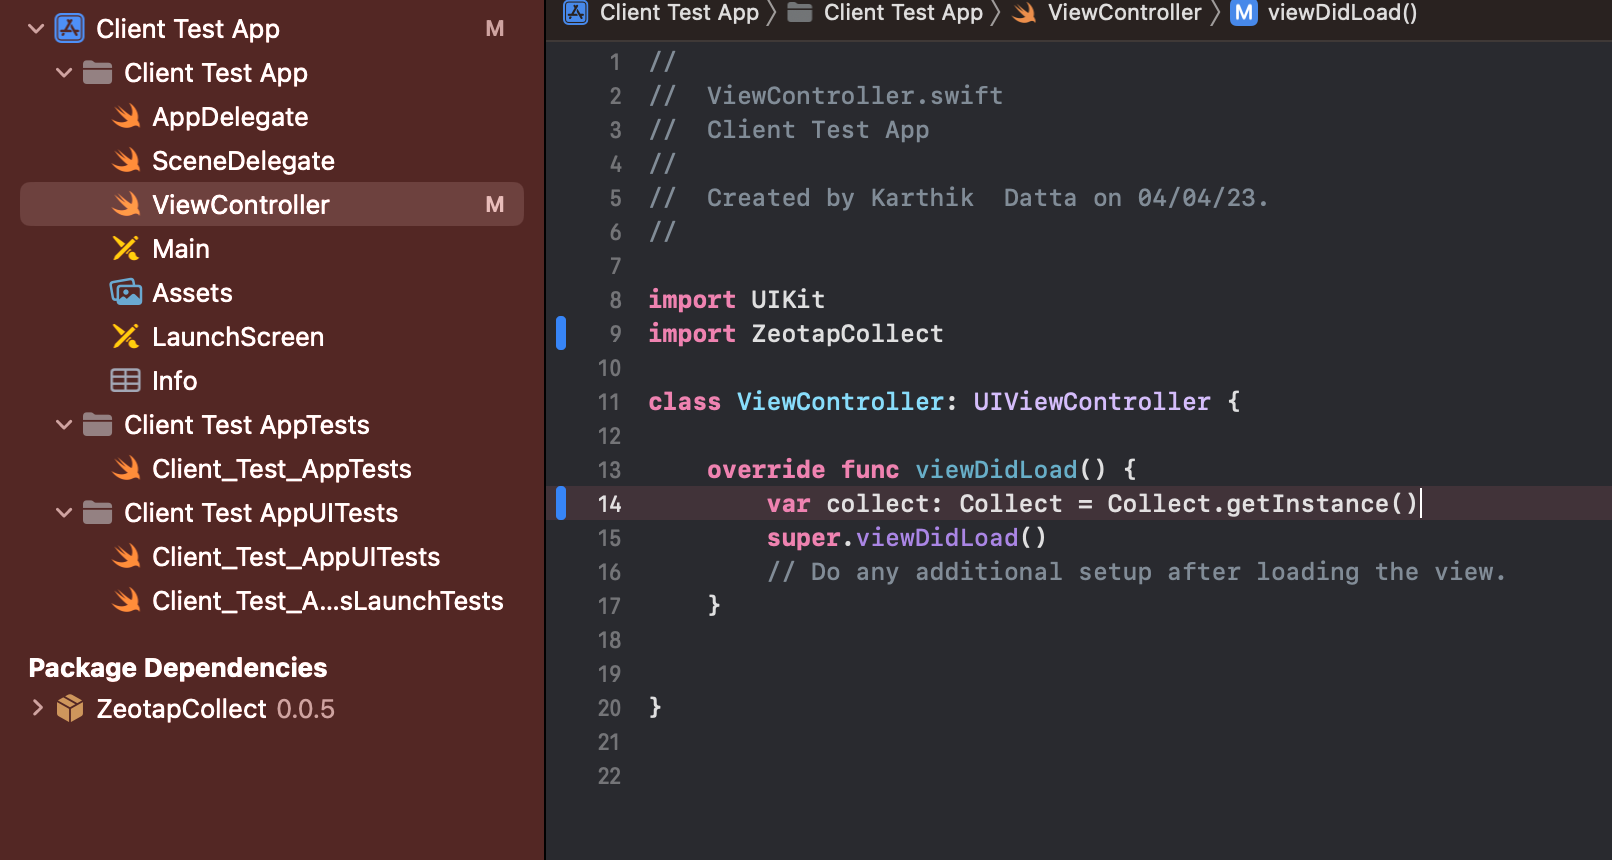
Once the dependencies are successfully identified and installed by the Swift Package Manager, 
ZeotapCollect appears under Package Dependencies.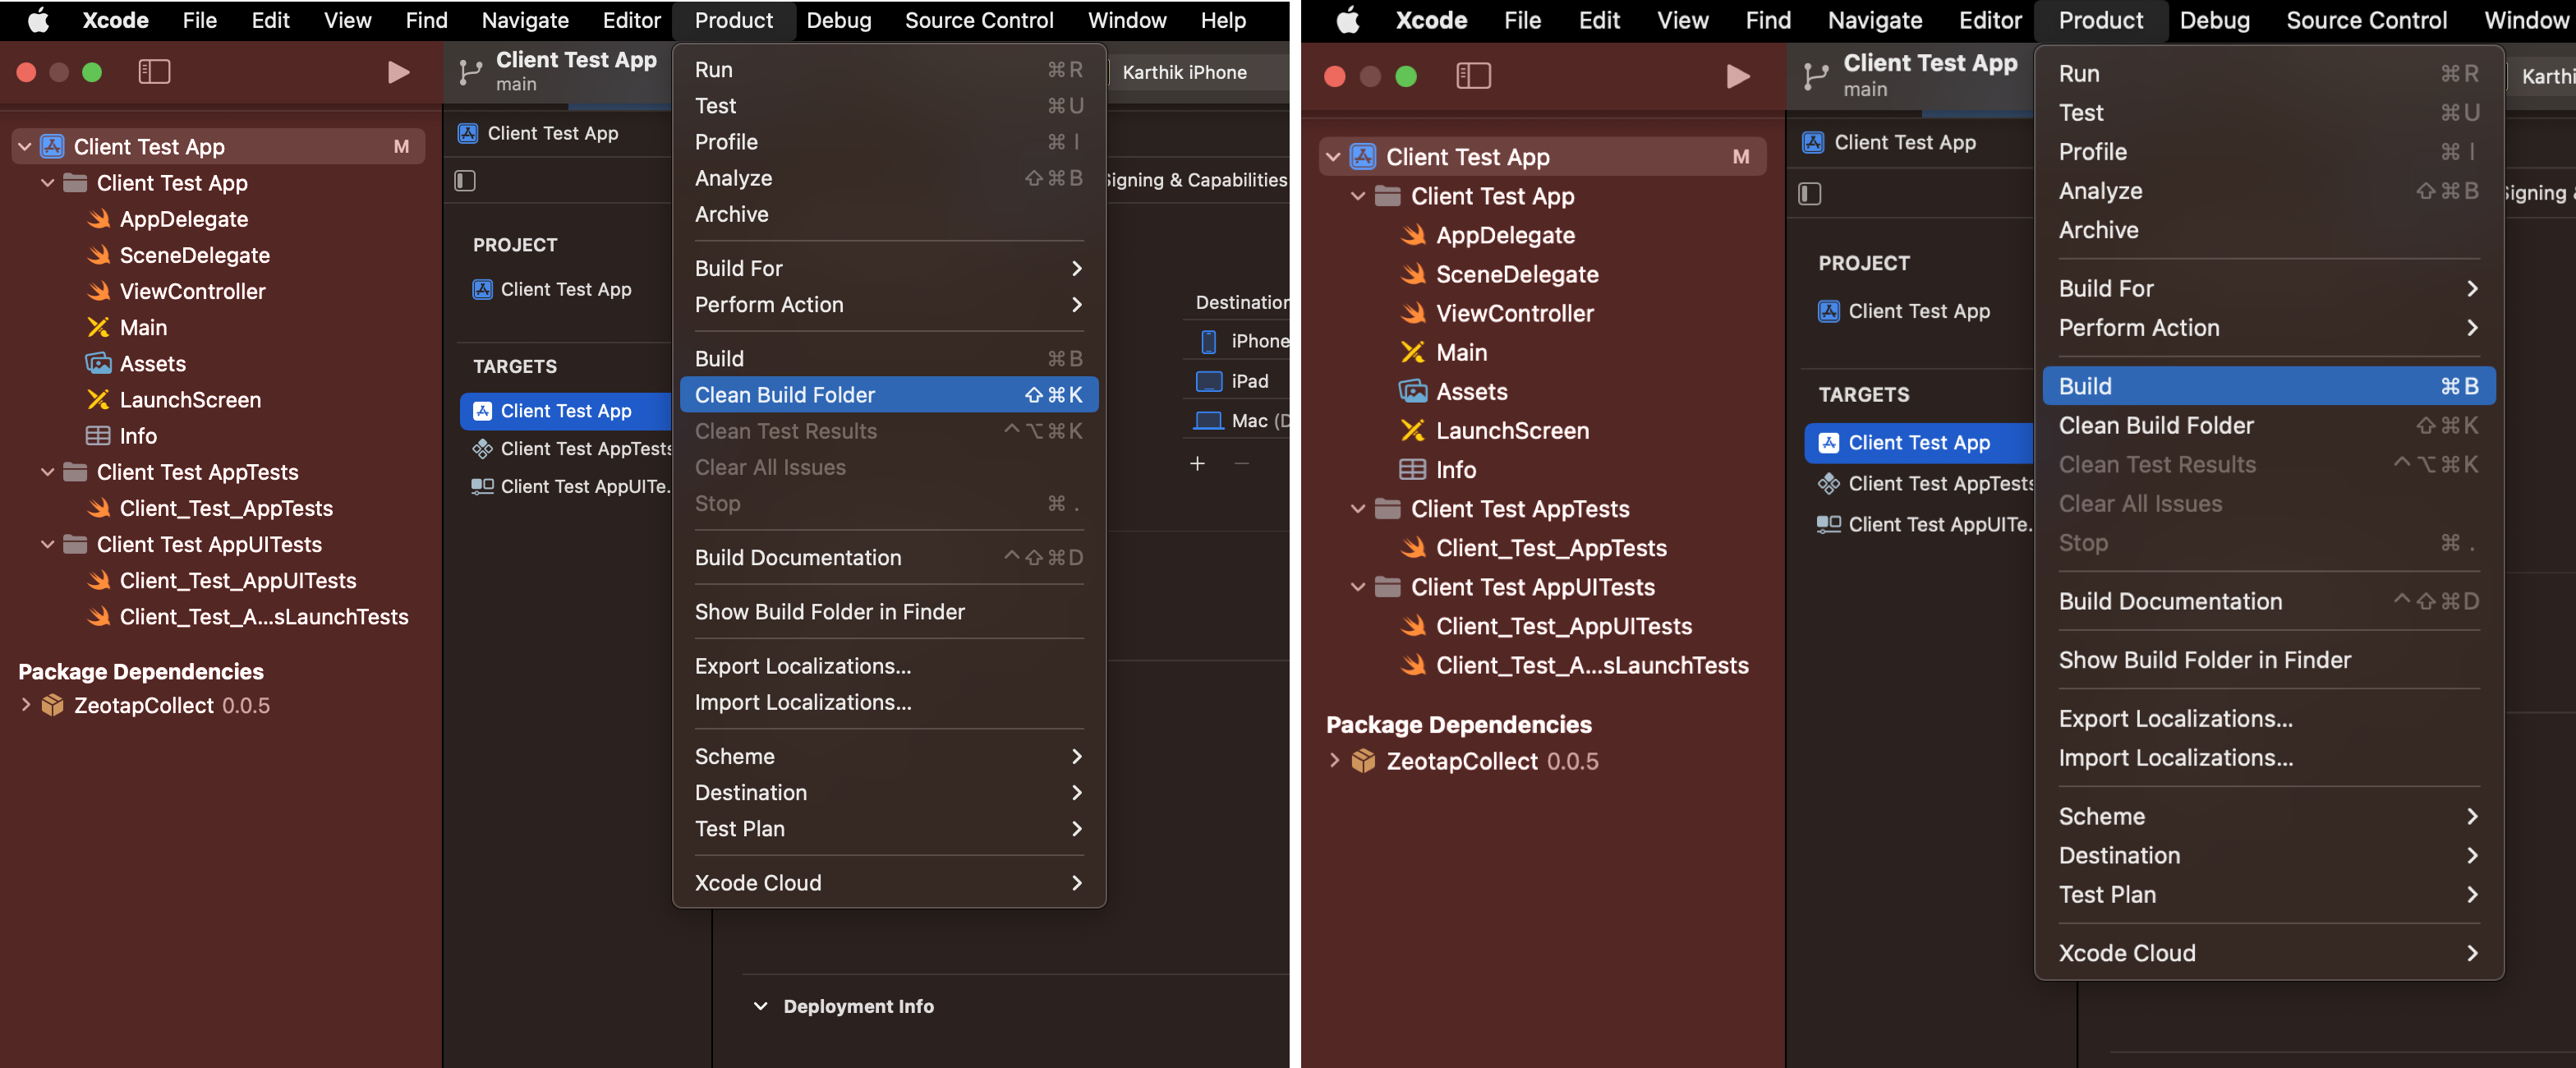
Integration Using CocoaPods
To ensure whether CocoaPods is installed in your system or not, follow the instructions below.- To check if CocoaPods is installed, run the command
pod --version. If CocoaPods is installed, you can see the version number displayed, as shown in the image below. - If CocoaPods is not installed, then you can add it to your project by following the instructions at https://guides.cocoapods.org/using/using-cocoapods.html.
Note:We recommend that you use
.xcworkspace instead of .xcodeproj when working with CocoaPods.ZeotapCollect iOS SDK:
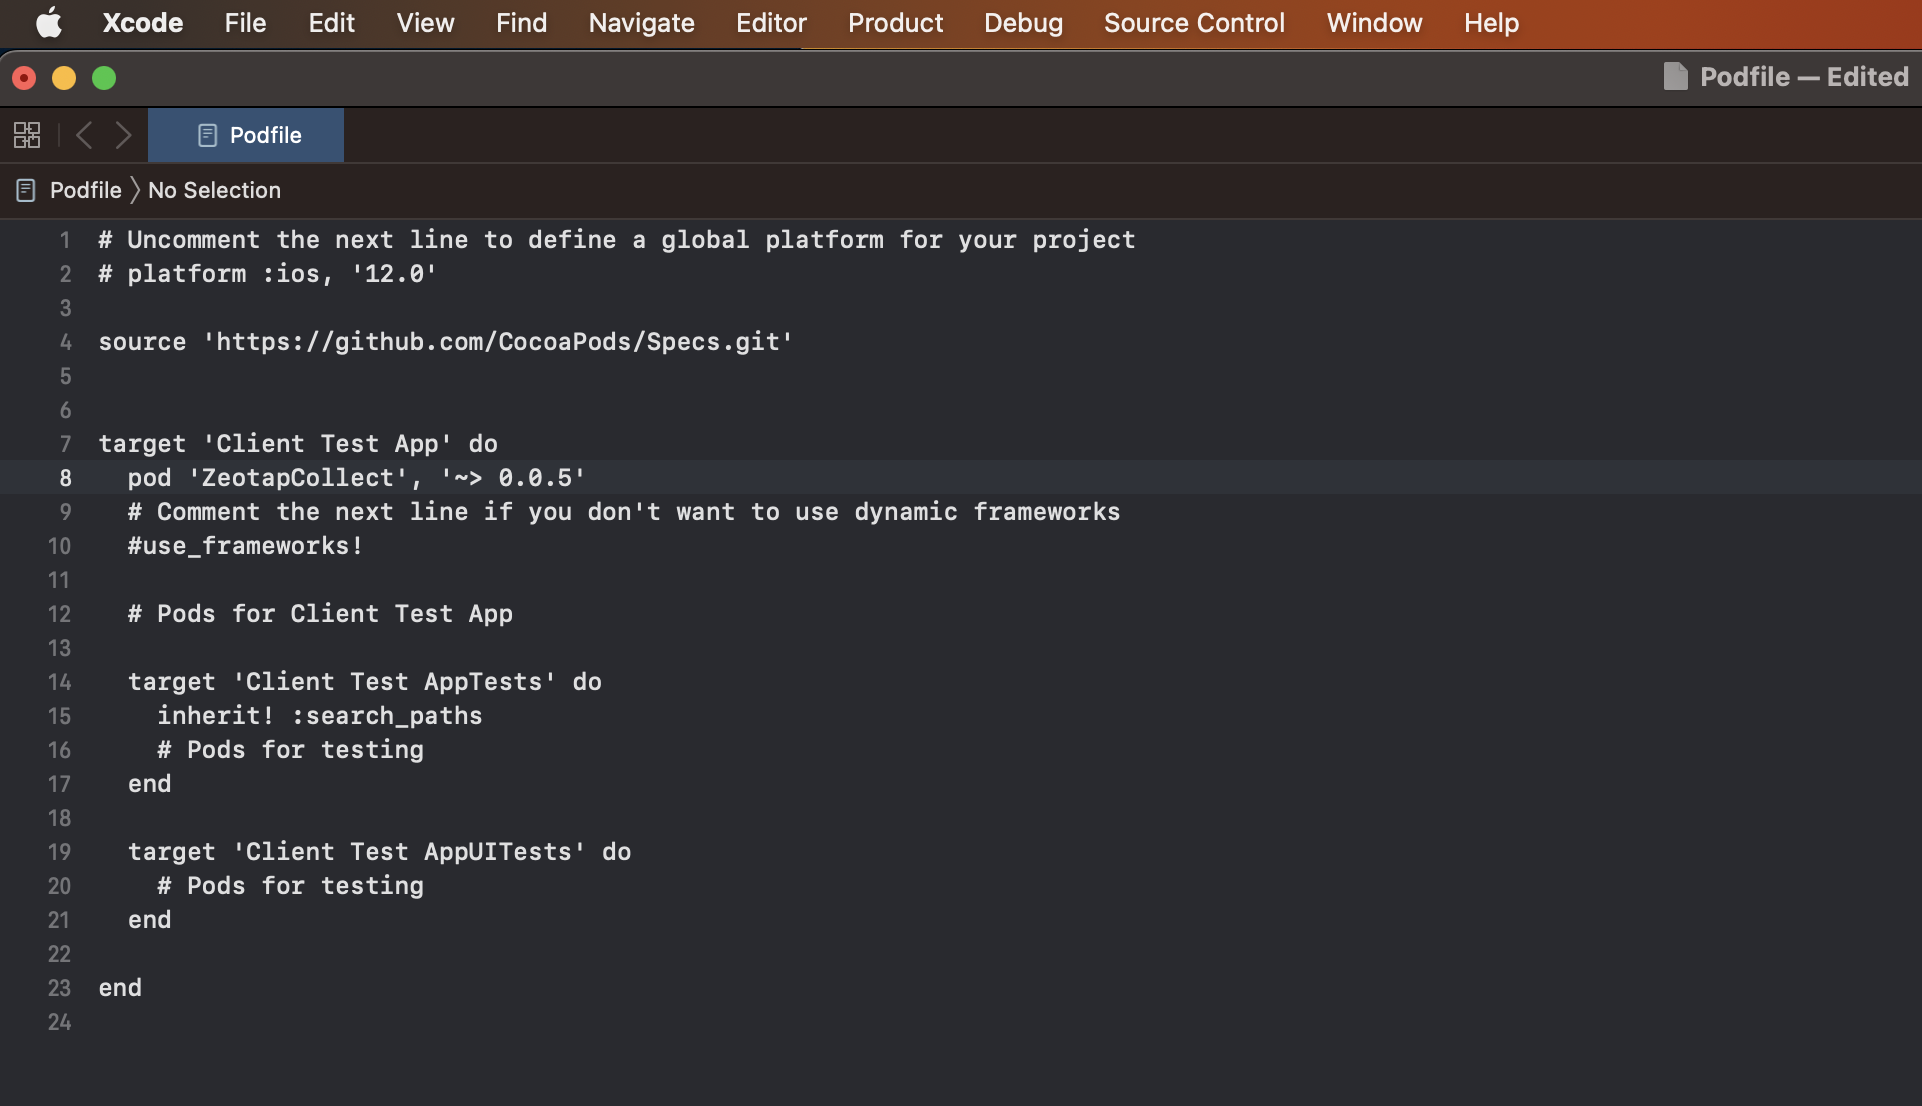
Save the
Podfile and run pod install. This identifies and installs the dependencies.Note:There can be multiple reasons for unresolved dependencies. However, you can attempt to resolve the issue by following the methods listed below:
-
Execute the following commands in the given order:
- pod cache clean —all
- pod update
- pod install
- In case you encounter any source-related problems, include the source “https://github.com/CocoaPods/Specs.git” in your Podfile.

Integration by Manual Process
Note:To download the iOS SDK for manual installation, click here.
To launch the project settings, click the project in the navigation bar and select as follows: PROJECT → TARGET → General → scroll and find Frameworks, Libraries and Embedded Content.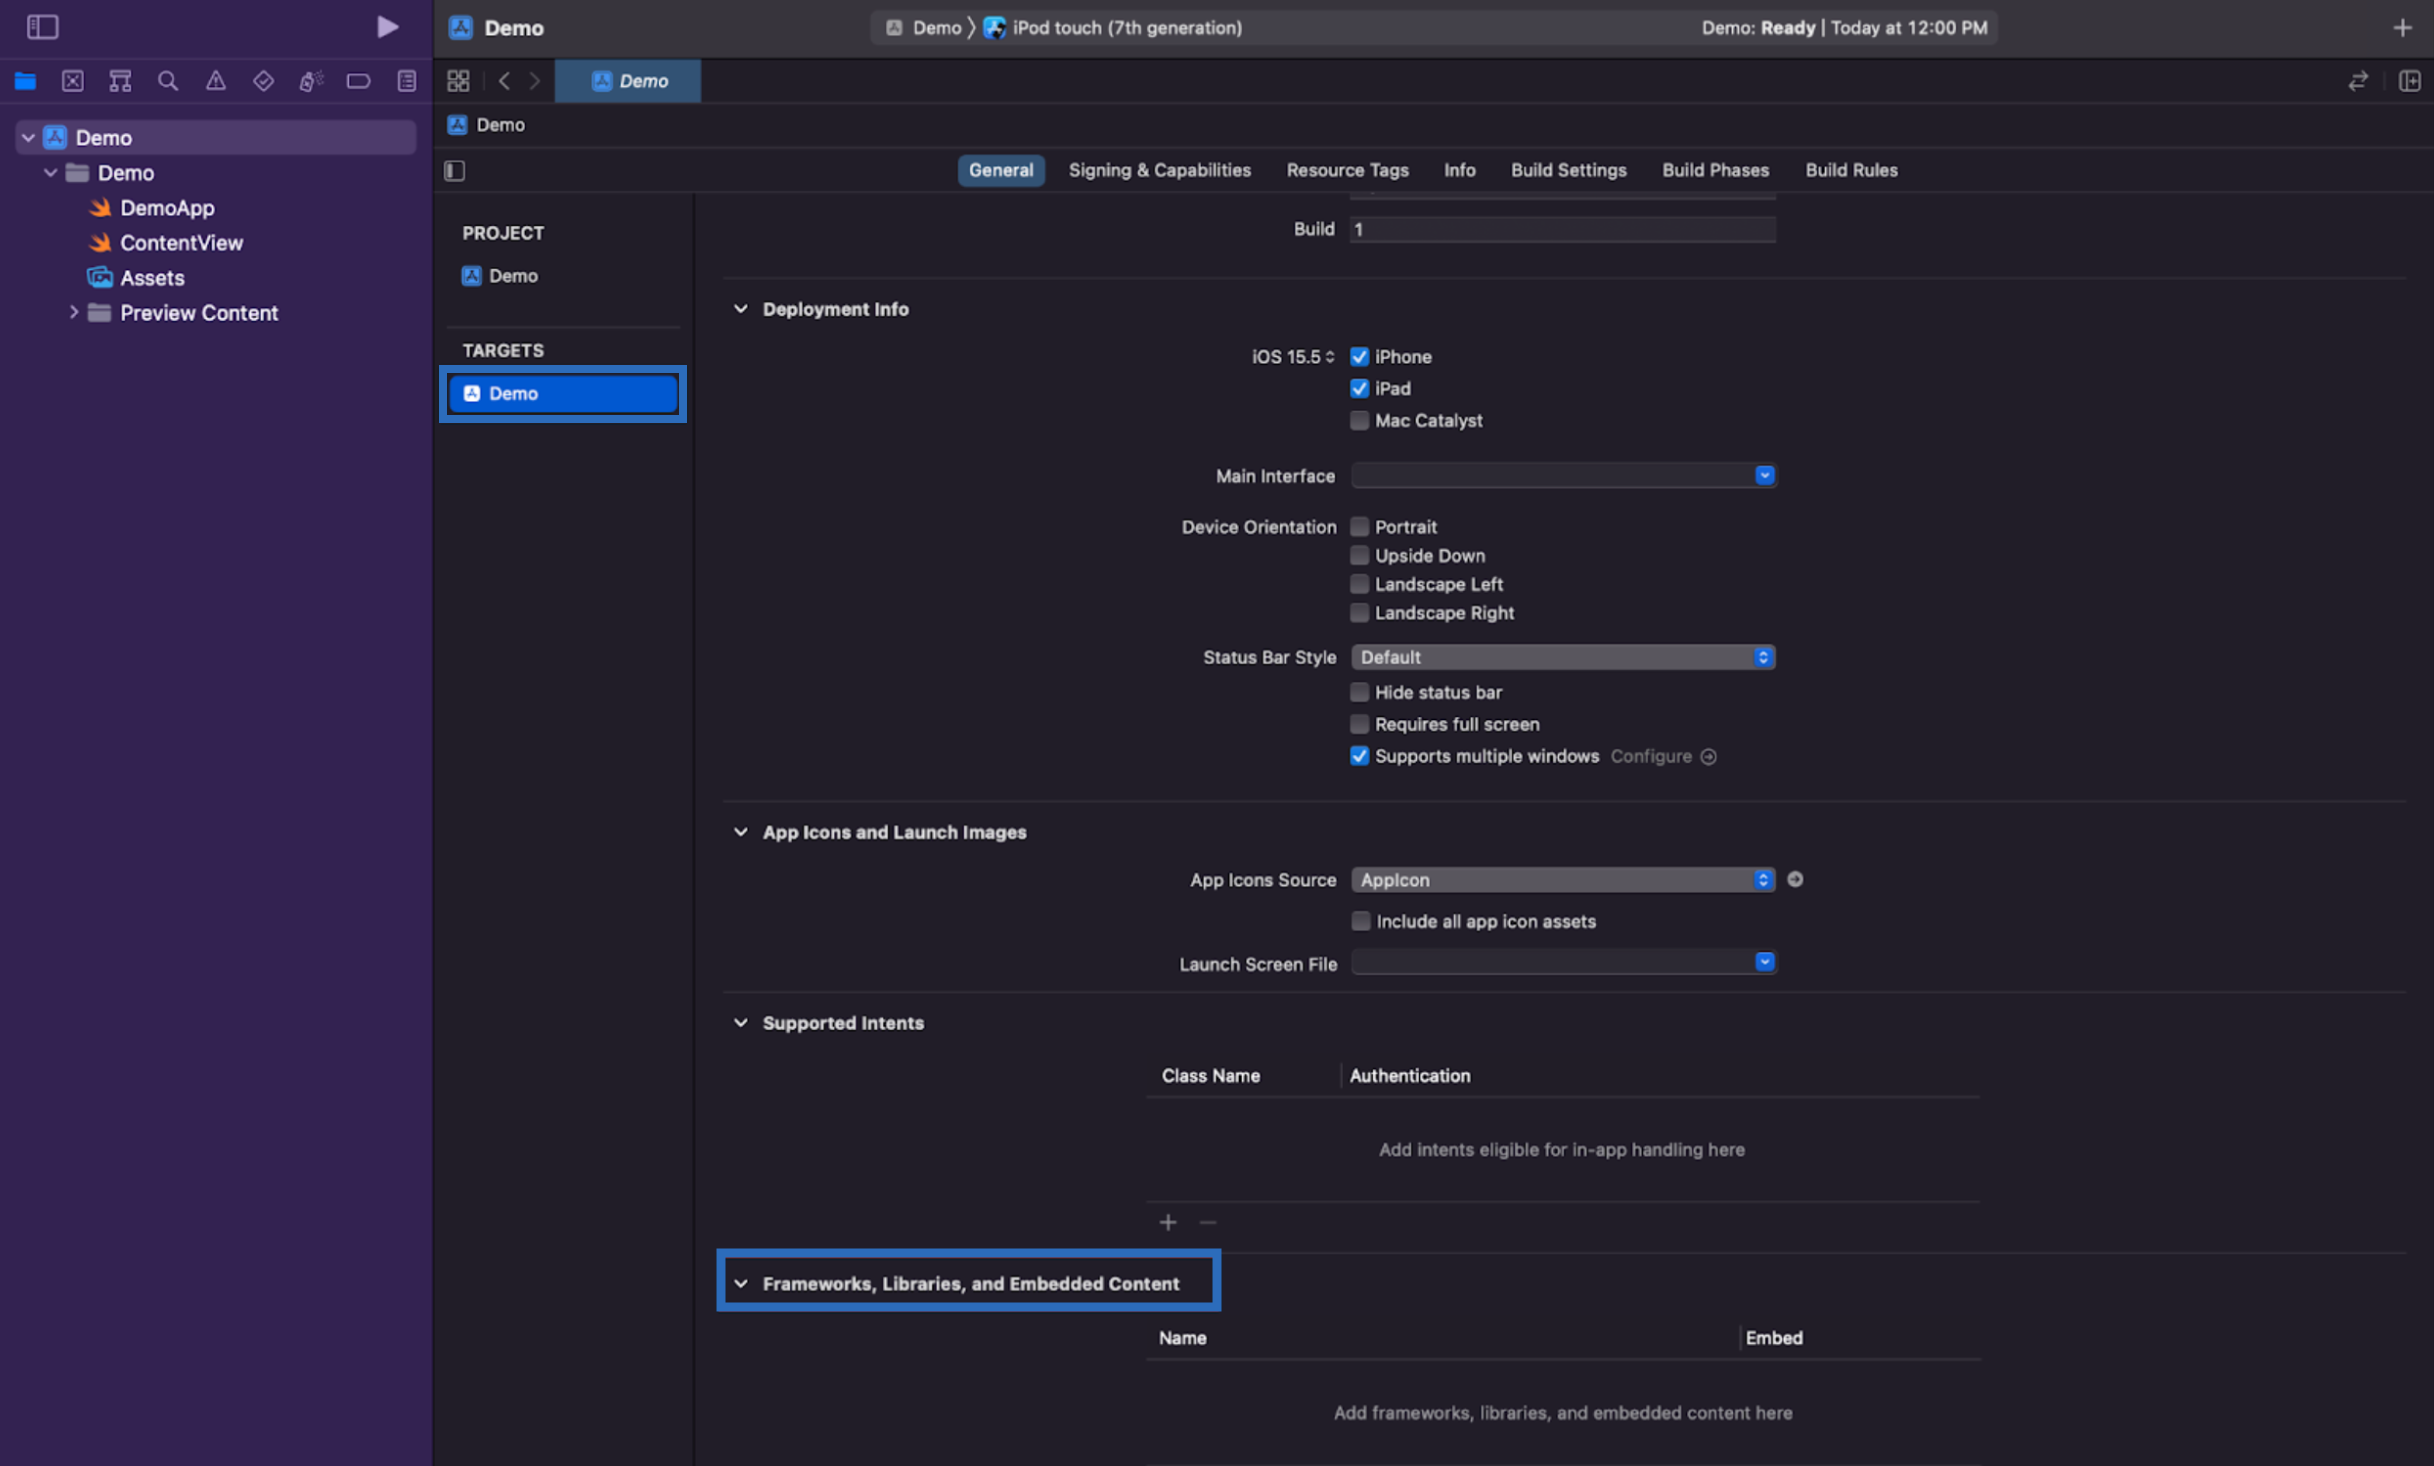
Under Frameworks, Libraries and Embedded Content, click +. In the pop-up that appears, click the Add Others… drop-down menu and then click Add Files…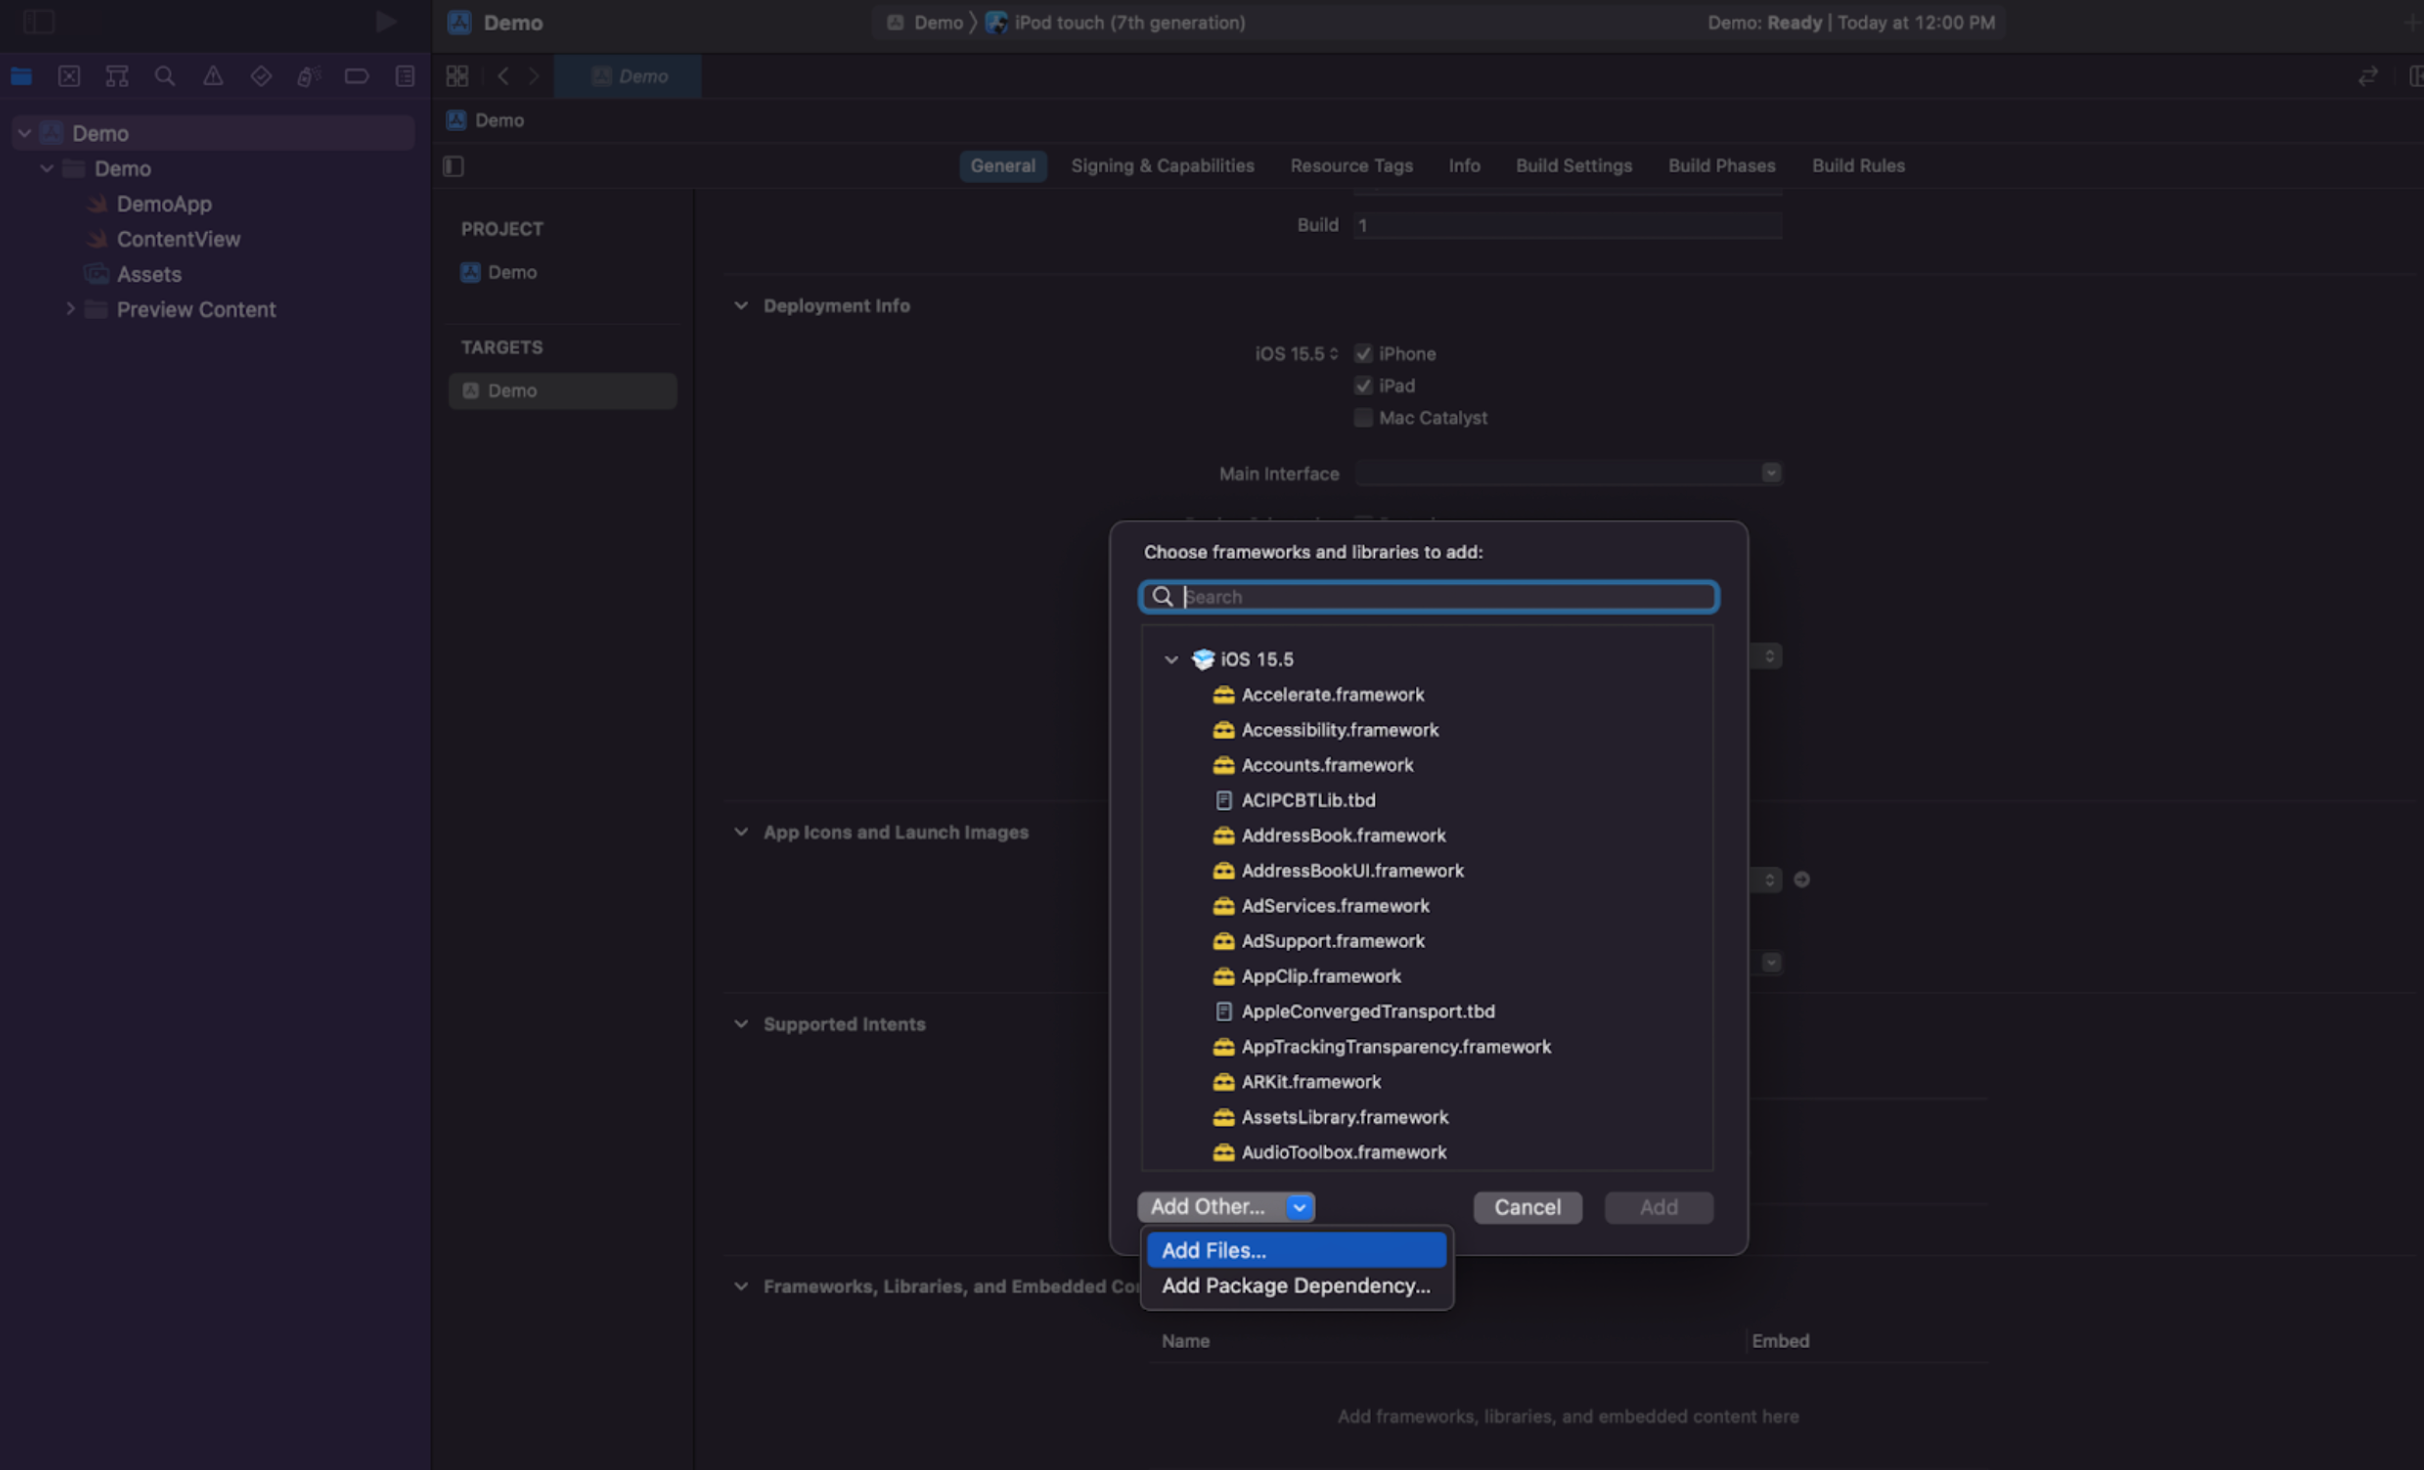
A folder appears where you can add 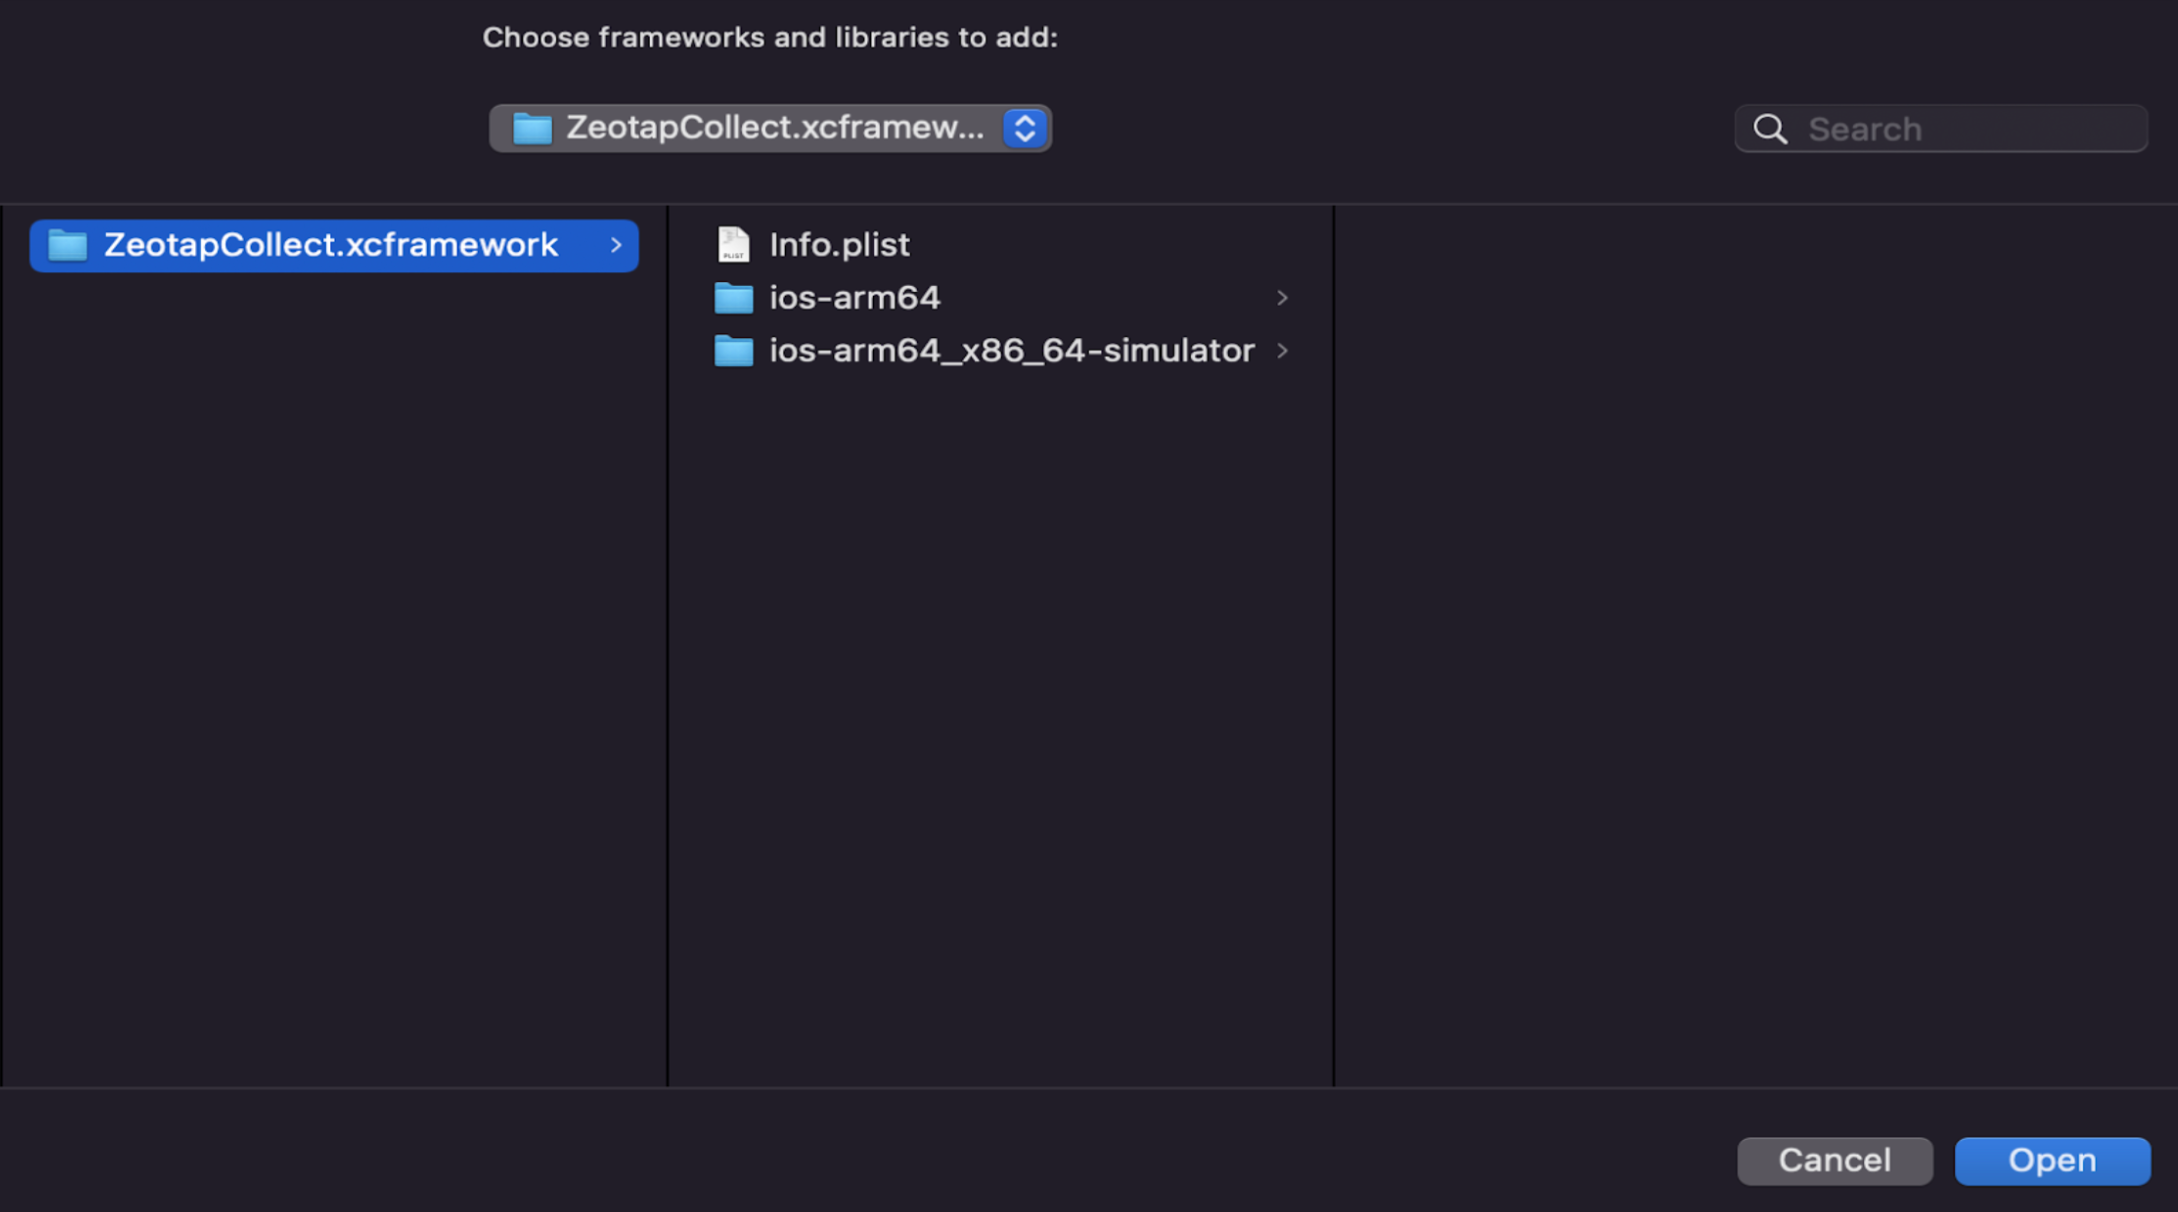
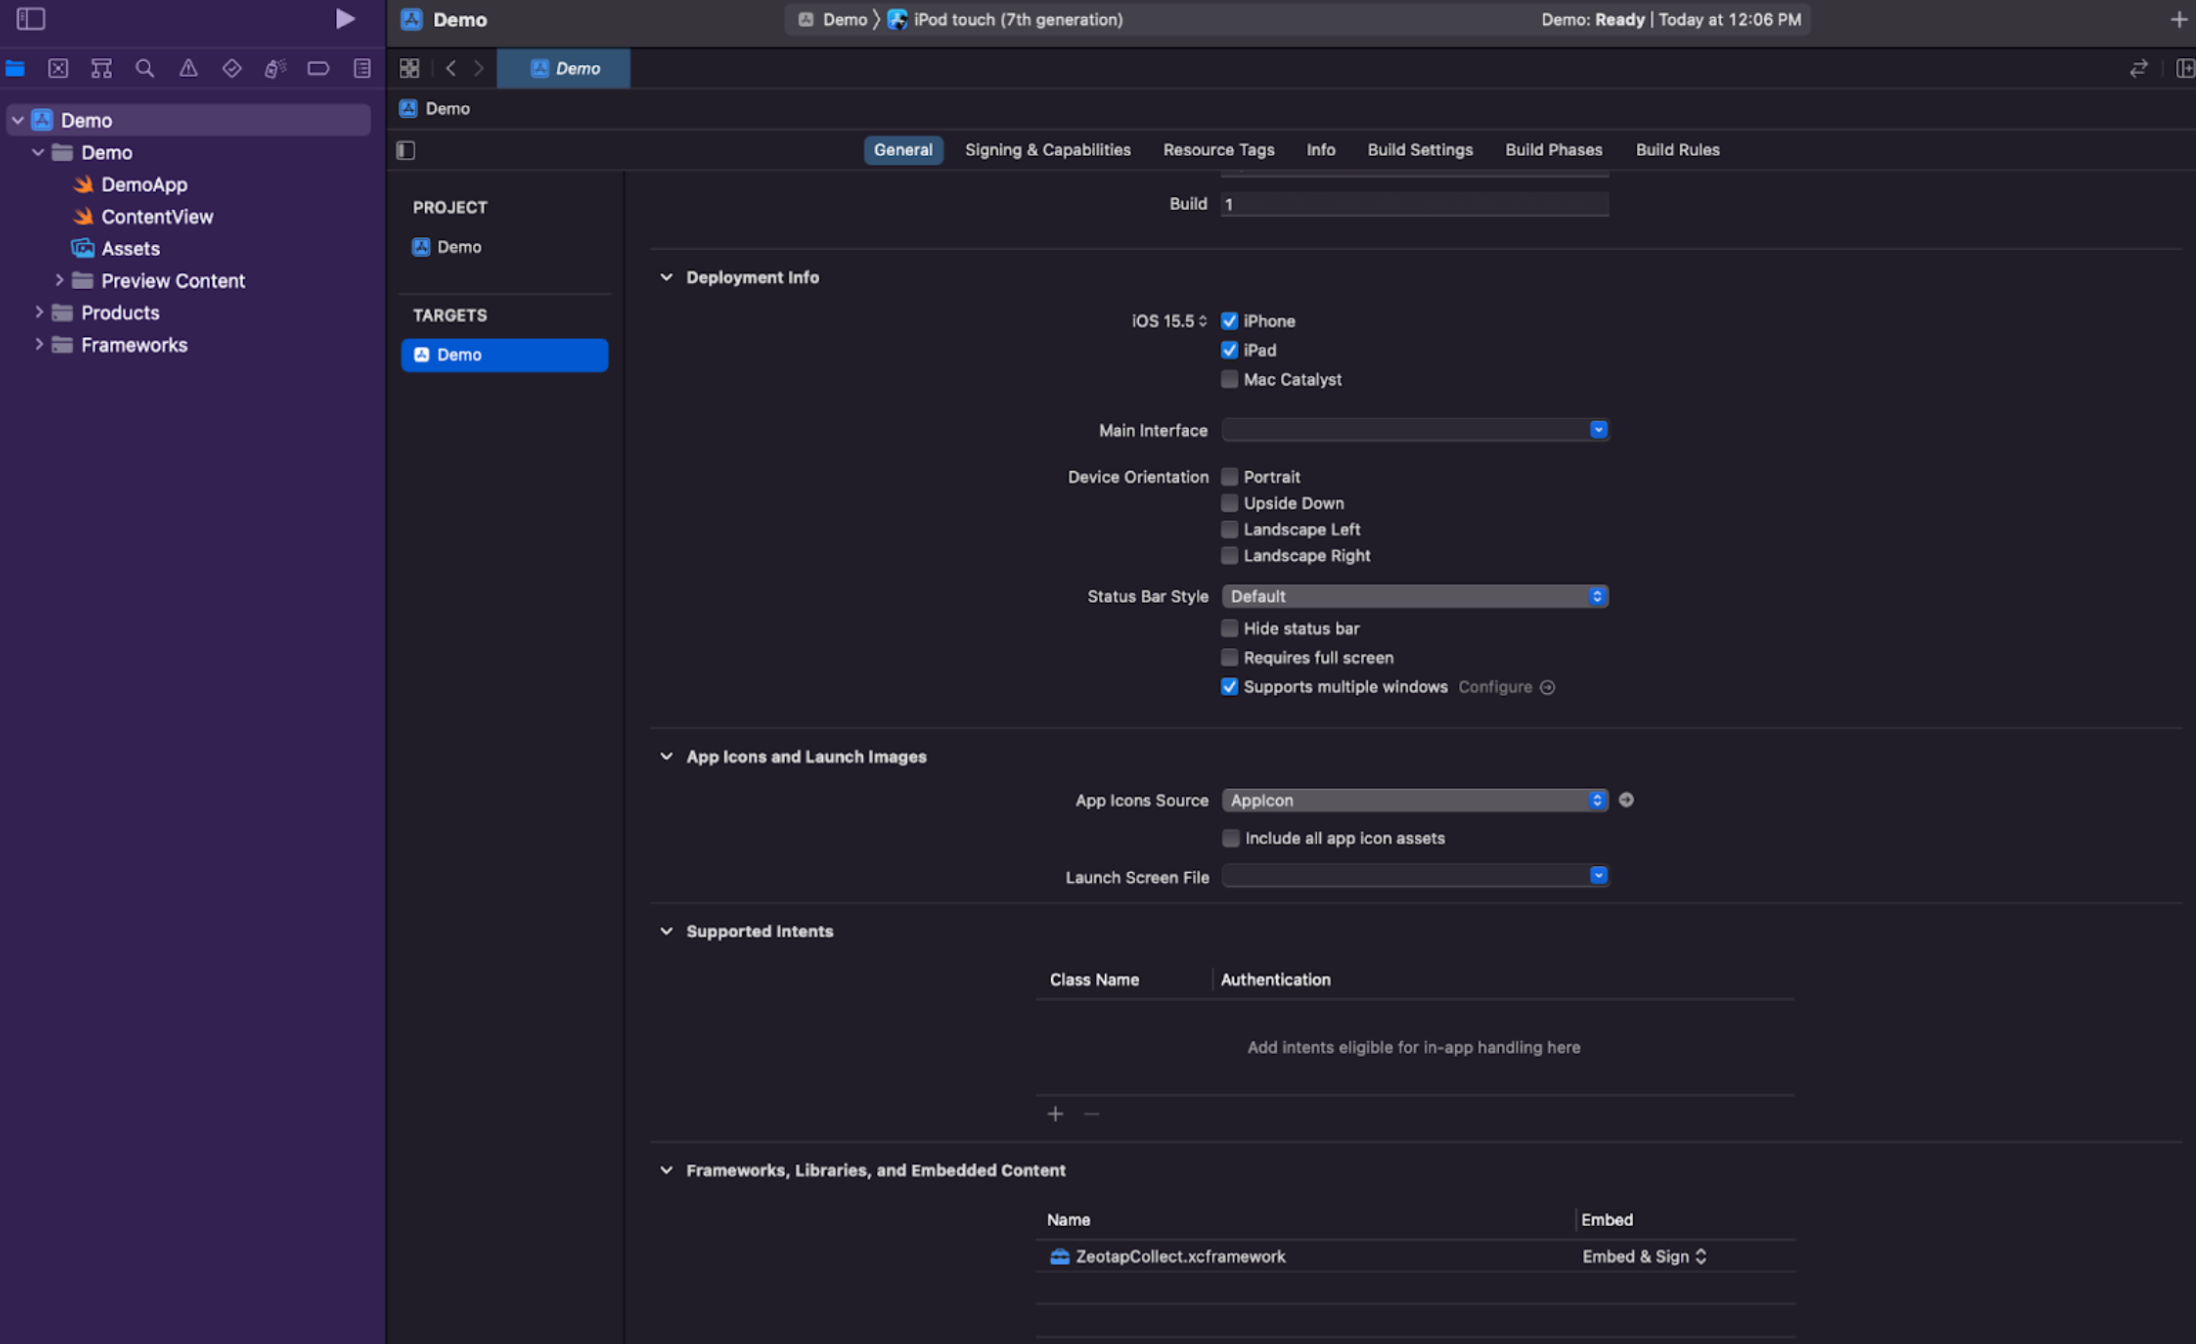
xcframework to the project.a. Select the ZeotapCollect.xcframework from downloads to integrate the Zeotap SDK.b. As you click to open, xcframework gets added to the project under Frameworks, Libraries and Embedded Content.
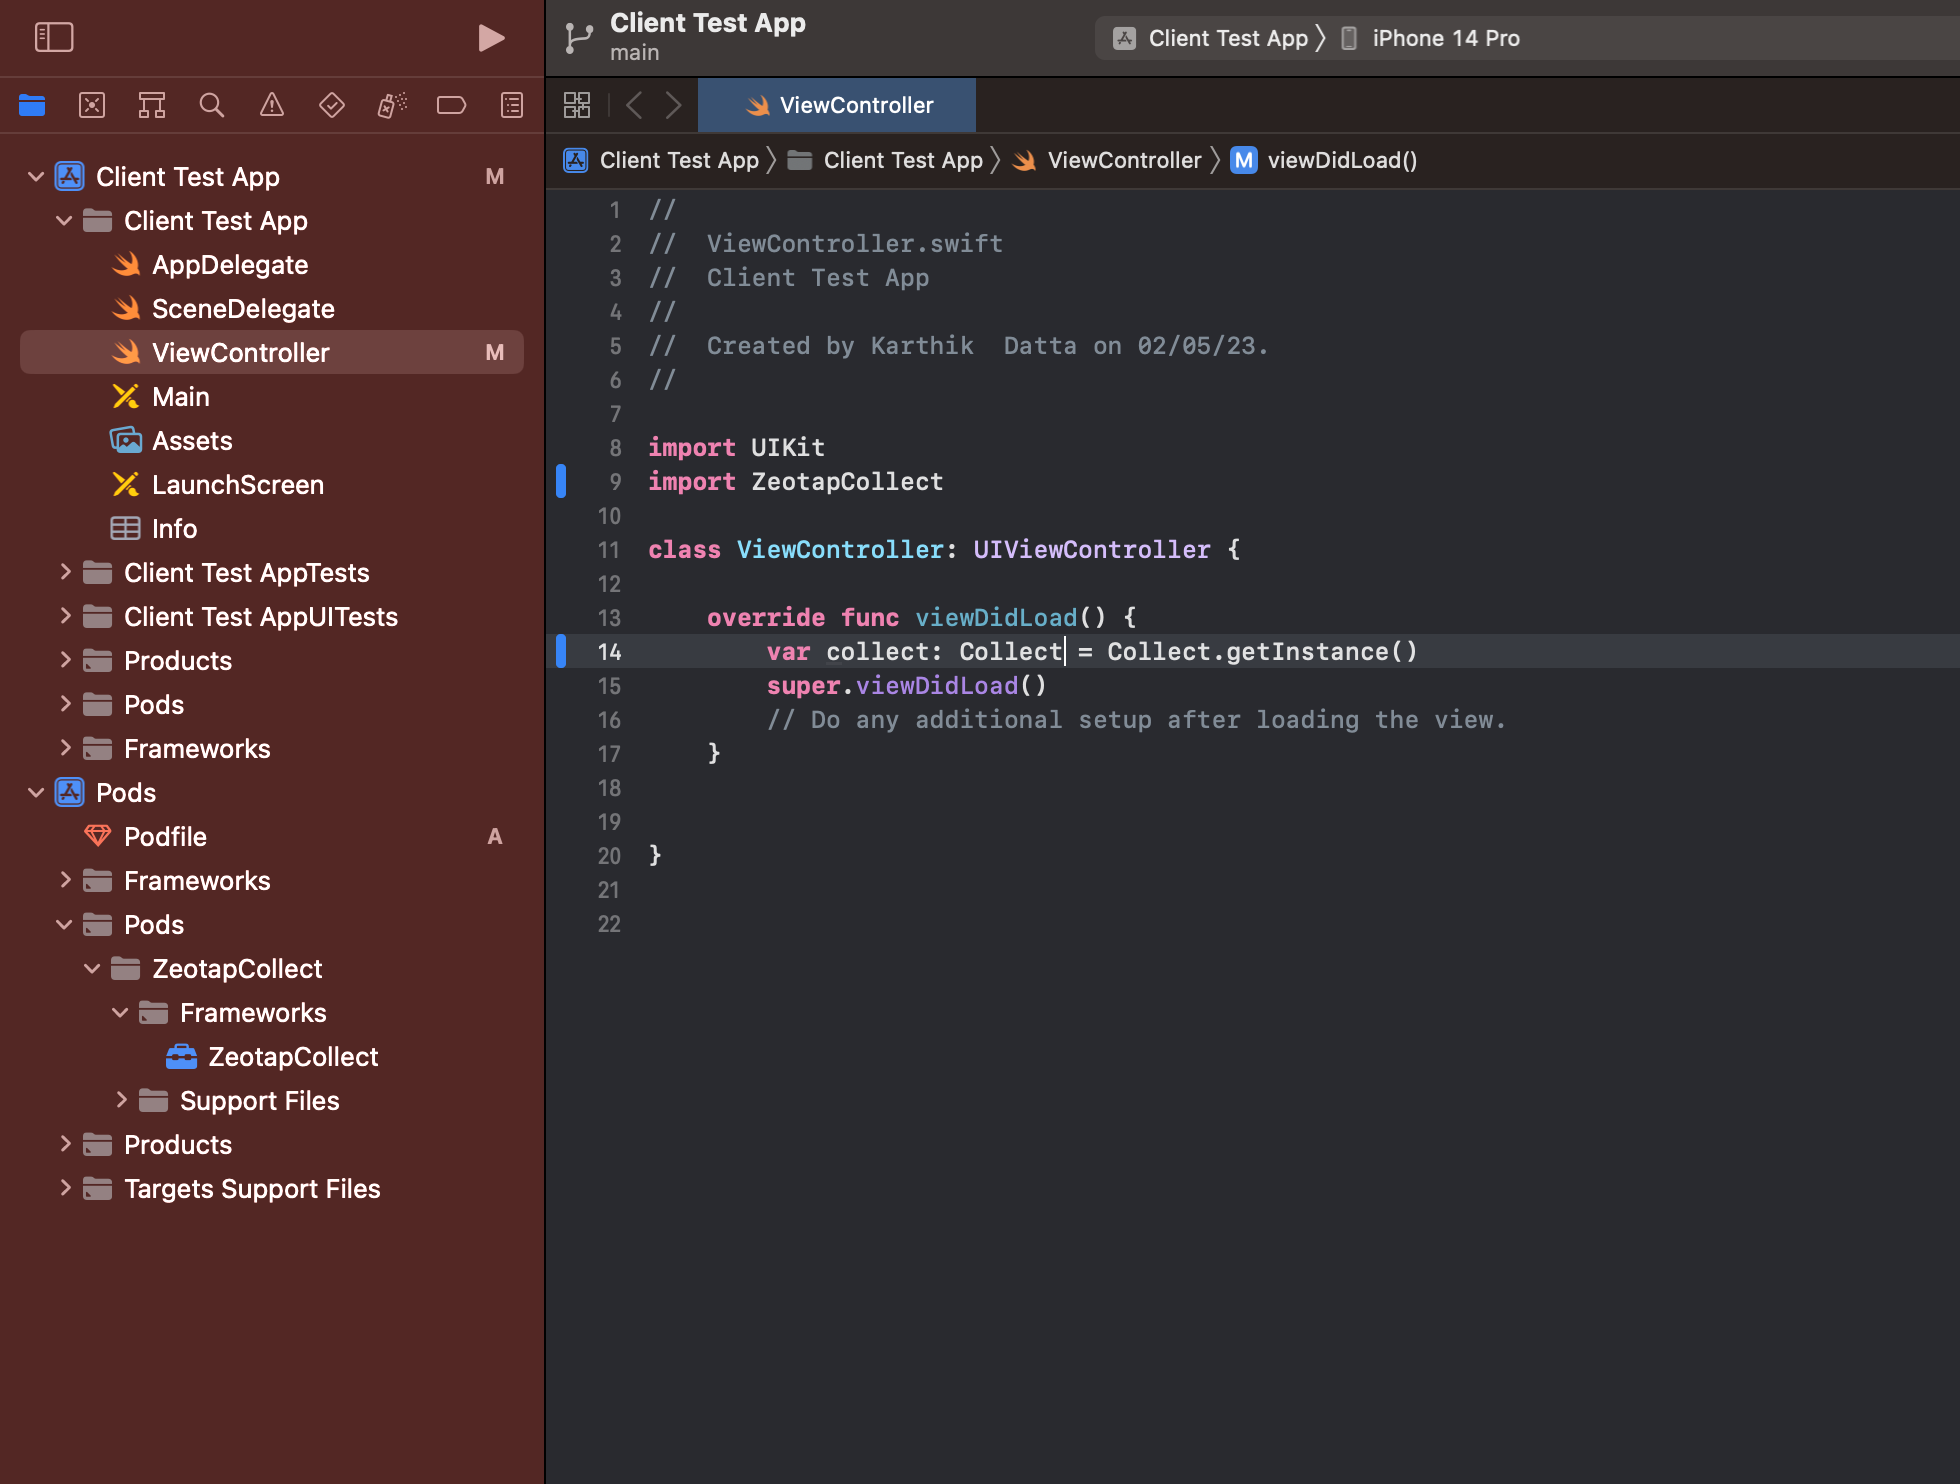
Initialise SDK
Upon starting your app, you are required to initialise the Collect SDK. To initialise, perform the following steps:Add SDK methods inside the application
Upon initializing the SDK, you can add the SDK methods inside the application as mentioned below.Options to Configure the SDK
Once the SDK is integrated, perform the following steps to configure the SDK:Import ZeotapCollect
module which will have CollectOption class to pass the configurations to the SDKTo configure the options, create a CollectOption object (It is recommended that you initialize the SDK in AppDelegate). This object has some functions that help you to set up the SDK options like write key, consent and so on.
Call build() to create the Option object.Example
Option options = CollectOption().writeKey(value):| MODIFIER AND TYPE | INPUT TYPE | METHODS | DESCRIPTION |
|---|---|---|---|
CollectOption | String | writeKey(value: String) | This is the write key that you have provided to the SDK. |
CollectOption | Boolean | logging(value: Bool) | If set to true, then it displays the info, debug, warning and error log severity levels. Else, it only displays the warning and error log severity levels. |
CollectOption | Boolean | optOut(value: Bool) | If set to true,then no events are posted to the SPL. The default value is false. This option acts as a fallback when consent is not used. |
CollectOption | Integer | batchSize(value: Int) | The maximum number of events allowed to remain in the unsent queue when scheduling an event. If the event exceeds this threshold, then the next batch is dispatched immediately. The default value is 30. |
CollectOption | Integer | maxCacheSize(value: Int) | This is the maximum number of events allowed to be stored in the local memory in case of network issue or delayed consent. The default value is 100, and the maximum value can be 200. |
CollectOption | Integer | eventUploadInterval(value: Int) | If the size of the queue is less than the threshold, then the request to post eventsscheduled after eventUploadInterval(value:).The default value is 90s. |
CollectOption | Boolean | useConsent(value: Bool) | If set to true, then the SDK waits to receive a consent signal and uses that consent to manage actions. |
CollectOption | Boolean | checkForCMP(value: Bool) | If both useConsent and checkForCMP are set to true, then the SDK looks for CMP data that is stored by other CMPs. Based on the CMP data, you can then manage the consents. |
CollectOption | Boolean | checkZeotapVendorConsent(value: Bool) | For CMP case, if set to true, then the SDK checks for Zeotap Vendor consent, while resolving GDPR consent to send the data.If set to false, then the SDK ignores Zeotap Vendor consent. |
CollectOption | [Int] | purposesForTracking(value: [Int]) | This option is used to pass a list of purpose IDs, based on which you can manage the consent for tracking NOTE: To know more about the purposes for tracking and the associated IDs, refer to the “Appendix A: Purposes and Features Definitions” section of this topic. |
CollectOption | [Int] | purposesForIdentifying(value: [Int]) | This option is used to pass a list of purpose IDs, based on which you can manage the consent for identification. NOTE: To know more about the purposes for identification and the associated IDs, refer to the “Appendix A: Purposes and Features Definitions” section of this topic. |
CollectOption | String | userCountry(code: String) | This option must be set in alpha-iso3 codes, which can then be sent with every request as user.user_country. The API defaults the IP to determine the country if the user country is missing. This determines the region where the data is stored. |
CollectOption | Boolean | areIdentitiesHashed(value: Bool) | This option indicates whether the identities shared in setUserIdentities are hashed or not. By default, isHashed is set to false. NOTE: This option is applicable only for PIIs and not for Custom Identities. |
CollectOption | Boolean | hashIdentities(value: Bool) | This option indicates whether or not hashing of the raw identities is required. By default, the hashing is set to false. NOTE: This option is applicable only for PIIs and not for Custom Identities. |
| Option | - | build() | This function builds the Option object that is required to initialise the Collect SDK with the configuration passed to the CollectOption object. |
Methods Available in Zeotap CDP Instance
The following methods are available in the Zeotap CDP instance:| METHODS | DESCRIPTION |
|---|---|
static func initialize(option: Option) -> Void | Collect.initialize(option: <option_config>)This method initializes the SDK with the context, write key and additional configuration. |
static func getInstance() -> Collect? | Collect.getInstance()This method returns the Collect object that contains the SDK functions. |
func setEventProperties(String, [String: Any]?, ResponseCallback?) -> Void | Collect.getInstance()?.setInstantEventProperties(eventName, eventProperties, {data in}) This method sends an event with the specified event name.It can be called with event properties, callback options, or both. |
func setInstantEventProperties(String, [String: Any]?, ResponseCallback?) -> Void | Collect.getInstance()?.setInstantEventProperties(eventName, eventProperties, {data in}) This method sends an event with the given event name immediately, bypassing the queue for batch sending. It can be called with event properties and a callback to attach event properties and handle the response, respectively. |
func setUserProperties([String: Any], ResponseCallback?) -> Void | Collect.getInstance()?.setUserProperties(userProperties, {data in })This method sends an event with the given user properties, along with default user properties. Use setUserProperties to override existing user properties. It can be called with callback functions to handle the response in the application. |
func setPageProperties([String: Any], ResponseCallback?) -> Void | **Collect.getInstance()?.setPageProperties(pageProperties, {data in}) **This method sends an event with the given page properties. All subsequent events will include a page node with these properties. Use setPageProperties to override the existing page properties. |
func setUserIdentities([String: String], ResponseCallback?) -> Void | Collect.getInstance()?.setUserIdentities(userIdentities, {data in})This method sends an event with the given user identities. All subsequent events will include these user identities. |
func unSetUserIdentities() -> Void | Collect.getInstance()?.unSetUserIdentities()This method is used to remove user identities that are set by the setUserIdentities method. |
func pauseCollection() -> Void | Collect.getInstance()?.pauseCollection()This method is used to pass the SDK from the Collect events for the user’s actions. |
func resumeCollection() -> Void | Collect.getInstance()?.resumeCollection()This method resumes the SDK to collect the events if the SDK was paused to collect by the pauseCollection() method. |
func setConsent(consent: [String: Any], ResponseCallback?) -> Void | Collect.getInstance()?.setConsent(consent: consentData, {data in})This method sets consent in the non-TCF consent management system included in the SDK. It also accepts brand consent, which is stored along with the user’s primary consent to ensure consistency across events. |
func listenToAskForConsent(action: Action) -> Void | Collect.getInstance()?.listenToAskForConsent(action: actionCallback)This method listens to the ask_consent event that is triggered when the SDK wants you to ask the user for consent. |
func setAdvertisingIdByATTStatus(status: ATTrackingManager.AuthorizationStatus) -> Void | Collect.getInstance()?.setAdvertisingIdByATTStatus(status: ATTrackingManager.AuthorizationStatus)This method is used to send ATT status to the event payload along with the Advertising ID if authorization status was authorized. |
func setATTStatusAndAdvertisingId(status: ATTrackingManager.AuthorizationStatus, advertisingId: String?) -> Void | Collect.getInstance()?.setATTStatusAndAdvertisingId(status: ATTrackingManager.AuthorizationStatus, advertisingId: String?)This method is used to send ATT status and Advertising ID to the event payload in case ATT status needs to be verified and shared to SDK. |
Verify the Connection
Upon successful integration, send someevents through your app to verify the connection. Once the connection is established and tested, log in to the Zeotap CDP App and navigate to the particular iOS source to view the data in the PREVIEW tab.
iOS 14 or later
The iOS SDK collects the Identifier for Advertisers (IDFA) id automatically from the user device if the iOS version is 13 or below and then sends it in the event payload as advertising_id . However, in the case of iOS 14 or later, the iOS SDK does not collect the IDFA id automatically due to Apple’s latest privacy focused guideline. You can refer to https://developer.apple.com/app-store/user-privacy-and-data-use/.Collect the IDFA
If you want the iOS SDK to pass the IDFA in the event payload, then using the Apple’s App Tracking Transparency (ATT) framework, you can display a pop-up to get the permission from the user to read the IDFA. On passing the ATT Authorisation Status to the iOS SDK, it addsatt_authorization_status and advertising_id to the payload. To know about the Tracking Transparency (ATT) framework, refer to the Apple documentation here.
att_authorization_status can have four different values as mentioned below. For more information on them, refer to the Apple guide here.
authorizeddeniednot_determinedrestricted
advertising_id can be passed along with the event payload, only if the att_authorization_status was authorised.
The following are the two options where you can pass the ATT Authorization Status:
- setAdvertisingIdByATTStatus - By passing
att_authorization_statusto this function, the iOS SDK functions get the IDFA from the device and send the id and status with payload.
Code
- setATTStatusAndAdvertisingId - This function expects the ATT Authorisation Status and IDFA string based on the permission. If the permission was not authorised, then passing the ATT Authorisation Status to SDK alone is enough in case of future usage.
Track Page Views
After integrating theSDK, you can log the users’ page view events by calling setPageProperties([String: Any]) and sending all page related information as key=value properties on the page load event. All further user events on the same page are then attached with these page properties.
| Parameter | Type | Description |
|---|---|---|
properties | [String: Any] | This indicates the page specific properties. |
Product page:
Code
Note:If page properties are not defined, then by default, no page property is available on an event payload.
Track User Actions
After tracking the page views, you can start tracking theevents. Use the setEventProperties method to track different user actions on the Application (for example, the selectVariant event with colour as a property) and properties relating to the event (for example, a ViewProduct event with productName, color as a property.
| Parameter | Type | Description |
|---|---|---|
eventName | String | This is the name of the event. |
eventProperties | [String: Any] | This is the object containing any properties for a particular event. |
events that you can capture using iOS SDK:
- System Events
- Custom Events
events refer to predefined actions that the system tracks based on specific user interactions. These events capture essential activities related to user consent and identities. These events ensure consistent tracking and tagging of key actions, which aids in debugging and understanding user behaviour. You can use these events to enrich the user profiles with the information captured. The following table lists the system events that are triggered in specific scenarios:
Note:This granular level of tracking has been enabled since May 14, 2024. Any system event tracked before this date is tagged with the common name SystemEnrichmentEvent which could have been triggered by any of the scenarios listed below.
| Event Name (Tags) | Scenarios |
|---|---|
| Set consent | Triggers the first time a user lands on the app and sets consent |
| Update consent | Triggers when a user changes their consent |
| Set identities | Triggers when a user logs in |
| Update identities | Triggers when a user changes already set identities |
events refer to user-defined actions specific to your application that are not covered by predefined system events. These events can be used to track additional behaviours, capture specific data points and provide deeper insights into user activities.
The following table lists some examples of custom events:
| Event Name (Tags) | Scenarios |
|---|---|
| Add to cart | Triggers when a user adds an item to their shopping cart |
| Remove from cart | Triggers when a user removes an item from their shopping cart |
| Complete purchase | Triggers when a user completes a transaction |
Code
Code
Identify Default Users
The SDK creates an ID calledzi for user identification. This ID is attached to all the event calls from the SDK, such as page views and user events. This ID is unique per the application.
UserDefaults is utilised for storing these IDs with an encrypted key that is derived from the <write_key>.
The zi ID is unique to each instance of the SDK that is write key based.
The table below explains certain features available in the SDK regarding the zi ID.
| Feature | Description |
|---|---|
Collect.getInstance()?.getZI() -> String | This is the method to get the zi value. |
Collect.getInstance()?.resetZI() -> Void | This is the method to reset the zi value for a user. You can use this method in case you want to differentiate users based on user login and so on. |
Collect.getInstance()?.setZI(zi: String) -> Void | This is the method to set a custom zi value that overrides the value generated by the SDK. You can use hashed **userid**or loginid for this purpose if required. |
Capture Users Properties
You can use thesetUserProperties method to attach user information for a known user who is using the Application. The user information is as follows:
- DB ID for the user (recommended)
- Any additional information about the user that you want to identify as a user attribute
Collect.getInstance()?.setUserProperties(properties) where properties is an object containing user identifiers and attributes that are sent as key=value properties to SDK events.
Below is an example showing how to add user attributes of the user visiting the app.
Code
Capture User Identities
ThesetUserIdentities method identifies the object that can be set by the user and saved in user storage. The following are the keys that are accepted in user Identities:
| Name | Type | Description |
|---|---|---|
[email] | String | This is the email address of the user. |
[loginid] | String | This is the login id of the user. |
[cellno] | String | This is the cell phone number of the user. Ensure that you provide the cell phone number in the following format: [country_code][space][cell_number]. For example, 49 1234567890. We recommend that you always send cell phone number in this format.Note: Do not include ‘+’ while sending the cell phone numbers. |
[cellno_cc] | String | This is the cell phone number of the user with the country code. Note: We recommend that you do not provide cell phone numbers with country code. |
Code
Raw User Identities
While capturing user identities in the raw form, you may or may not want Zeotap to hash them. Refer to the table below to understand the scenarios, the SDK options that are involved and a sample to invoke thesetUserIdentities method.
| Scenario | SDK Options | setuseridentities |
|---|---|---|
| You send raw user identities, but do not want Zeotap to hash them | The following SDK options are involved in this scenario:
| var userIdentities = [ “email”: “[email protected]”, “cellno”: “49 1234567890” ] Collect.getInstance()?.setUserIdentities(userIdentities); |
| You send raw user identities and want Zeotap to hash them | The following SDK options are involved in this scenario:
| var userIdentities = [ “email”: “[email protected]”, “cellno”: “49 1234567890” ] Collect.getInstance()?.setUserIdentities(userIdentities); |
setUserIdentities method considers the properties as mentioned in the table below.
| Parameter | Type | Description |
|---|---|---|
userIdentities | [String: Any] | This is the Object containing the user identities. |
[userIdentities.email] | String | This is the user’s raw email address. The SDK either captures as is or converts to sha256, sha1, md5 lowercase and uppercase hashed values, based on the SDK configurations. |
[userIdentities.cellno] | String | This is the user’s raw cell phone number. The SDK either captures as is or converts to sha256, sha1, md5 based on the SDK configurations. |
[userIdentities.loginid] | String | This is the user’s login ID that is hashed and logged. |
[userIdentities.cellno_cc] | String | This is the user’s raw cell phone number. The SDK either captures as is or converts to sha256, sha1, md5 with the country code, based on the SDK configurations. |
Note:For the following selections, by default, we hash the raw identities to
sha-256, sha-1 and md-5:- When
areIdentitiesHashed: false - When
CollectOption.optOut(value: Bool)is set tofalse
Hashed User Identities
You may only send in user identities that are hashed using algorithms likeSHA-256, SHA1 and MD5. In this scenario, refer to the table below to understand the scenario, the SDK options that are involved and a sample for the setUserIdentities property.
| Scenario | SDK Options | setUserIdentities |
|---|---|---|
| You send hashed user identities only | The SDK option involved in this scenario is areIdentitiesHashed(value: true) | var userIdentities = ["email_sha256_lowercase": "b0492275843c15593bba8a749c3379e3b5067aab173e91fcb37d840ca8b1738d","cellno_with_country_code_sha256":"91-1234567890"]Collect.getInstance()?.setUserIdentities(userIdentities); |
setUserIdentities property is configured with properties, as mentioned in the table below.
| Parameter | Type | Description |
|---|---|---|
| `userIdentities | [String: Any] | This is the Object containing the user identities. |
[userIdentities.email_sha256_lowercase] | String | This is the user’s email address hashed to sha256 after converting it to lowercase. |
[userIdentities.email_sha256_uppercase] | String | This is the user’s email address hashed to sha256 after converting it to uppercase. |
[userIdentities.email_md5_lowercase] | String | This is the user’s email address hashed to md5 after converting it to lowercase. |
[userIdentities.email_md5_uppercase] | String | This is the user’s email address hashed to md5 after converting to uppercase. |
[userIdentities.email_sha1_lowercase] | String | This is the user’s email address hashed to sha1 after converting to lowercase. |
[userIdentities.email_sha1_uppercase] | String | This is the user’s email address hashed to sha1 after converting to uppercase. |
[userIdentities.cellno_without_country_code_sha256] | String | This is the user’s cell phone number without the country code and hashed to sha256. |
[userIdentities.cellno_without_country_code_md5] | String | This is the user’s cell phone number without the country code and hashed to md5. |
[userIdentities.cellno_without_country_code_sha1] | String | This is the user’s cell phone number without the country code and hashed to sha1. |
[userIdentities.cellno_with_country_code_sha256] | String | This is the user’s cell phone number with the country code and hashed to sha256. |
[userIdentities.cellno_with_country_code_md5] | String | This is the user’s cell phone number with the country code and hashed to md5. |
[userIdentities.cellno_with_country_code_sha1] | String | This is the user’s cell phone number with the country code and hashed to sha1. |
[userIdentities.cellno_e164_sha256] | String | This is the user’s cell phone number in e164 format hashed to sha256. |
[userIdentities.cellno_e164_md5] | String | This is the user’s cell phone number in e164 format hashed to . |
[userIdentities.cellno_e164_sha1] | String | This is the user’s cell phone number in e164 format hashed to sha1. |
[userIdentities.loginid_sha256_lowercase] | String | This is the user’s login ID that is logged. We hash the login ID to sha256 after converting to lowercase. |
[userIdentities.loginid_sha256_uppercase] | String | This is the user’s login ID that is logged. We hash the login ID to sha256 after converting to uppercase. |
[userIdentities.loginid_md5_lowercase] | String | This is the user’s login ID that is logged. We hash the login ID to md5 after converting to lowercase. |
[userIdentities.loginid_md5_uppercase] | String | This is the user’s login ID that is logged. We hash the login ID to md5 after converting to uppercase. |
[userIdentities.loginid_sha1_lowercase] | String | This is the user’s login ID that is logged. We hash the login ID to sha1 after converting to lowercase. |
[userIdentities.loginid_sha1_uppercase] | String | This is the user’s login ID that is logged. We hash the login ID to sha1 after converting to uppercase. |
Note:To know about the hashing guidelines for email and cell phone numbers, refer here.
Set Events With Callback Function
You can also setevents with Callback function as shown below. The data parameter is an object that contains status and message.
Code
Note:For more information about the
Callback function status codes and errors, refer here.Log Out Communication
If you no longer wish to attach these identities to theevents (for example, when the user logs out) you can communicate this by using unsetUserIdentities and then remove identities.
Call the following method:
Collect.getInstance()?.unsetUserIdentities()
Send User Profile Information
If you have any other information you want to send about the user on the app, you can send the same usingsetUserProperties. This is sent to the API with the default user zi ID, along with any other identities set using setUserIdentities.
Below is an example showing how to pass the user profile information.
Code
Track User Consent
The consent that you provide is used for the following two primary purposes:- User identification
- Tracking user data
Default Opt-in
In this scenario, you directly provide consent to Zeotap by setting theoptOut flag to true or false. For all these three purposes, if the optOut flag is set to true, then it indicates that you have not granted access to Zeotap. Here, iOS SDK is not allowed to perform user identification or tracking user data. However, if the optOut flag is set to false, then the SDK is allowed to perform all the above actions.
| Function | Type | Value | Description |
|---|---|---|---|
CollectOption:: optOut | Boolean | false | This is an explicit consent signal that you set. When enabled, the SDK can perform user identification, cookie syncing and event capturing. |
GDPR TCF CMP
If you already have a TCF 2.0 Consent Management Platform (CMP) implemented on your app, then the SDK automatically checks for the same. To do this, both theuseConsent and checkForCMP flags are set to true. The SDK also queries the TCF consent string to fetch the Publisher’s consent before recording the events.
The below table describes the keys/parameters that need to be configured while using the GDPR consent module.
| Function | Type | Value | Description |
|---|---|---|---|
CollectOption:: useConsent | Boolean | true | If this option is set to true, then the SDK waits to receive a consent signal and uses that consent to manage actions. This consent signal is determined by CollectOption:: checkForCMP. |
CollectOption:: checkForCMP | Boolean | true | If this option is set to true, then we check for the presence of the TCF 2.0 variables in the UserDefaults. If the TCF 2.0 variables are present, then we query the CMP API and check for the publisher’s consent.If this option is set to false, then we use the set consent signal using the setConsent method. |
CollectOptions.Builder::checkZeotapvendorConsent | Boolean | true or false | For CMP case, if set to true, then the SDK checks for Zeotap Vendor consent, while resolving GDPR consent to send the data.If set to false, then the SDK ignores Zeotap Vendor consent. Note that the default value is false. |
CollectOption:: purposesForTracking | [Int] | [1, 3, 4] | This option is used to pass a list of purpose IDs, based on which you can manage the consent for tracking. Note: To know more about the purposes for tracking and the associated IDs, refer to the “Appendix A: Purposes and Features Definitions” section of this topic. |
CollectOption:: purposesForIdentifying | [Int] | [1, 9] | This option is used to pass a list of purpose IDs, based on which you can manage the consent for identification. Note: To know more about the purposes for identification and the associated IDs, refer to the “Appendix A: Purposes and Features Definitions” section of this topic. |
Custom Consent
You may not want to explicitly give consent or even use the TCF API. Instead, they may want to have a custom consent flow. The following three points summarize this scenario:- The
useConsentflag is set totrue - The
checkForCMPoption is set tofalse - The
setConsentmethod is used to resolve the user consent
UserDefaults and used as the user’s consent status for the subsequent event log until a new status is set using the same.
The following are the keys that are accepted in user consent:
| Name | Type | Description |
|---|---|---|
track | boolean | True if we want to track any user data |
identify | boolean | True if it is allowed to identify you and a user. |
track– This consent signal is used to track and record user activities. Any consent cookie created to store consents can use this permission, as it precedes all other data collection.identify– This consent signal is used for user matching and third-party enrichment(for example,zcookieand ID+ permissions).
Tracking but not for Identification. The consent is passed in the form of a Dictionary with the particular signal marked as true or false. Going by the above example, the Object would be set to true for Tracking and false for Identification.
Call the setConsent Method
Call the setConsent method as mentioned below.JavaScript
| Parameter | Type | Required | Description |
|---|---|---|---|
| value | [String: Any] | Yes | [String: Any]– Granular consent allows passing value as a Dictionary. |
Invoke Custom Consent
Below is an example showing how you can set the user’s consent status.JavaScript
callback listener as mentioned below.
JavaScript
Track Brand Consent
Use thesetConsent method to store brand-specific consent, such as zeotapVendorConsent or xyzVendorConsent, and ensure it persists across all events.
Example
JavaScript
Note:For consent types other than custom consent, the
track and identify flags are ignored because the consent configuration differs.Users
User information is available in the form of identifiers such as CRM IDs, person IDs or user attributes such as age, gender or customer classification. However, app event data is not considered user information. All this information helps tie the online behaviour of the user with the logged-in user ID and previously known user information. This user information is especially useful when you have users who visit the app from multiple devices, or who use your app. The CRM ID helps us to identify the user as the same user across the devices or app. The following are some of the user methods:- If you want to tie post-login behaviour to the actual logged-in user, then use
setUserIdentitiesorsetUserPropertiesdepending on your use case. - If you want to merge unknown and known user identities into one, then use
setUserPropertiesto update the information against the single user. - If you want to differentiate the two users, then use
setUserIdentitiesto attach the logged-in identities of the users to specific actions till it is unset.
- On user registration
- On user login
- On user profile update
- On user visit to post-login specific pages (like a wishList or a member-only Offers page)
List of Accepted Identifiers
The following are the list of accepted identifiers that are used only as intended and sent askey=value pairs:
- email – This is the registered email address of the user. The email address is hashed to
sha256, sha1andmd5after the SDK converts them to lower and upper cases before they reach the Zeotap servers. - cellno – This is the registered cellular phone number of the user. The phone number is hashed to
sha256, sha1andmd5by the SDK before it reaches the Zeotap servers. - cellno_cc – The dialing country code (such as 33 for France, 44 for the UK, 1 for the USA, 34 for Spain and so on) can be sent here. The dialing country code is attached to the cellular phone number to create hashes with country codes before it reaches the Zeotap servers.
- loginid – This is the app-specific login ID. The login id is hashed to
sha256, sha1andmd5by the SDK before they reach the Zeotap servers. - Custom Identities – Custom identities are the identities that the client chooses to input and can be any of their first-party identifiers. Note that the hashing configurations are not applicable for custom identities. Some examples of custom identities are crmID, ECID and visitorID. The following is the format, in which you can pass the custom identities:
Collect.getInstance().setUserIdentities(["crmId":"123"])
Note:
- To send any other identifiers apart from the identifiers mentioned above, reach out to your TAM with details for the same. Zeotap updates the catalogue and sends you the correct key that is required to start sending the data.
- Only the main cellular phone number must be sent, without any country codes, prepended numbers (like 0), or symbols such as +, (, ) and so on.
Events
Events are actions performed by a user on your app. These could range from searching for a product, viewing an offer, subscribing to a newsletter and so on. Event properties are details describing the event, and could refer to user action specific to the event (such asevent: applyDiscount having property: discountCodeSelected) or property of the event itself (such as event: applyDiscount having property: newPrice). Tracking this helps understand user journey and behaviour on the app.
The Zeotap library supports custom events and properties for the automotive and ecommerce verticals. To track any new events you can add the event name and its property in the object and pass it to setEventProperties of Collect instance. Defining some sample events and the properties for it below.
Method:
Collect.getInstance()?.setEventProperties(eventName,eventProperties)
| event | eventProperties (sent as key=value) |
|---|---|
viewHome | |
viewCategories | categoryLevel1 (string), categoryLevel2 (string), categoryLevel3 (string) |
viewProductDetails | productID (string), productName (string) |
setConfigurations | productID (string),colour (string),model (string),subModel (string),engine (string),fuelType (string),transmission (string),trim (string),brand (string),ecolabel (string),vehicletype (string),emissionstandard (string),power (string),torque (string),fuelcapacity (double),seatingcapacity (string),luggagecapacity (string),tiresize (string),maxspeed (double),acceleration (double),fuelconsumption (string),weight (string) |
calculateFinance | productID (string),price (string),currency (string) |
makeAppointment | productID (string) |
requestTest | productID (string) |
login |
eventType property and add your own custom names for each step, in order to group all events under a single type.
For example, setConfigurations as eventType and selectColour, selectModel and so on as the actual eventNames.
Code
Pages
Setting the page properties is useful in tracking allevents that occur within a page to a single page view. Therefore, ensure to set this first before calling the event method.
Below is the list of page names that can be set against the property ‘name’.
Code
Contextual Information
Zeotap records additional information relating to an event triggered or a page being loaded and then supplements details to the data point being captured. The following are the contextual information that Zeotap captured:- device Id/iOS id
- telco carrier, network type, os version
- DeviceManufacturer
- DeviceModel
- DeviceVersion
- ClientAppName and ClientAppVersion