Overview
Adobe Experience Platform provides a simple way to deploy and manage all the analytics, marketing and advertising tags necessary to power relevant customer experiences. The tags are offered to the Adobe Experience Cloud customers as an included, value-add feature. Zeotap provides the Zeotap Collect Tag Extension within the Adobe Experience Platform marketplace to capture events and user identities and enable cookie syncing on the Web.Prerequisites
The following are the prerequisites that you need to set up before proceeding with this integration:- Tags – Tags allow you to build and maintain your own integrations, called extensions. These extensions are available to the Adobe Experience Cloud customers in an app-store experience so they can quickly install, configure and deploy their tags. For more information about tags, refer here.
- Extensions – An extension is a package of code (JavaScript, HTML and CSS) that extends the tag’s functionality. In other words, extensions are apps that you can use to achieve your tasks. For more information about Extensions, refer here.
-
Rules – Rules are the conditions that combine multiple events, sequenced in the way that you want to use the ‘if/then’ logic. You can use Rules to configure the following attributes:
- Events
- Conditions
- Actions
- Data Elements – Data Elements are variables that are stored on the Adobe Experience Platform as a library. You can use them to populate the value fields while configuring the Action under Rules. For more information about Data Elements, refer here.
Configuring the Zeotap Collect Extension
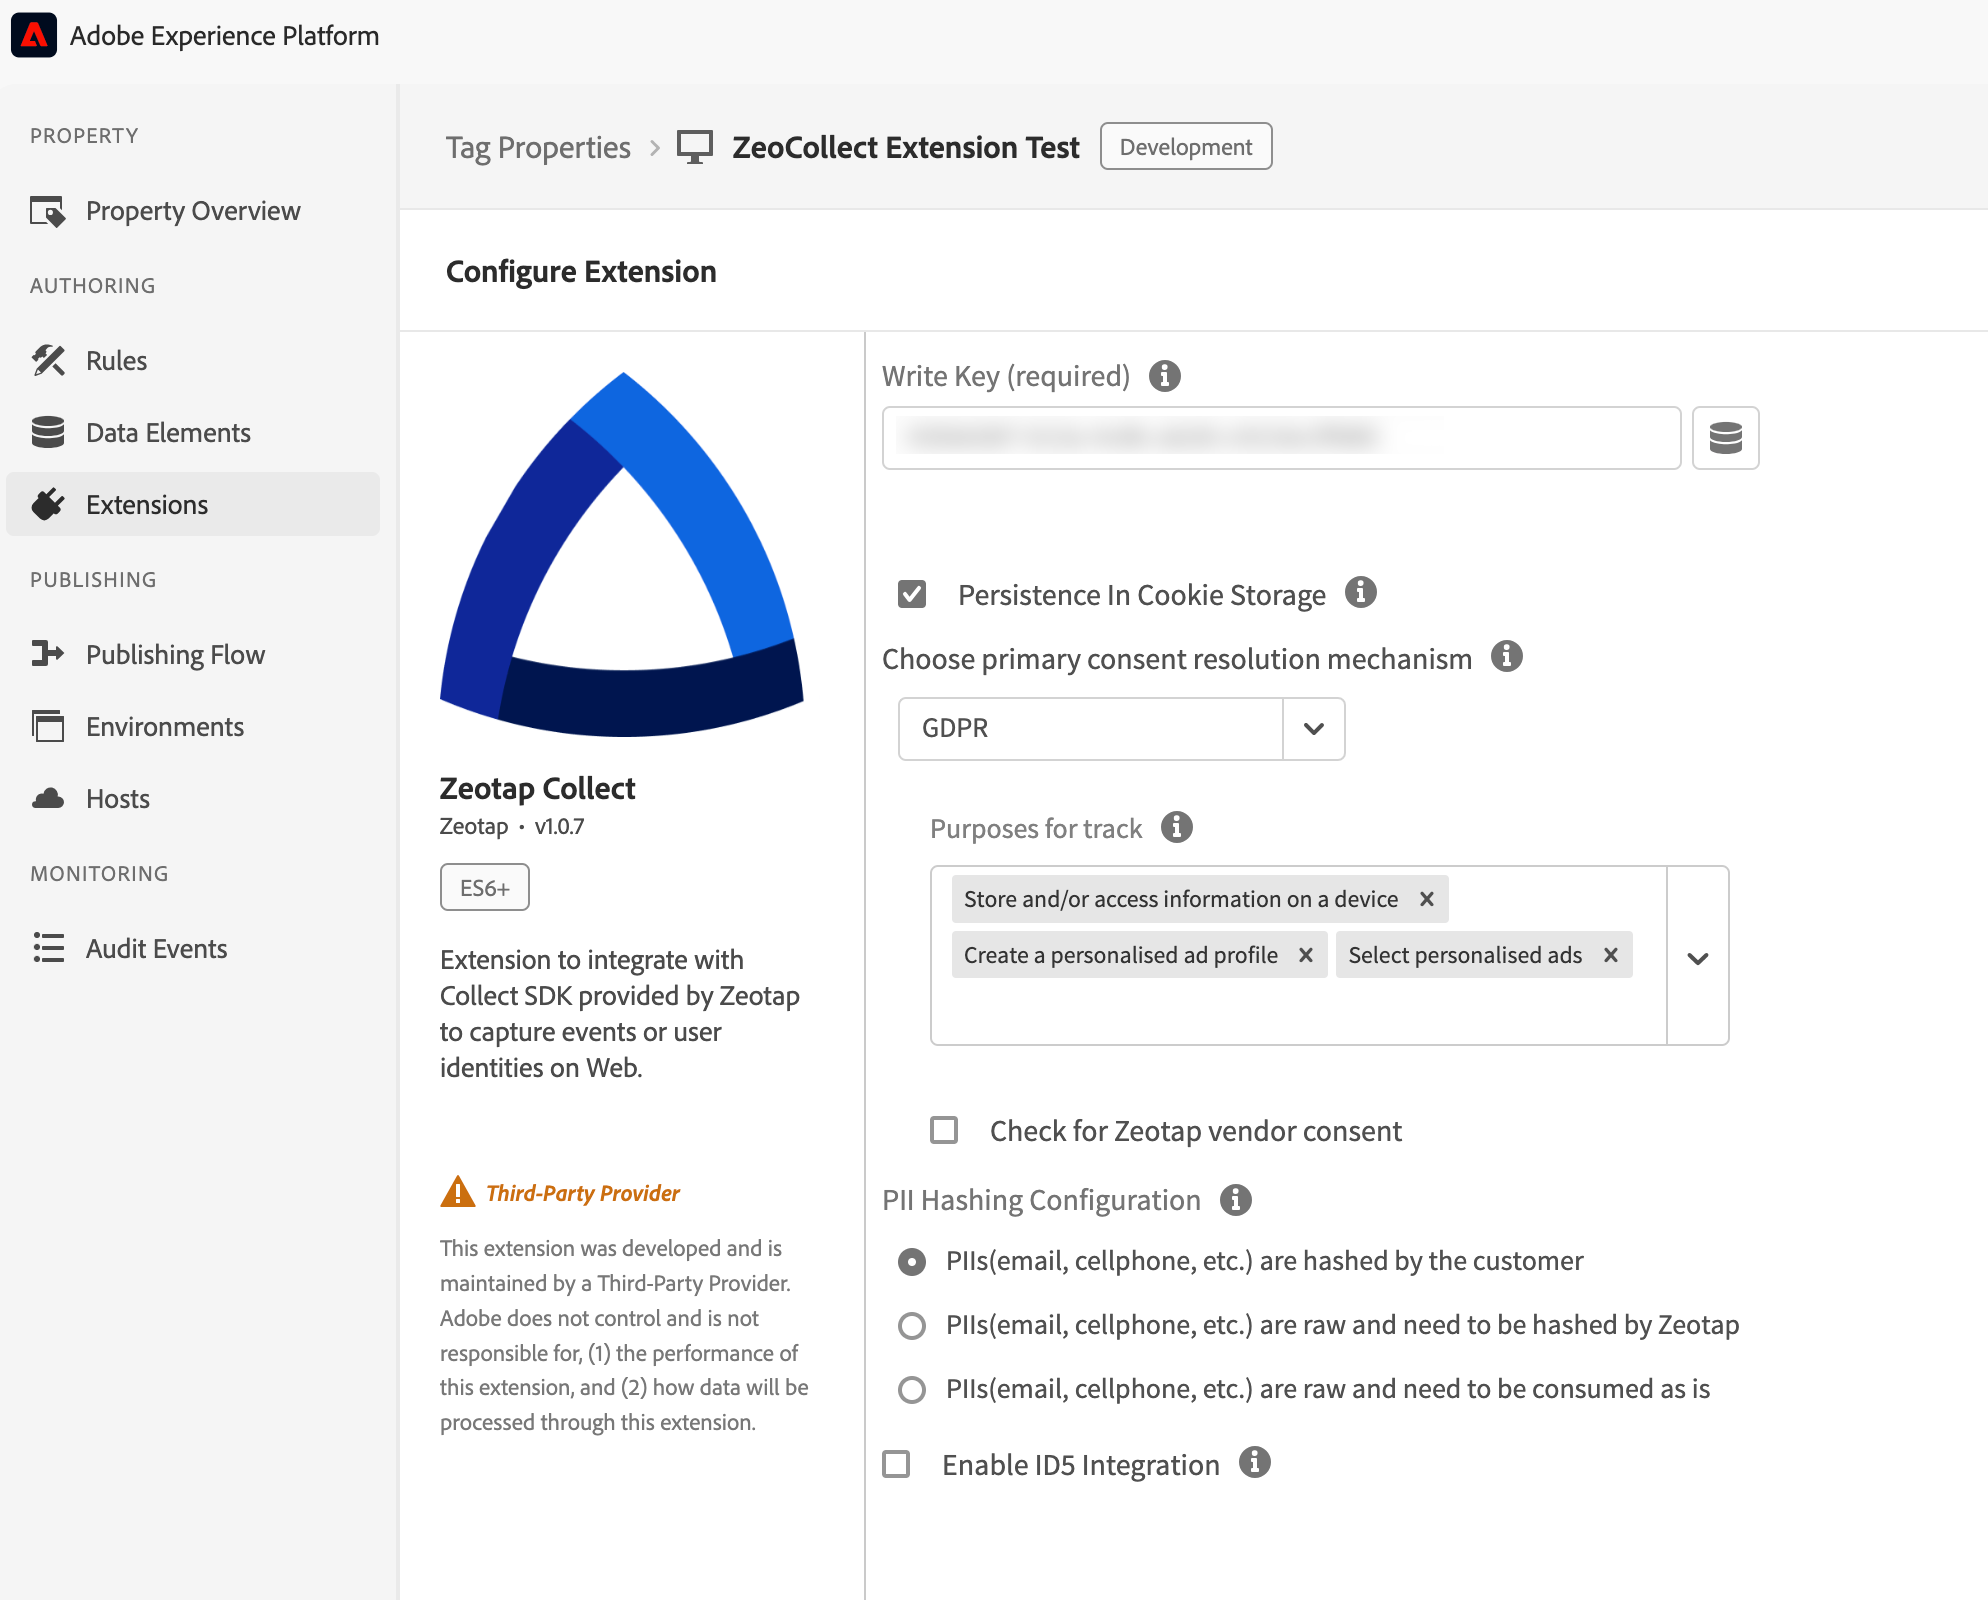
- Write Key - When you create an Adobe Experience Platform Tag Extension source in your Sources account, a Write Key is auto-generated by the system. This is a mandatory field for recording events.
-
Consent Method – The Zeotap Collect Extension has three different options to communicate consent. While initialising, you can set options for the extension to consume consent according to your requirements. Note that, in any of these methods, you can send Brand Consent fields.
-
Default Opt-in – This option signifies whether the extension can record events or not. When selected, the extension has the consent to capture events, collect user identities or cookie syncing and is used as a fallback when user consent is not specified. By default, Explicit is enabled as the Consent Method unless you select otherwise.
—> Note that for this consent type, the
setConsentstring (including the Track, Cookie Sync, and Identify fields) will not be considered. —> When the TCF API is available, you can also send the TC string. —> To send Brand Consent fields, use the options under Rules > Actions > Extension: Zeotap Collect, and select Action Type: Set Custom Consent, as shown below.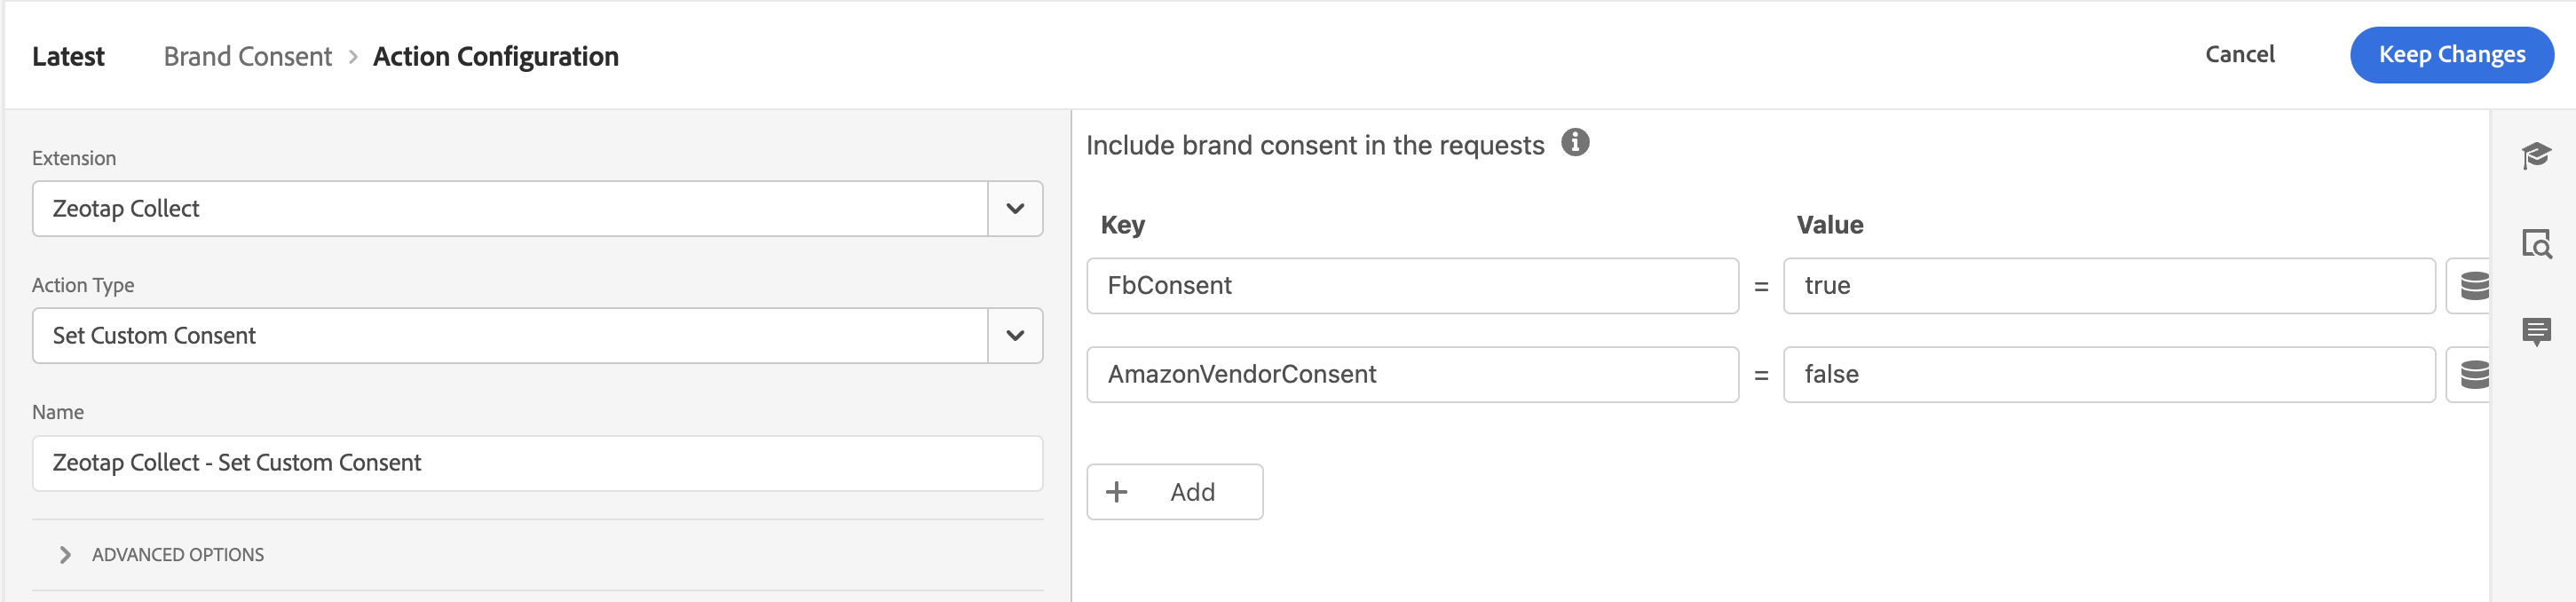
-
Custom – This method is relevant when you do not want to give consent explicitly or even use the TCF API. Instead, you have your own custom consent flow. If you opt for this option, ensure that you are also implementing the
setConsent(Track, Cookie Sync and Identify) action provided by the extension, in order to resolve consent for Zeotap extension. —> When the TCF API is available, you can also send the TC string. —> To send Brand Consent fields, use the options under Rules > Actions > Extension: Zeotap Collect, and select Action Type: Set Custom Consent.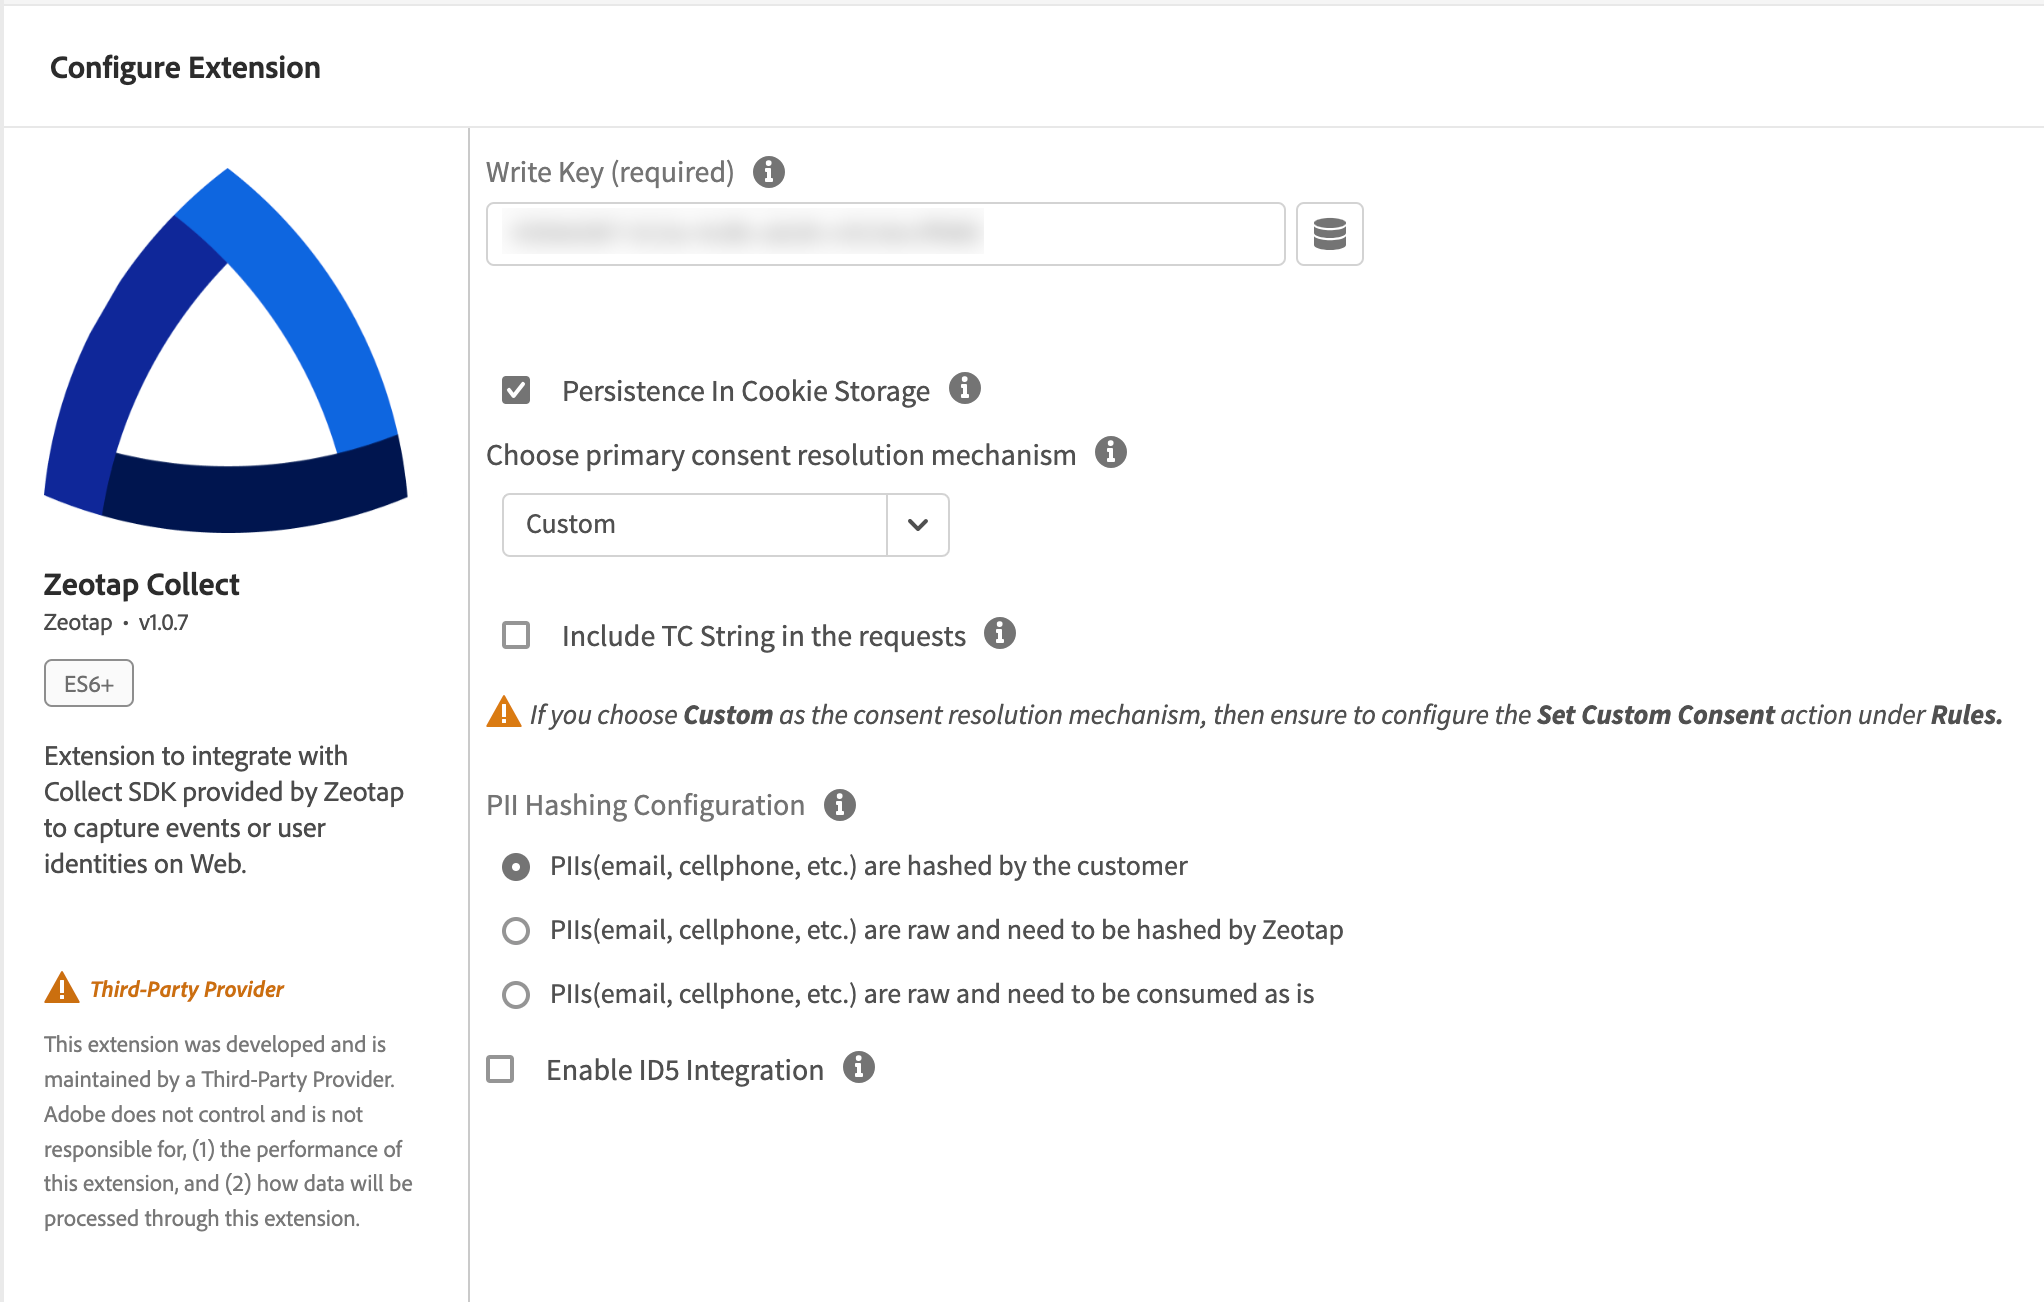
-
GDPR – This method automatically checks for a TCF 2.0 Consent Management Platform (CMP) implemented on your website. If you already have a TCF 2.0 CMP implemented on your website, then the extension resolves consent by querying the TCF API. The JavaScript that the extension adds to the page also queries the TCF consent string to fetch the Publisher’s consent before recording the events.
—> When the TCF API is available, you can also send the TC string.
—> To send Brand Consent fields, use the options under Rules > Actions > Extension: Zeotap Collect, and select Action Type: Set Custom Consent.
The following are the parameters that need to be configured while using the GDPR consent type:
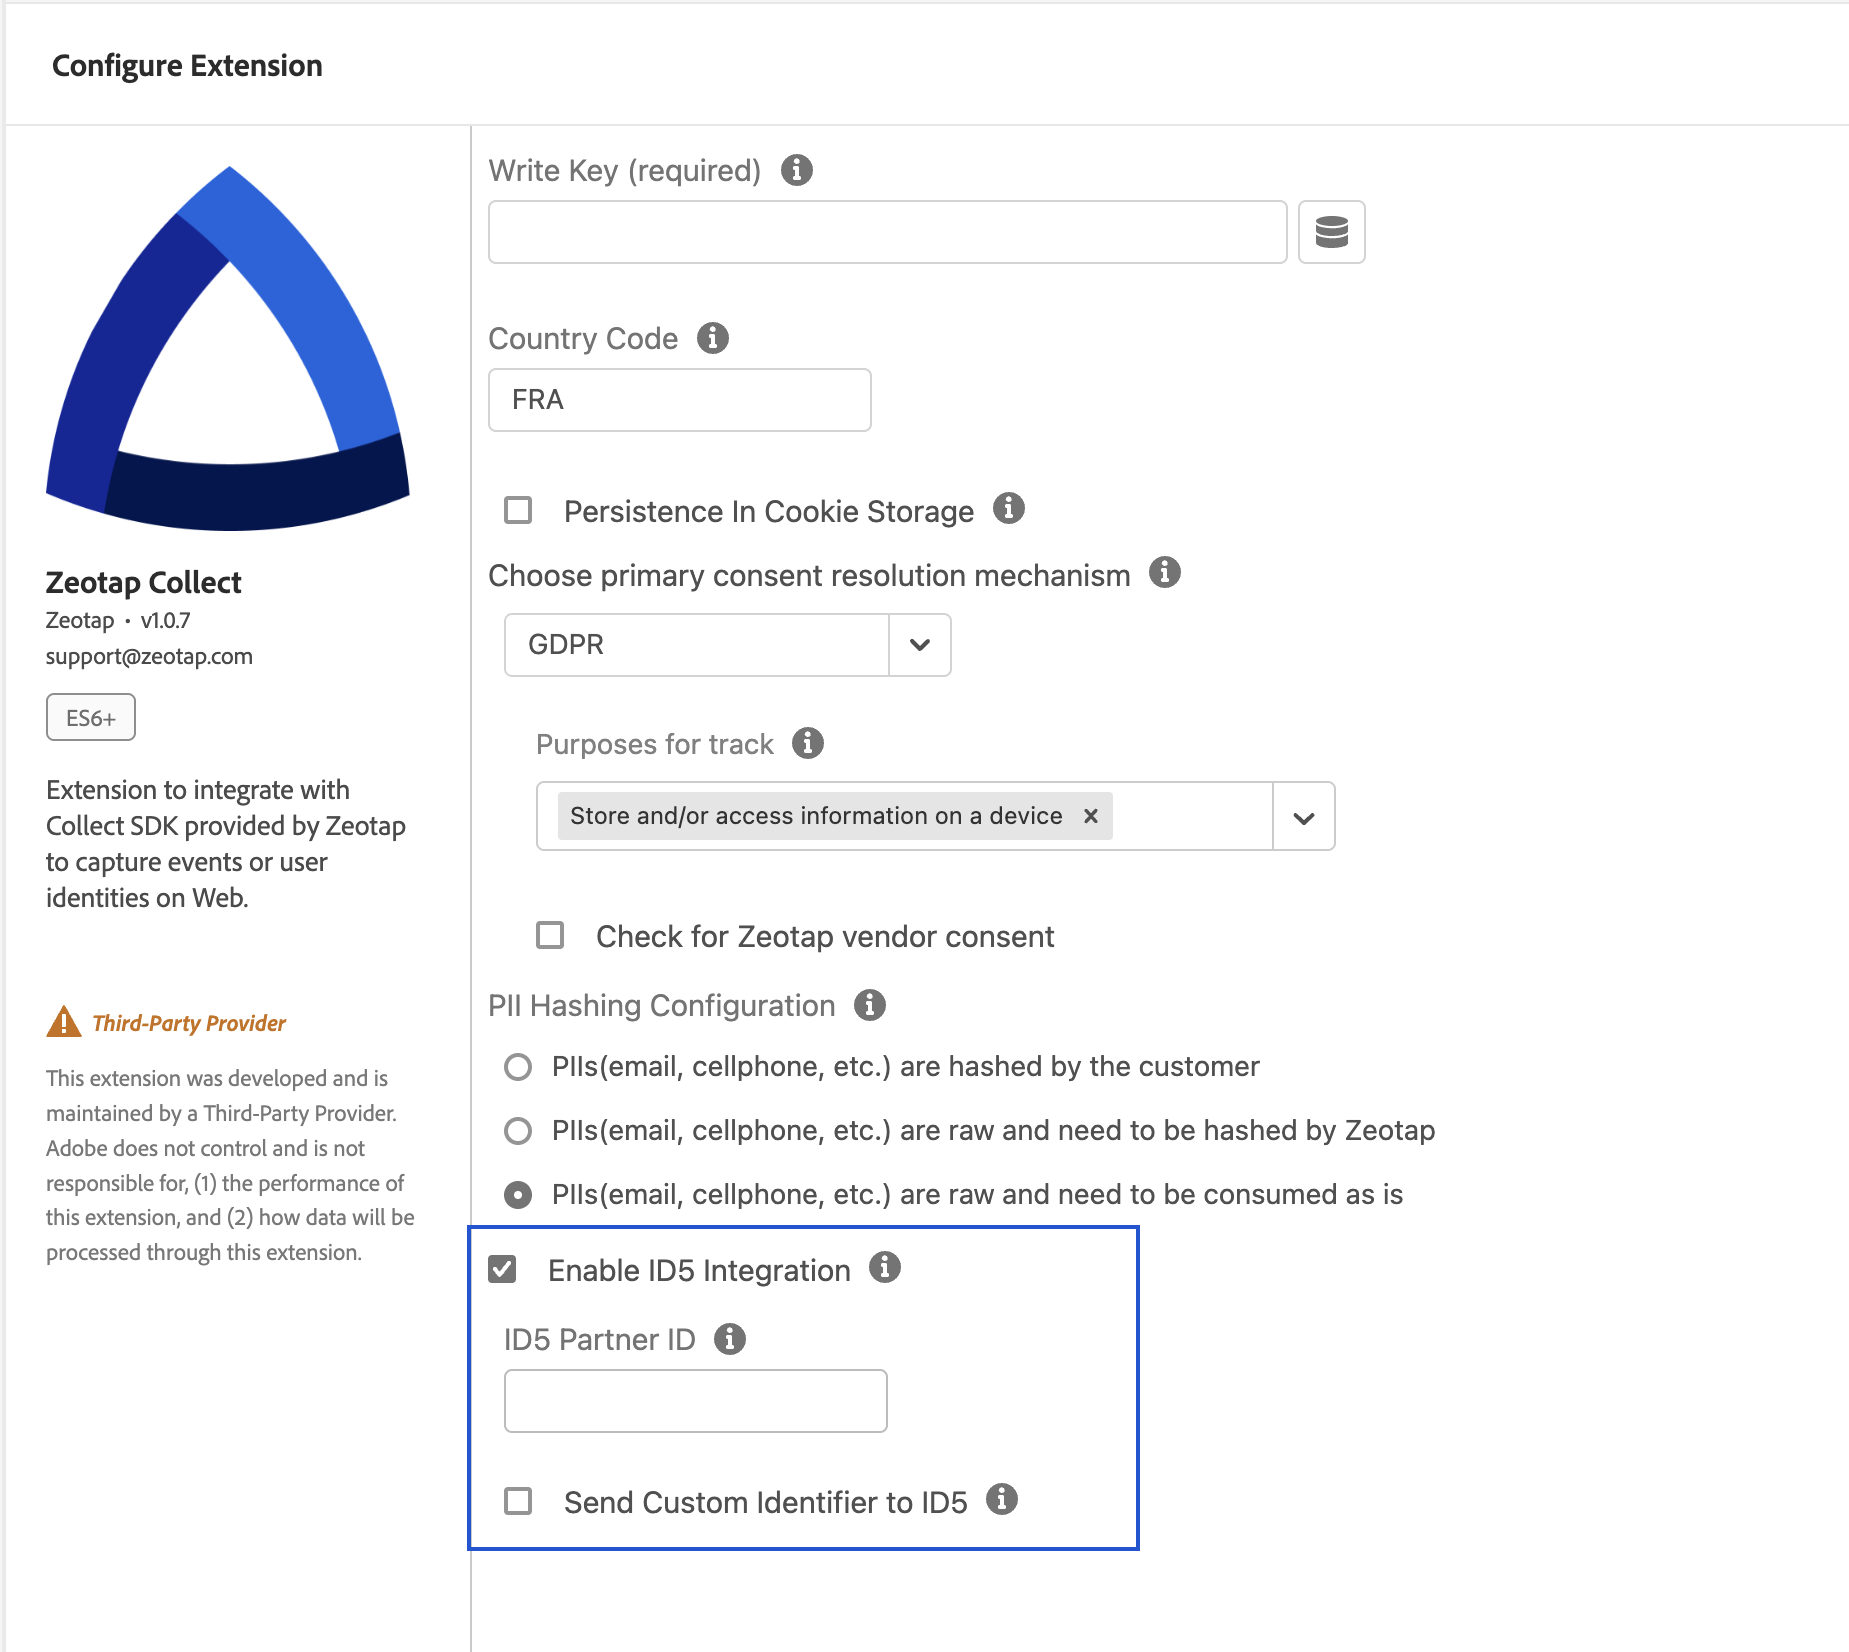
- Purposes for track – This option is used to pass a list of purpose IDs, based on which you can manage the consent for tracking. By default, the three options shown in the image below are selected. However, You can modify them using the drop-down menu.
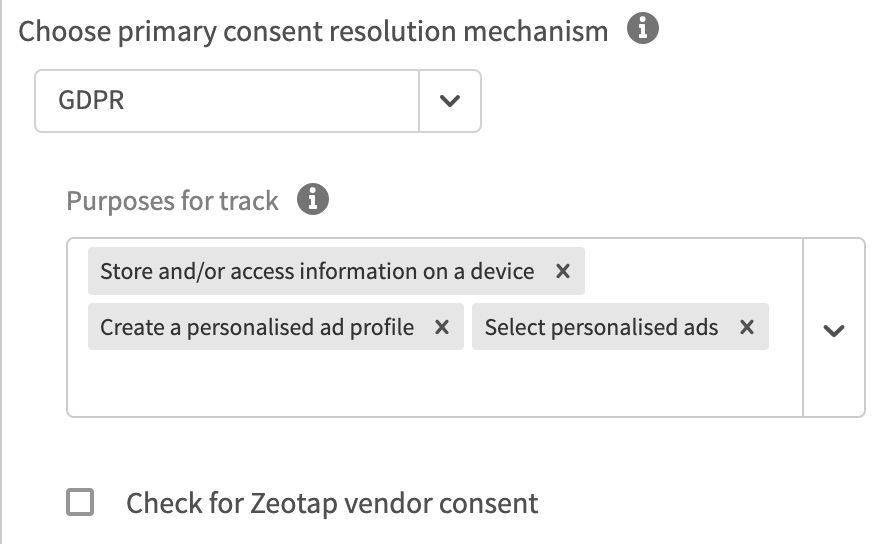
- Check for Zeotap vendor consent – You can select the Check for Zeotap vendor consent checkbox to allow the extension to verify the Zeotap vendor consent in the
tcdata(consent data JSON generated by the CMP on the website) before capturing events. By default, the Check for Zeotap vendor consent checkbox is unchecked.
- Purposes for track – This option is used to pass a list of purpose IDs, based on which you can manage the consent for tracking. By default, the three options shown in the image below are selected. However, You can modify them using the drop-down menu.
-
PII Hashing Configurations – This option allows you to configure how Personally Identifiable Information (PIIs) like email, cellphone and more must be collected by Zeotap. The following are the PIIs hashing configurations available:
- PIIs (email, cellphone) are hashed by the customer – The client sends hashed user PIIs in the formats of
SHA256,MD5andSHA1as mentioned in the table below. - PIIs (email, cellphone) are raw and must be hashed by Zeotap – The client sends raw user PIIs, but they want Zeotap to hash them in the formats of
SHA256,MD5andSHA1as mentioned in the table below. - PIIs (email, cellphone) are raw and must be consumed as is – The client sends raw user PIIs and they do not want Zeotap to hash them
- PIIs (email, cellphone) are hashed by the customer – The client sends hashed user PIIs in the formats of
- Country Code– This option allows you to enter the ISO Alpha 3 country code for the country that you want to associate your users with.
-
Default Opt-in – This option signifies whether the extension can record events or not. When selected, the extension has the consent to capture events, collect user identities or cookie syncing and is used as a fallback when user consent is not specified. By default, Explicit is enabled as the Consent Method unless you select otherwise.
—> Note that for this consent type, the
User Identities
User information is available in the form of identifiers that can be categorised as below.- Personal Identifiable Information (PII)
- Raw User PII
- Hashed User PII
- Custom Identities
Personal Identifiable Information (PII)
Personal Identifiable Information (PII) is any data that confirms an individual’s identity. Zeotap extension accepts email address, cellphone number, login Id and so on as PIIs. PII can be categorised as Raw User PII and Hashed User PII.Raw User PII
The client captures user identities in the raw form and may or may not want Zeotap to hash them. The Raw User PIIs supported by Zeotap are listed below.| Raw User PII | Description |
|---|---|
| fpuid | This is the first-party ID for a given user, such as a crmID or DBID. |
| This is the user’s raw email address. | |
| cellno | This is the user’s raw cell phone number. |
| loginid | This is the user’s login ID. |
| cellno_cc | This is the user’s raw cell phone number with the country code. |
Hashed User PII
The client only sends in user PII that are hashed using algorithms likeSHA-256, SHA1 and MD5. The Hashed User PIIs supported by Zeotap are listed below.
| HASHED USER PII | DESCRIPTION |
|---|---|
fpuid | This is the first-party ID for a given user, such as a crmID or DBID. |
email_sha256_lowercase | This is the user’s email address hashed to sha256 after converting it to lowercase. |
email_sha256_uppercase | This is the user’s email address hashed to sha256 after converting it to uppercase. |
email_md5_lowercase | This is the user’s email address hashed to md5 after converting it to lowercase. |
email_md5_uppercase | This is the user’s email address hashed to md5 after converting to uppercase. |
email_sha1_lowercase | This is the user’s email address hashed to sha1 after converting to lowercase. |
email_sha1_uppercase | This is the user’s email address hashed to sha1 after converting to uppercase. |
cellno_without_country_code_sha256 | This is the user’s cell phone number without the country code and hashed to sha256. |
cellno_without_country_code_md5 | This is the user’s cell phone number without the country code and hashed to md5. |
cellno_without_country_code_sha1 | This is the user’s cell phone number without the country code and hashed to sha1. |
cellno_with_country_code_sha256 | This is the user’s cell phone number with the country code and hashed to sha256. |
cellno_with_country_code_md5 | This is the user’s cell phone number with the country code and hashed to md5. |
cellno_with_country_code_sha1 | This is the user’s cell phone number with the country code and hashed to sha1. |
cellno_e164_sha256 | This is the user’s cell phone number in e164 format hashed to sha256. |
cellno_e164_sha1 | This is the user’s cell phone number in e164 format hashed to sha1. |
cellno_e164_md5 | This is the user’s cell phone number in e164 format hashed to md5. |
loginid_sha256_lowercase | This is the user’s login ID that is logged. The login ID is hashed to sha256 after converting to lowercase. |
loginid_sha256_uppercase | This is the user’s login ID that is logged. The login ID is hashed to sha256 after converting to uppercase. |
loginid_md5_lowercase | This is the user’s login ID that is logged. The login ID is hashed to md5 after converting to lowercase. |
loginid_md5_uppercase | This is the user’s login ID that is logged. The login ID is hashed to md5 after converting to uppercase. |
loginid_sha1_lowercase | This is the user’s login ID that is logged. The login ID is hashed to sha1 after converting to lowercase. |
loginid_sha1_uppercase | This is the user’s login ID that is logged. The login ID is hashed to sha1 after converting to uppercase. |
Custom Identities
Custom identities are the identities that the client chooses to input and can be any of their first-party identifiers. Hashing configurations are not applicable for custom identities. Some examples of custom identities arecrmID, ECID and visitorID.
Note:To know about the hashing guidelines for email and cell phone numbers, refer here.
Zeotap Collect Extension Actions
Zeotap Collect Extension supports the following Action Types under Rules: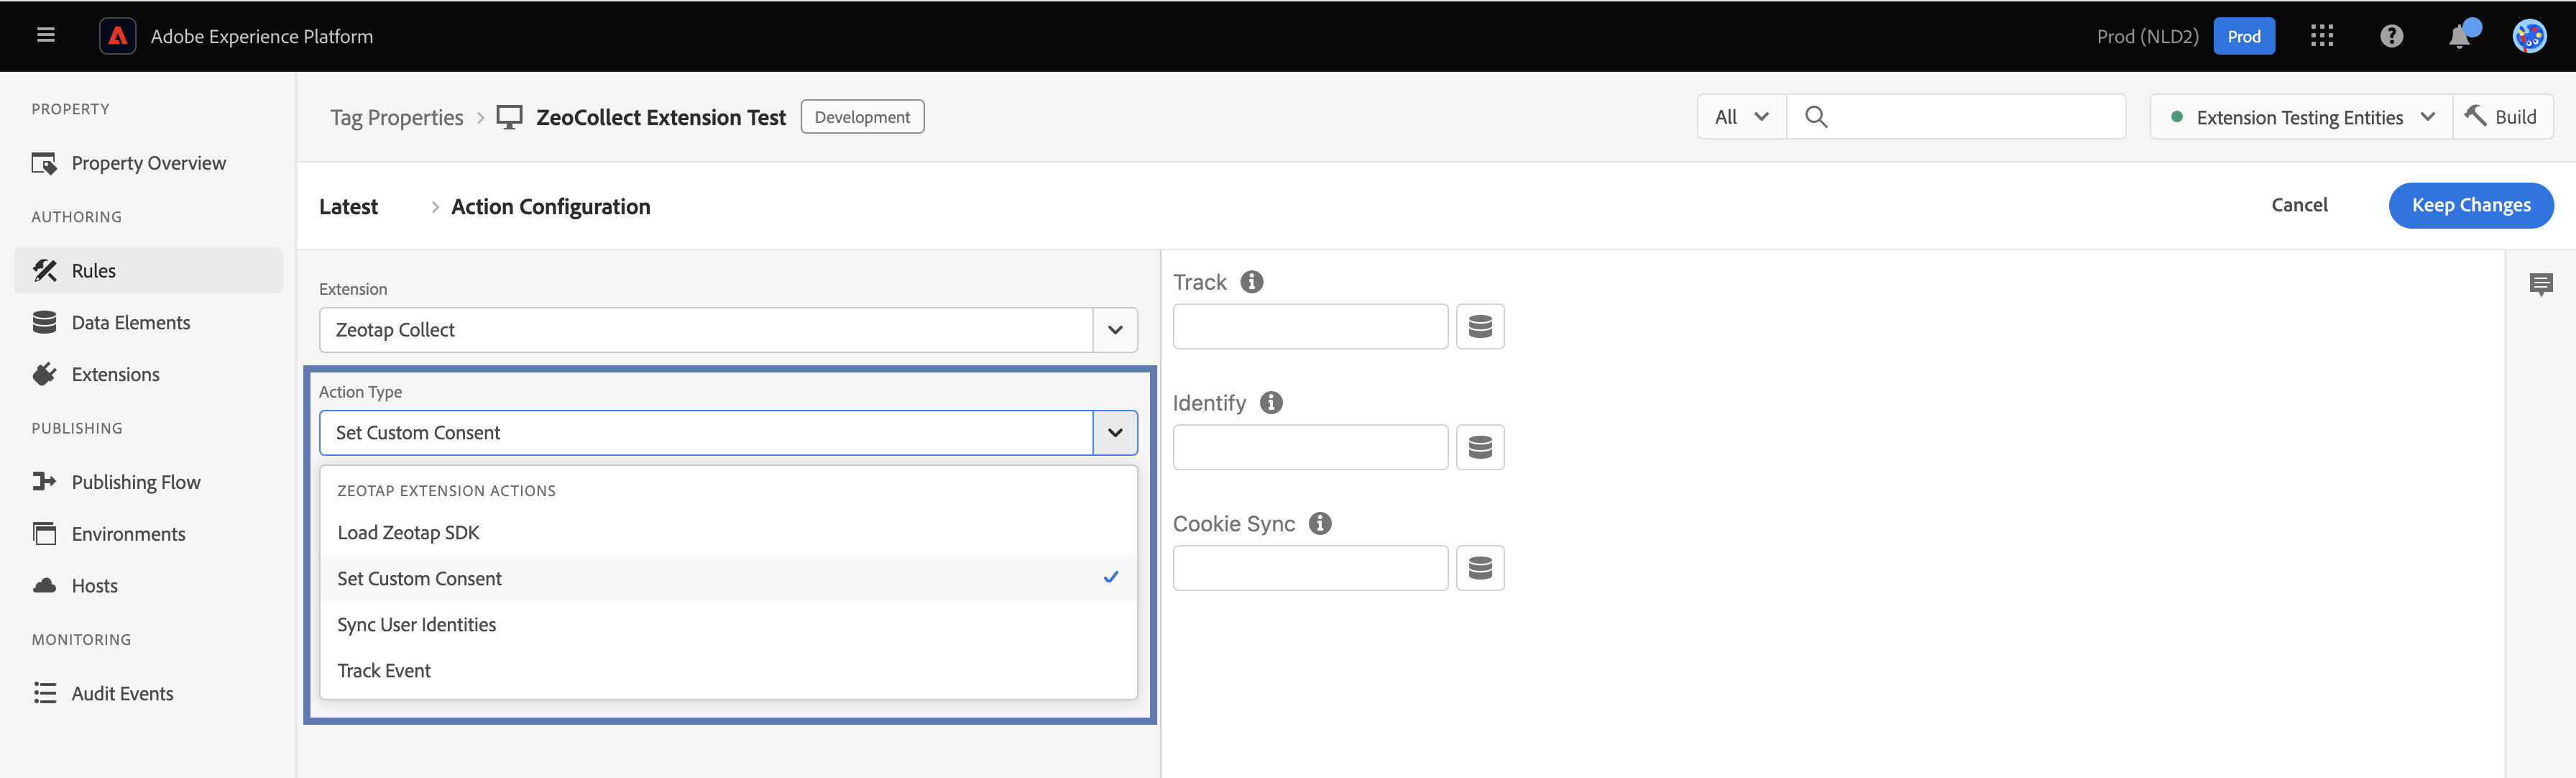
- Load Zeotap SDK – You can select Load Zeotap SDK as the action type for all the rules that involve the Zeotap Collect Extension. This ensures that the Collect JavaScript is stamped on the client’s website.
- Set Custom Consent – If you choose Custom as the consent mechanism while configuring the Zeotap Collect Extension, then ensure to set up the Set Custom Consent action under Rules.
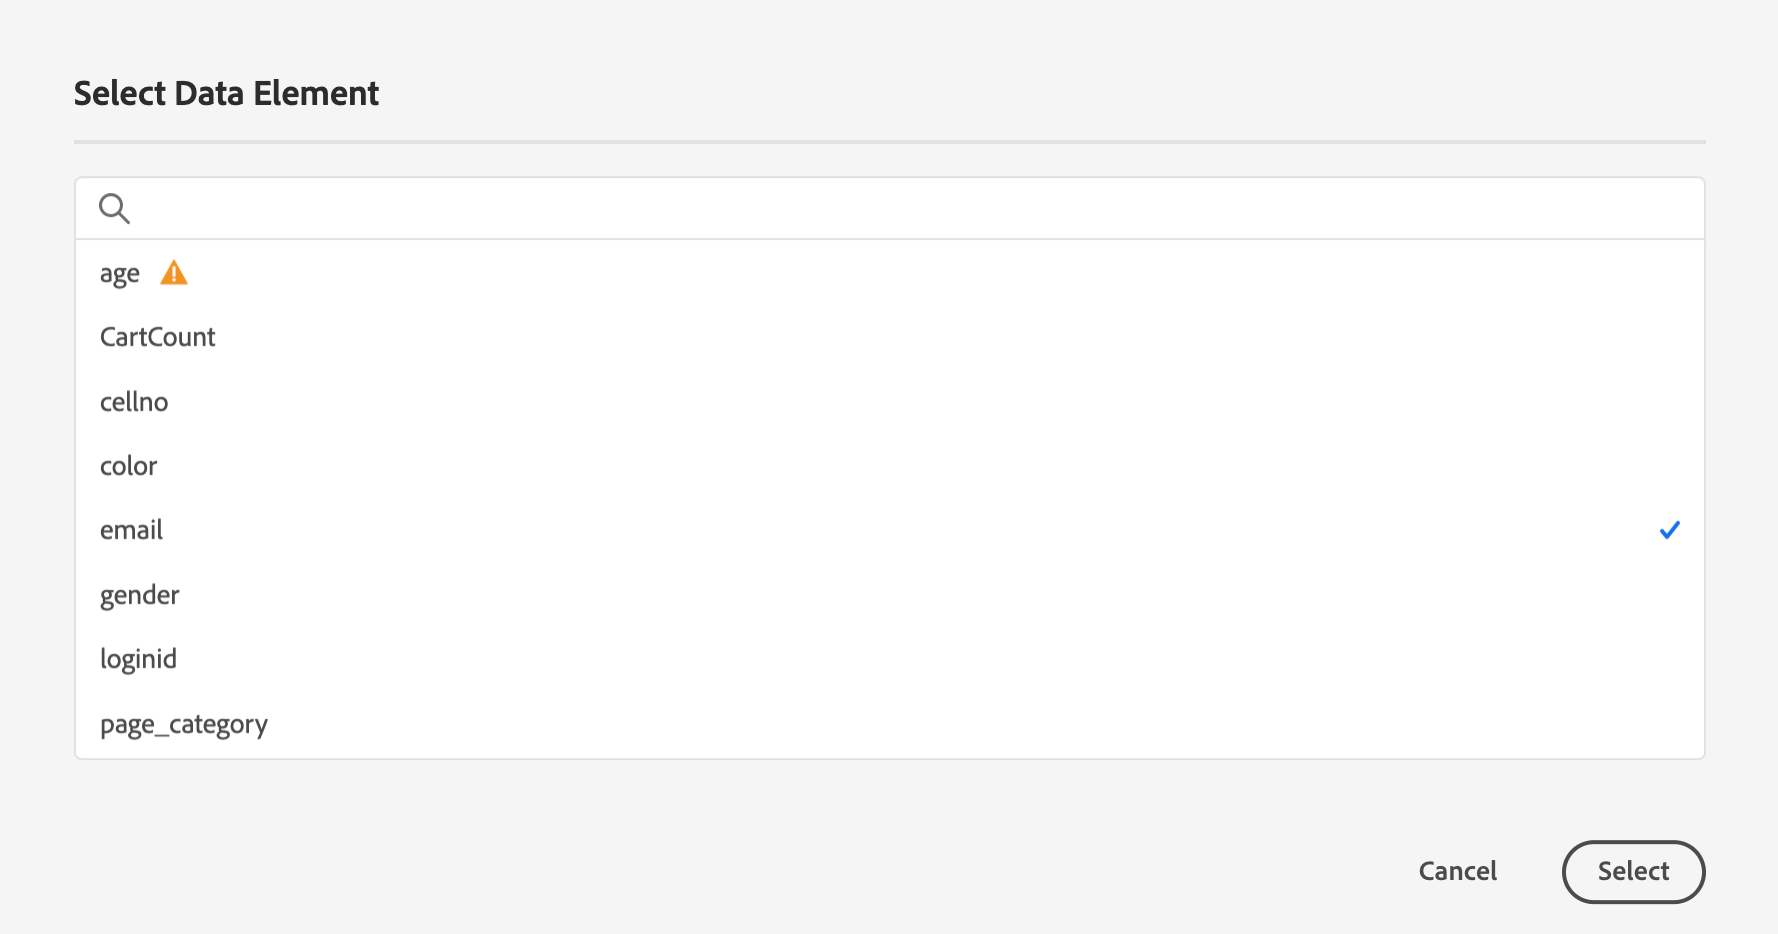
- Sync User Identities – Set the key-value pairs for the identities to be captured (includes User PIIs and Custom Identities like ECID, crmID, visitorID).
- Track Event– The available Event Types and the resulting actions are explained in the table below.
| EVENT TYPE | DESCRIPTION |
|---|---|
| Page View | • Set the key-value pair based on your data tracking requirement. For example, page name, page category and so on. Note: When this rule is triggered, the key-value pairs in the action configuration screen are sent to the Zeotap CDP, along with the event attributes that are passed as a second argument to _satellite.track(Direct Call).• You can add any number of keys and values. 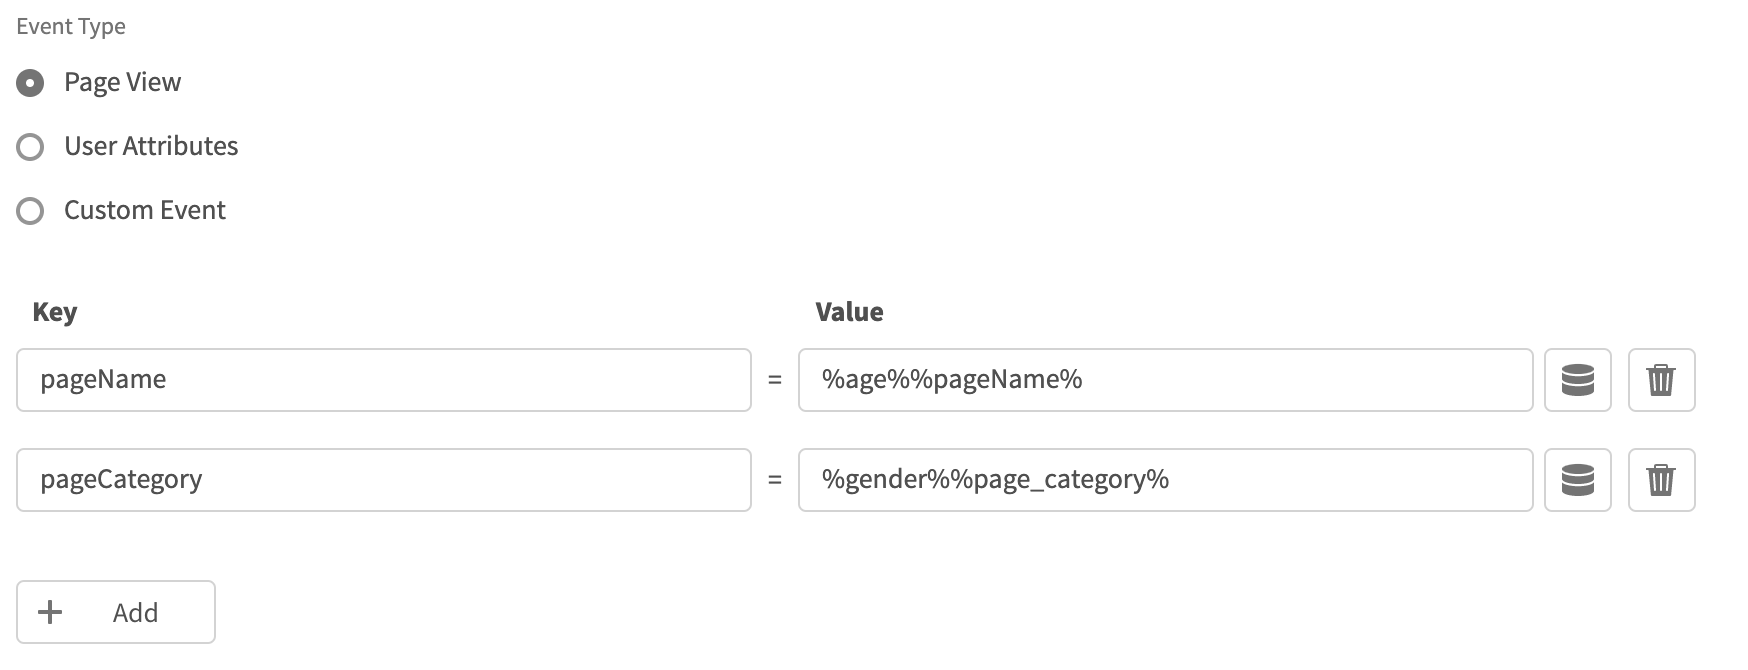 |
| User Attributes | • Set the key-value pair based on the user attributes that you want to capture as a part of the event. For example, age, gender and so on. • You can add any number of keys and values. 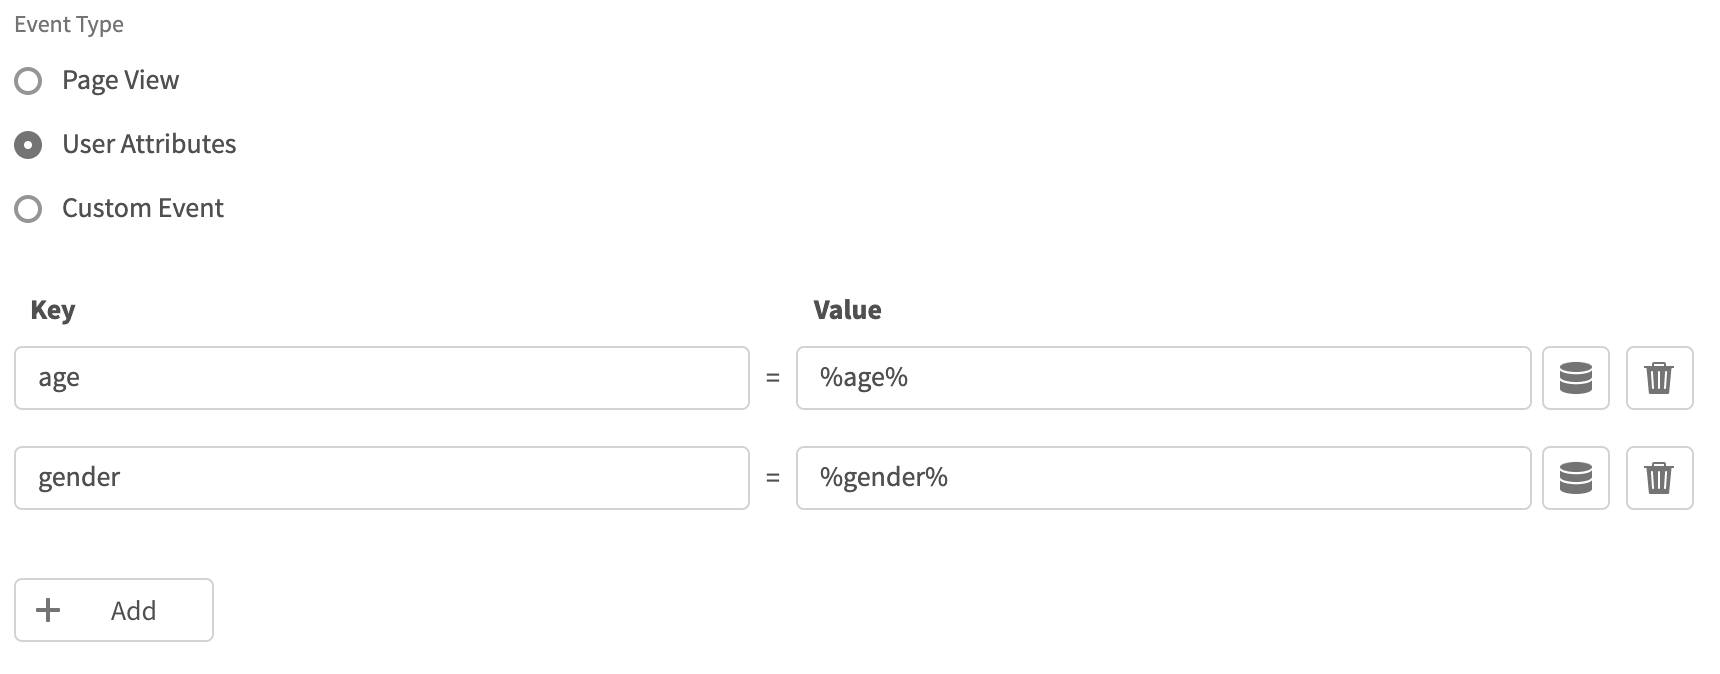 Note: The records for the country and city columns are blacklisted for ingestion because SPL uses the user’s IP address to find out the country and city automatically. For the complete list of blacklisted fields, click here. |
| Custom Event | • Specify the Name for the event to be triggered. • Set the key-value pair based on your data tracking requirement. • You can add any number of keys and values. 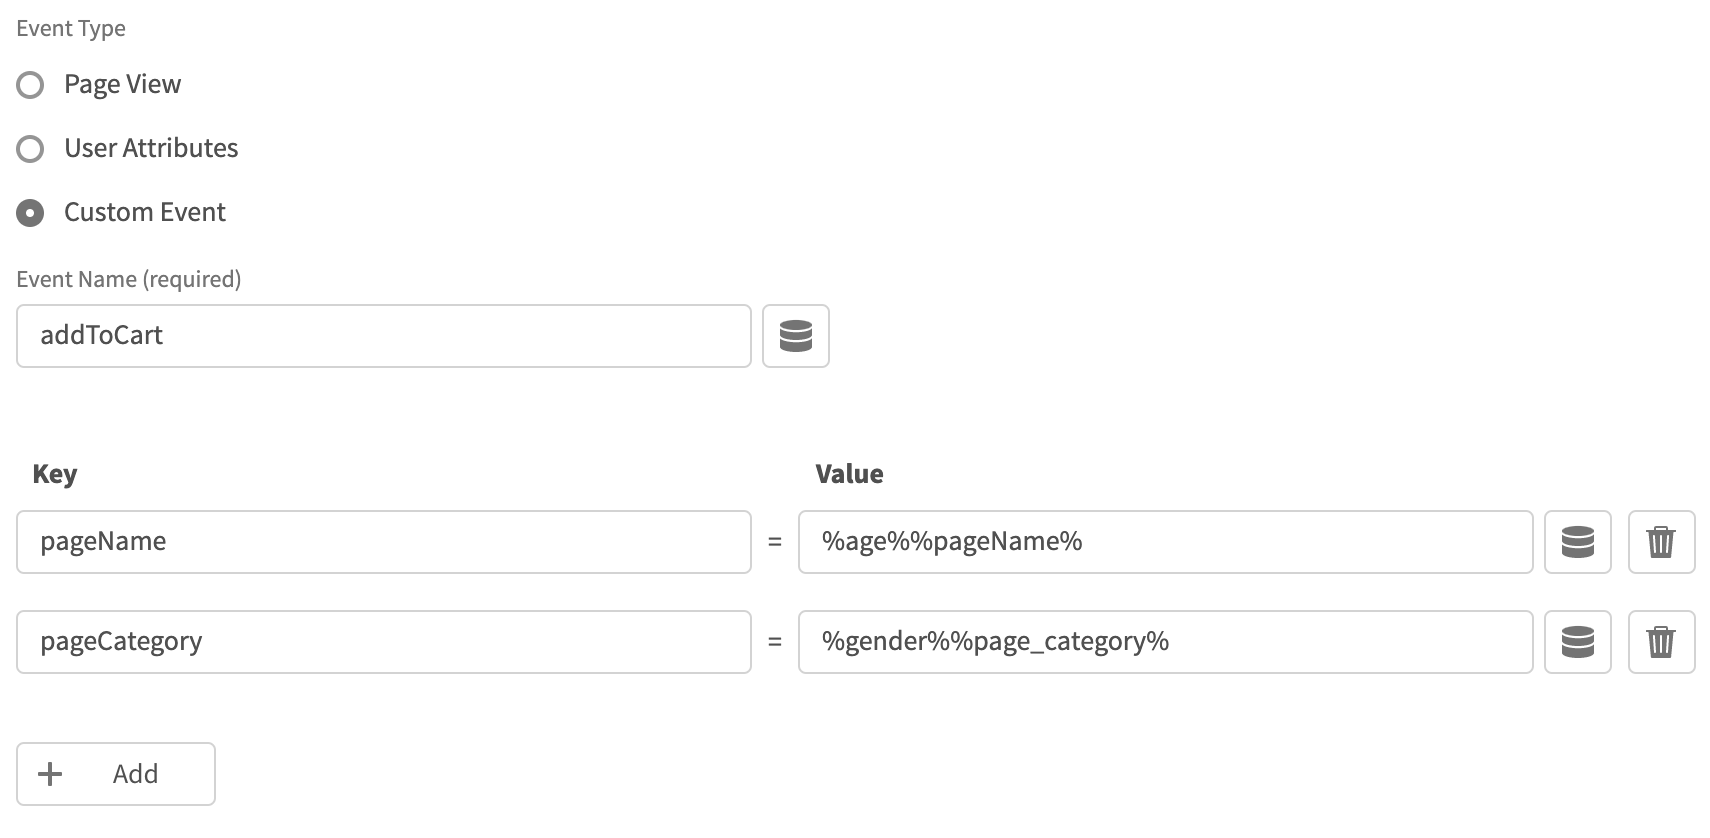 |
Cookie Sync
Zeotap allows you to collect the user’s web data from different platforms and target the users by cookie syncing with selected partners. You can use the Zeotap’s list of integrated partners for cookie syncing.Note:For Zeotap Collect Extension, Cookie Sync is enabled by default. To disable it, reach out to the Zeotap POC.
Zeotap Collect Extension Checklist
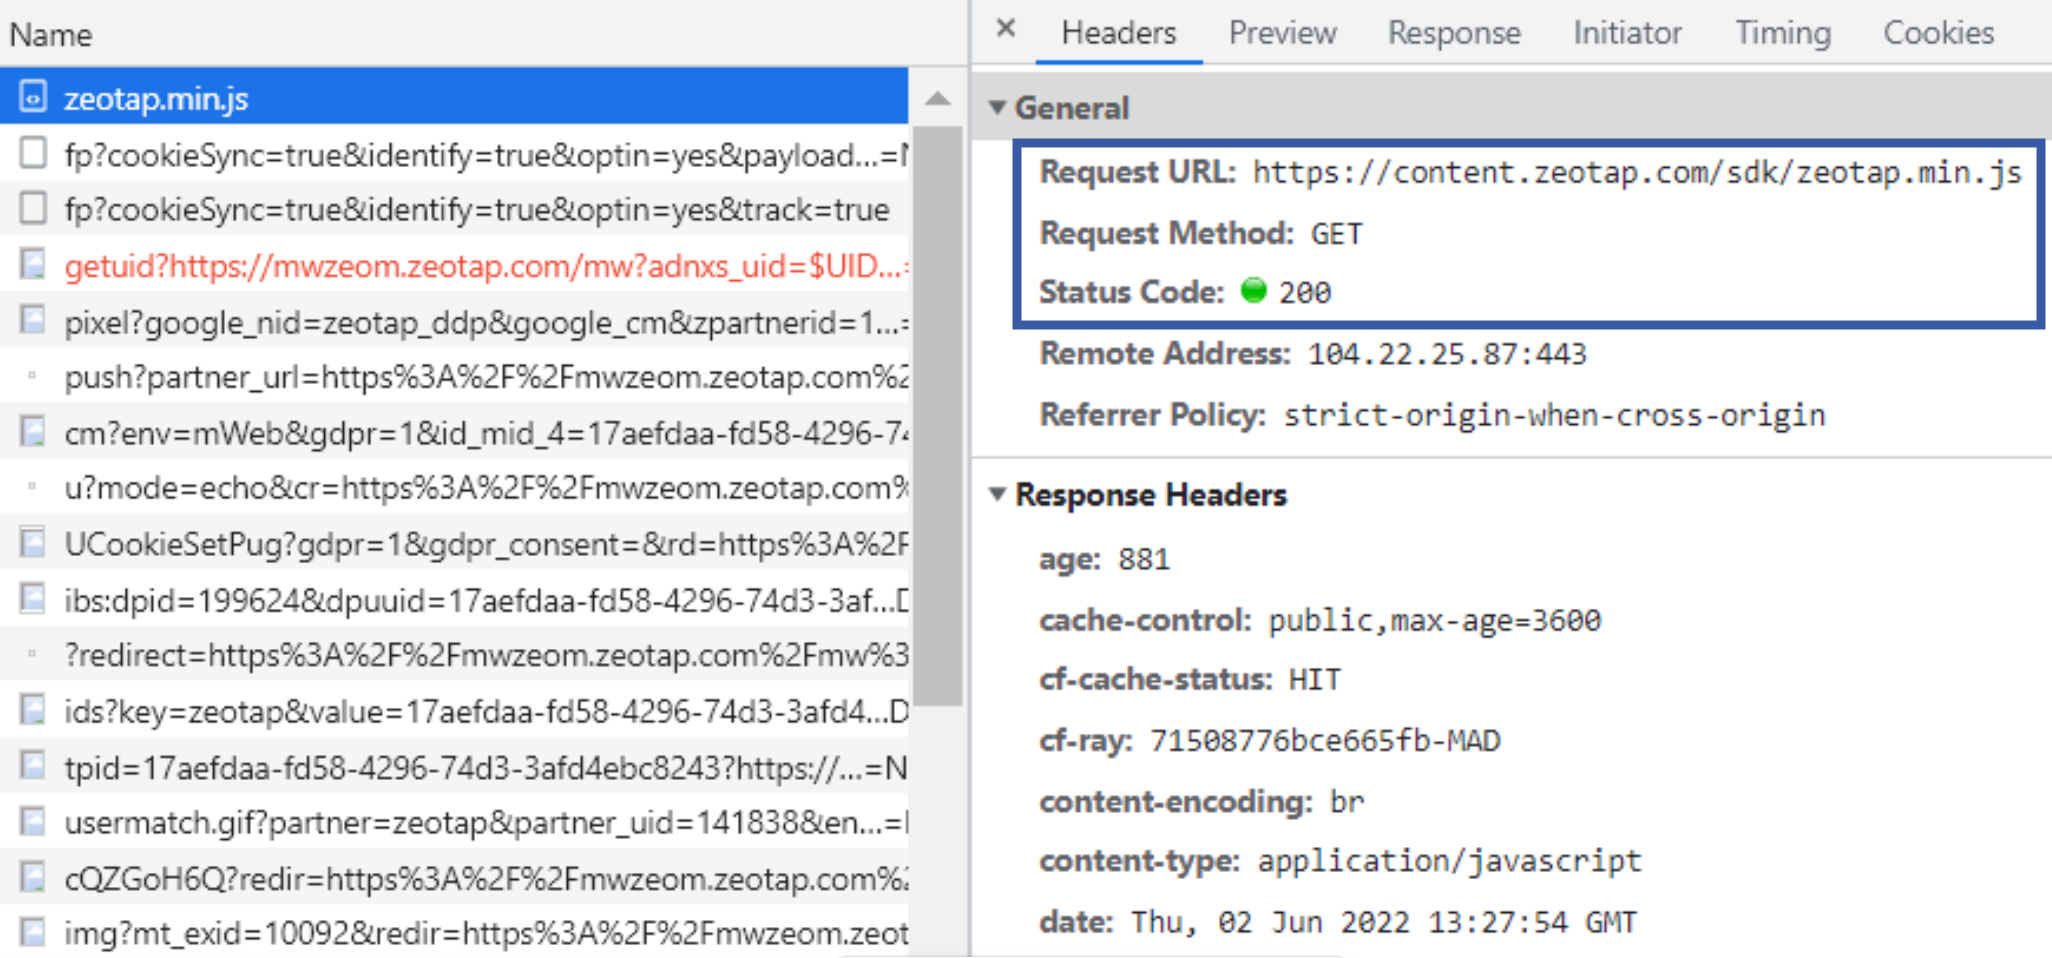
This checklist covers the important activities that you can perform to check the implementation of the Zeotap Collect Extension within the Adobe Experience Platform.- Once the customer initiates the Zeotap Init action, at first, they must confirm that the
zeotap.min.jsSDK fetch call returns a status of 200 as shown below.
- To verify that the integration is functioning properly, enter Zeotap on the Console tab. The expected response is the object displayed below.
e {_q: Array(0), _qcmp:Array(0)}
Note:Note that if the response is undefined, it indicates that the Zeotap’s initialisation is unsuccessful. Additionally, the variables _q and _qcmp must be empty arrays. If they are not, the events are added to the queue while the consent is still unresolved.
- Check the Fetch/XHR calls (GET and POST calls) in the Network tab.
-
GET call: Facilitates cookie sync with our channel partners.
-
POST call: After you implement the Zeotap Track Event action, you can see these POST calls under the Network section. The expected POST call is 204 > ok.
 Note:Verify that the
write_keyis correct if the response is not 204/200.
-
GET call: Facilitates cookie sync with our channel partners.
Events flowing into Zeotap CDP
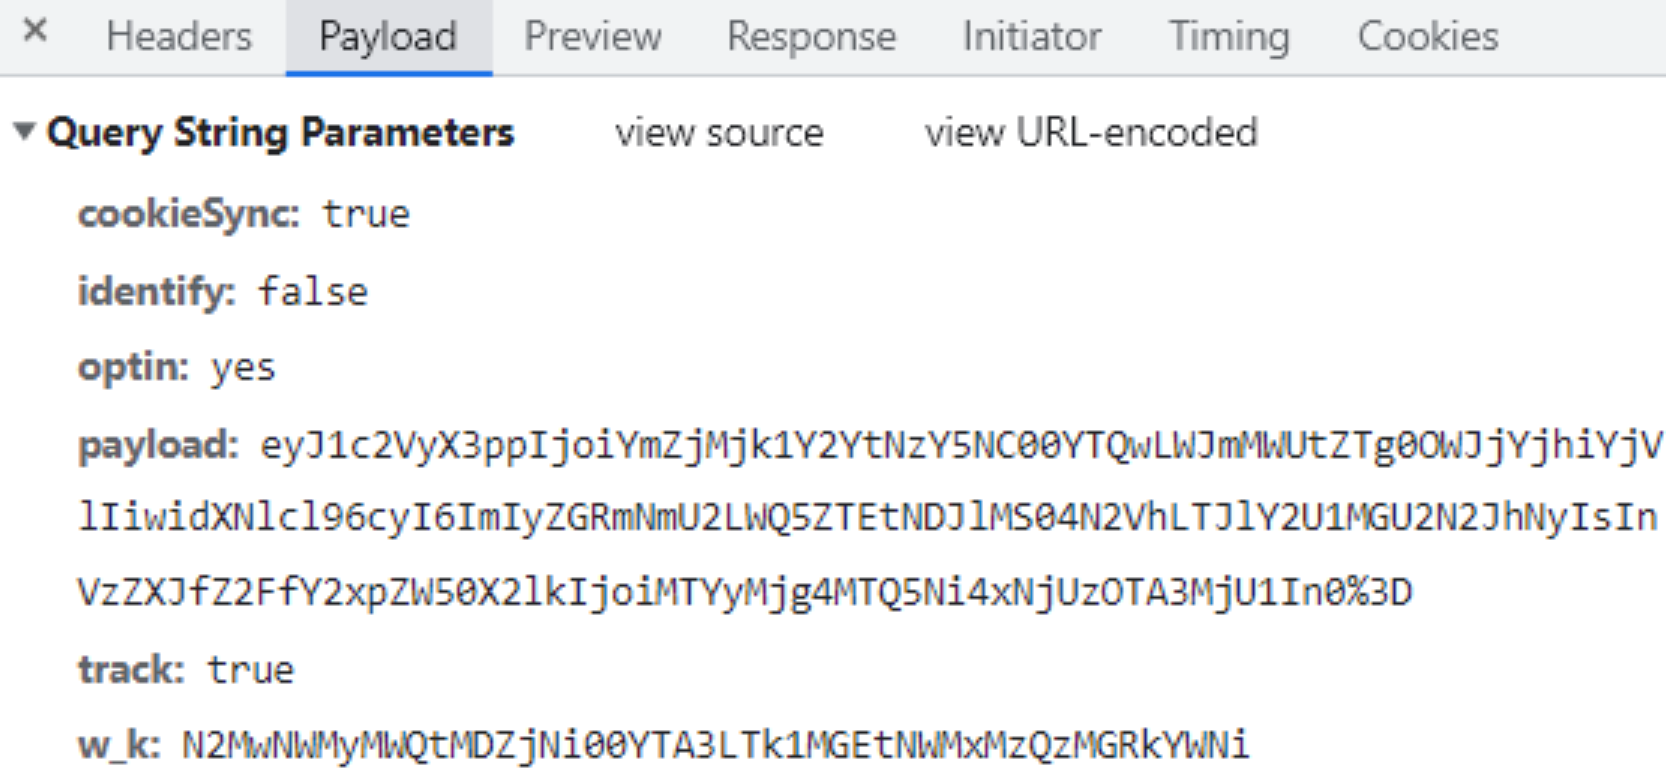
Once you have created an Adobe Experience Platform Tag Extension source and successfully completed the implementation stages, it is essential that you understand how the events flow into Zeotap CDP. This forms the base for all the downstream systems that the events flow into and get consumed.Call to Initiate Cookie Syncing
Request| Query Parameter | Description |
|---|---|
optin | This indicates whether the SDK has consent for any of the actions or not. |
track | This indicates whether the SDK has consent to track event or user data. |
identify | This indicates whether the SDK has consent to identify the user, using Zeotap ID+ 1P cookie. |
cookieSync | This indicates whether the SDK has consent to cookieSync with the organisation’s channel partners. |
cmp | This indicates whether consent is resolved through the TCFAPI present on the page; 1 if True, else 0 for False. |
gdpr_consent | This indicates the TCF V2 consent string, if the Consent Resolution mechanism selected is TCF. |
| Query Parameter | Description |
|---|---|
w_k | This indicates the encoded write_key of the Zeotap Collect Source. |
payload | This indicates the encoded identities passed to the Zeotap JavaScript on the website. This can be User PIIs or Custom Identities, along with the default 1P cookies set by the JavaScript on the website after initialisation. |
<img style='display:none' src='{{REDIRECTION_URL}}'>
Call to capture Event Data
Request URL -<https://spl.zeotap.com/fp?cookieSync=true&identify=true&optin=yes&track=true>
Request Method - POST
Request Payload
The request payload consists of the following nodes:
- Event node to capture the event properties
- User node to capture user identities whether hashed or raw identities, based on the hashing configuration
- Page node to capture page related information like url, referrer, pageCategory and more
Code
ID5 Integration
The Zeotap SDK offers an optional integration with ID5. You need your unique Partner ID provided by ID5 to integrate it using Zeotap.Step 1: Add the ID5 JavaScript Library
- Load the ID5 JavaScript library on the client’s website, in your script section.
- Include the library after the CMP JavaScript and before the Zeotap Collect SDK.
JavaScript
Step 2: Configure ID5 in Zeotap Tag
- Check the enable ID5 option on the configure screen of extension.
- Input the associated ID5 Partner ID.
-
If you wish to share the
sha256hashed email and cellphone number, check the send custom identifier to ID5 option.
Step 3: Transmission of ID5 id to Zeotap
- Zeotap interacts with ID5 and attempts to retrieve the ID5 id.
- This ID (if obtained) is then transmitted in all events under user node in the payload.
- ID5 User id is then logged into the zeotap platform.
Troubleshooting
| Known Issue | Error | Reason | Resolution |
|---|---|---|---|
| In some cases, the Zeotap action scripts can run into a race condition. In such cases the rules implementing Track Event or Sync User Identities can throw an error. | • VM3703:2 Uncaught (in promise) TypeError: Cannot read properties of undefined (reading 'setPageProperties')• Uncaught (in promise) TypeError: Cannot read properties of undefined (reading 'setUserIdentities';) | This occurs when the Zeotap Init and Track Event/Sync User Identities actions are occurring at the same time. As a result, the Zeotap SDK methods are being called before the Zeotap JS is initialised on the page. | To fix this, a Custom Code Event is used to fire the Track Event/Sync User Identities rule, which checks if the Zeotap SDK is initialised or not. Here is an example of how to create a Custom Code Event:// this code checks if zeotap is initialised after every 1 second, once initialised it triggers the event and clears the interval.const interval = setInterval(() => {if (window.zeotap) {// Zeotap script initialisedtrigger()clearInterval(interval)}}, 1000) |
Use Cases
Learn more about implementing the Adobe Experience Platform Tag Extension through the use cases explained below.Use Case 1: Add to Cart Event
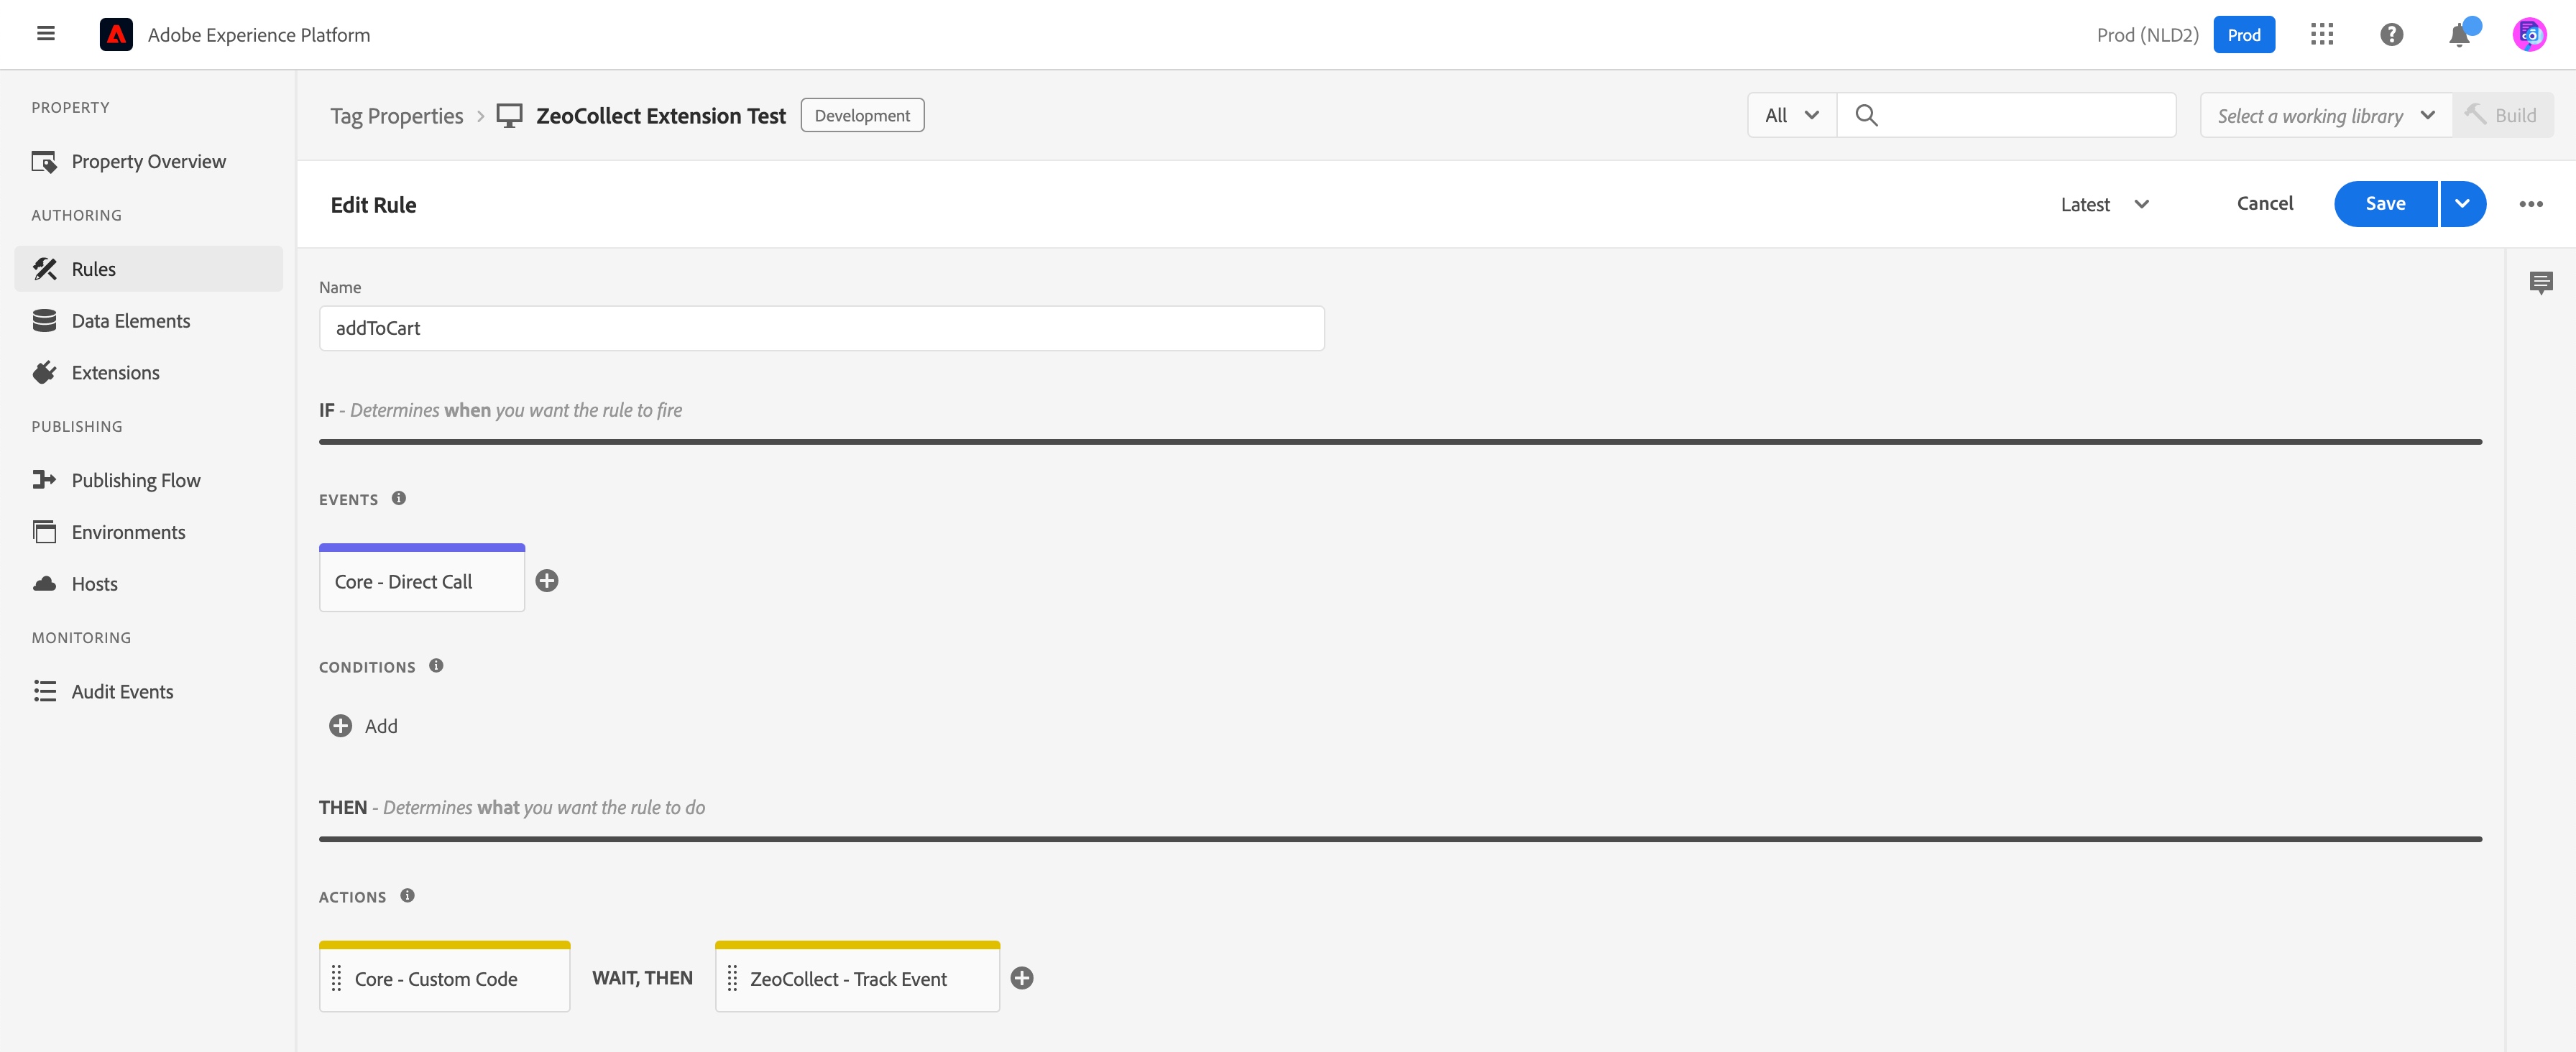
This use case explains how to configure the Add to Cart event on the Adobe Experience Platform. After you add and configure the Tag by providing the Write key, Consent method and PII hashing configuration, you must set the Rules for the Add to Cart event by specifying the actions to occur if the condition is met.
Enter a name for the Rule, like addToCart. Configure the Events and Actions as mentioned in the section below. Note that based on the events configured, the actions occur.

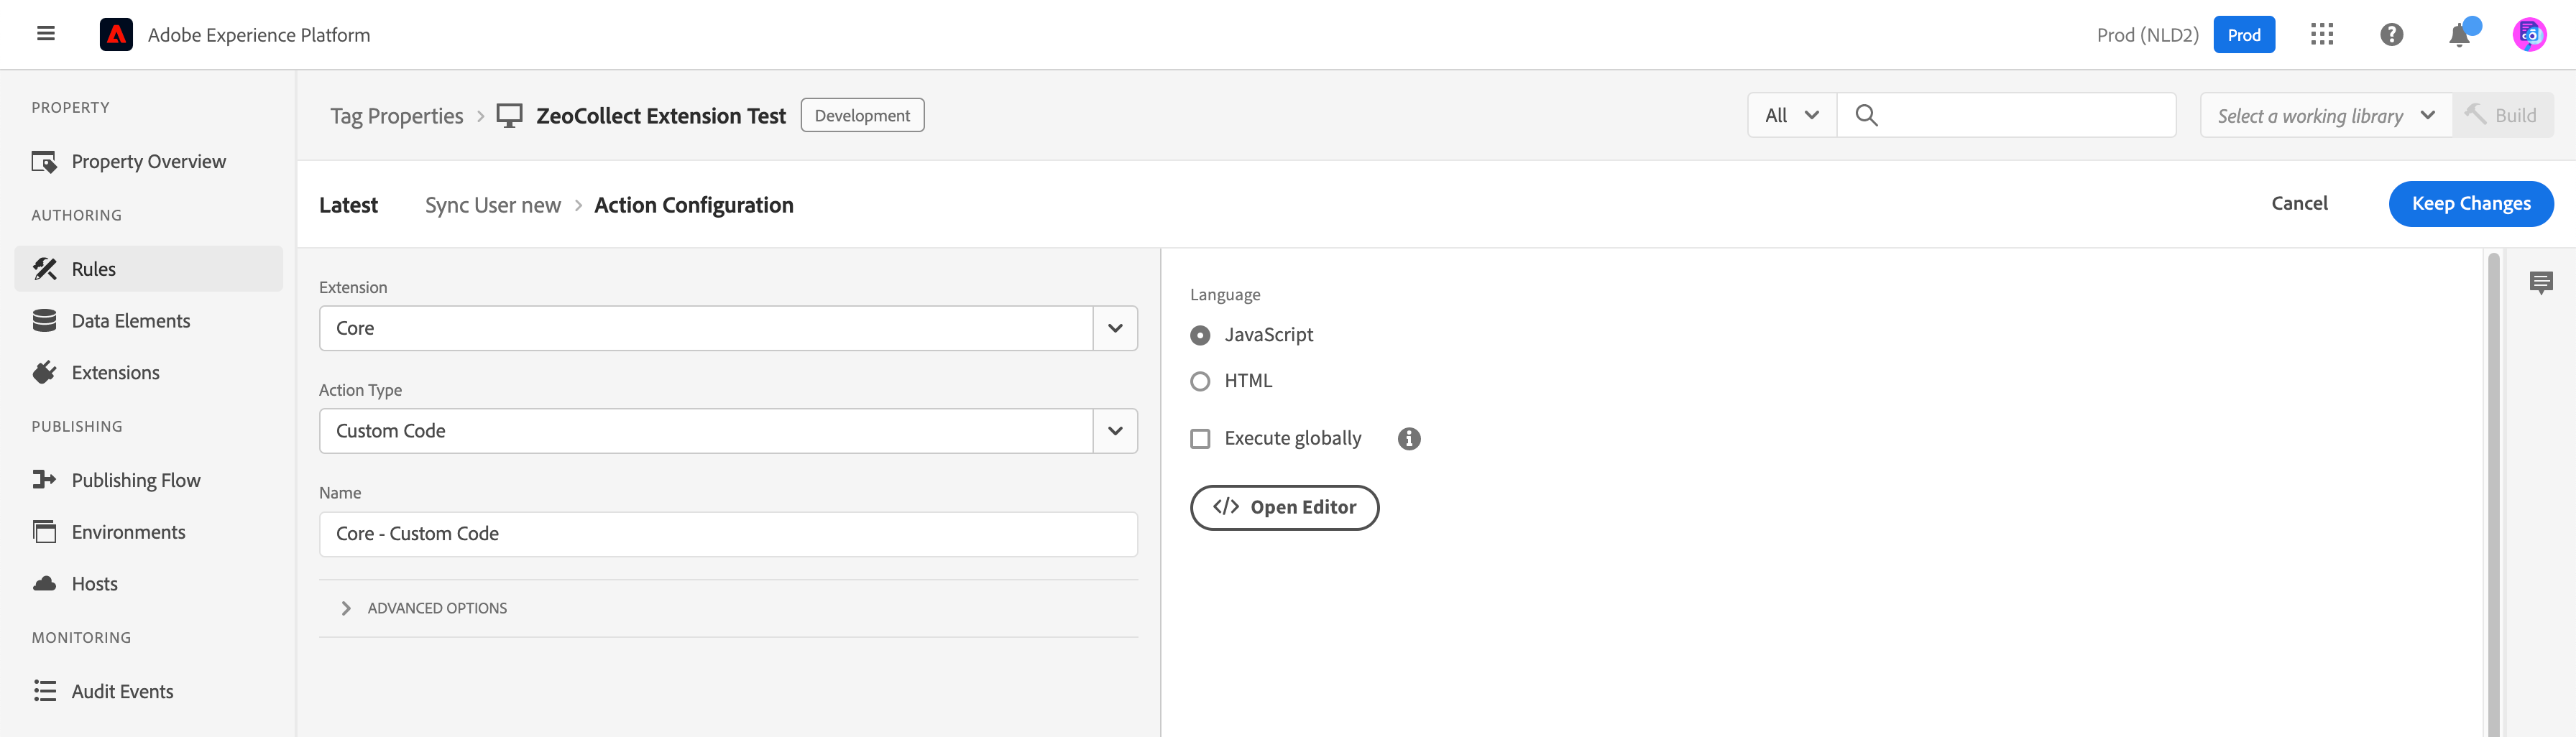
In the window that appears, make the following selections:a. Select Core as the Extension. Note that some default event types are available for each Extension.b. Select Direct Call as the Event Type. In the Identifier field that appears enter a string that is passed to 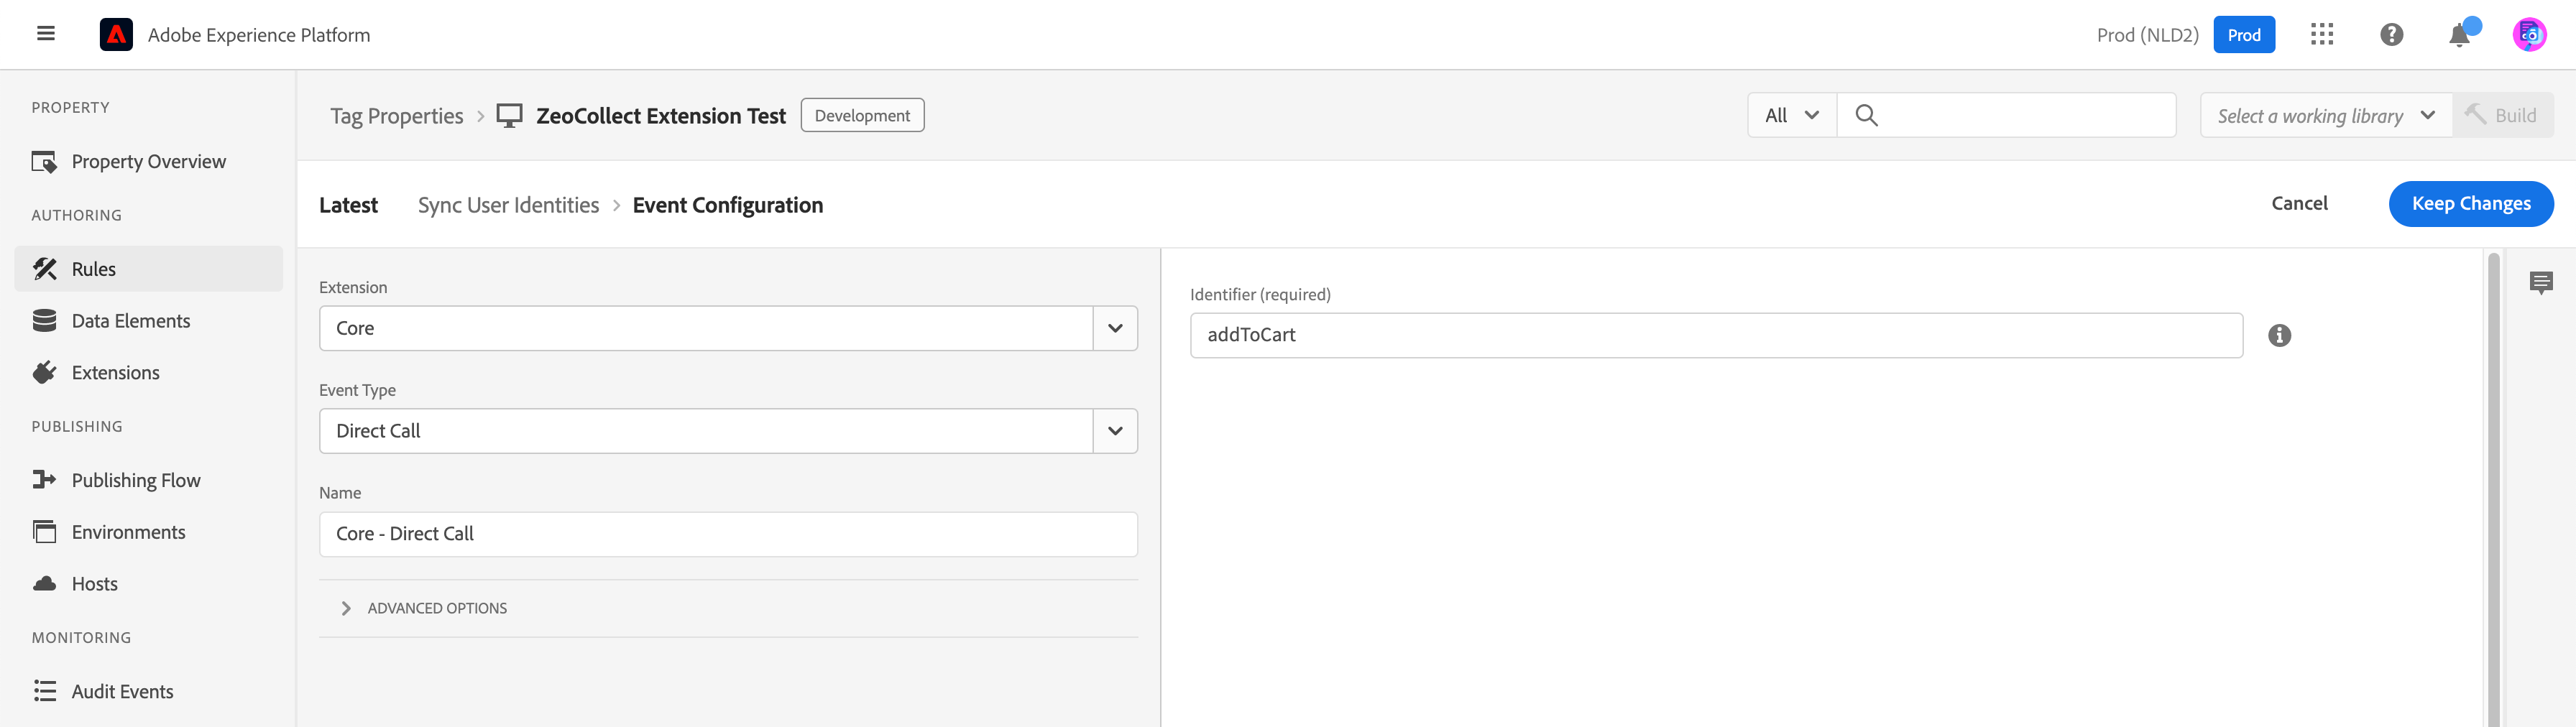
_satellite.track( ) in the Direct Call, without any quotes(’). Here, addToCart is the string passed.c. The Name field is auto-populated based on the selected Extension and Event Type. Click Keep Changes to save the event configuration.To trigger the event, invoke the following from the website:
_satellite.track('addToCart', { ... event params })

Another Action to collect the user identities is configured using the following attributes: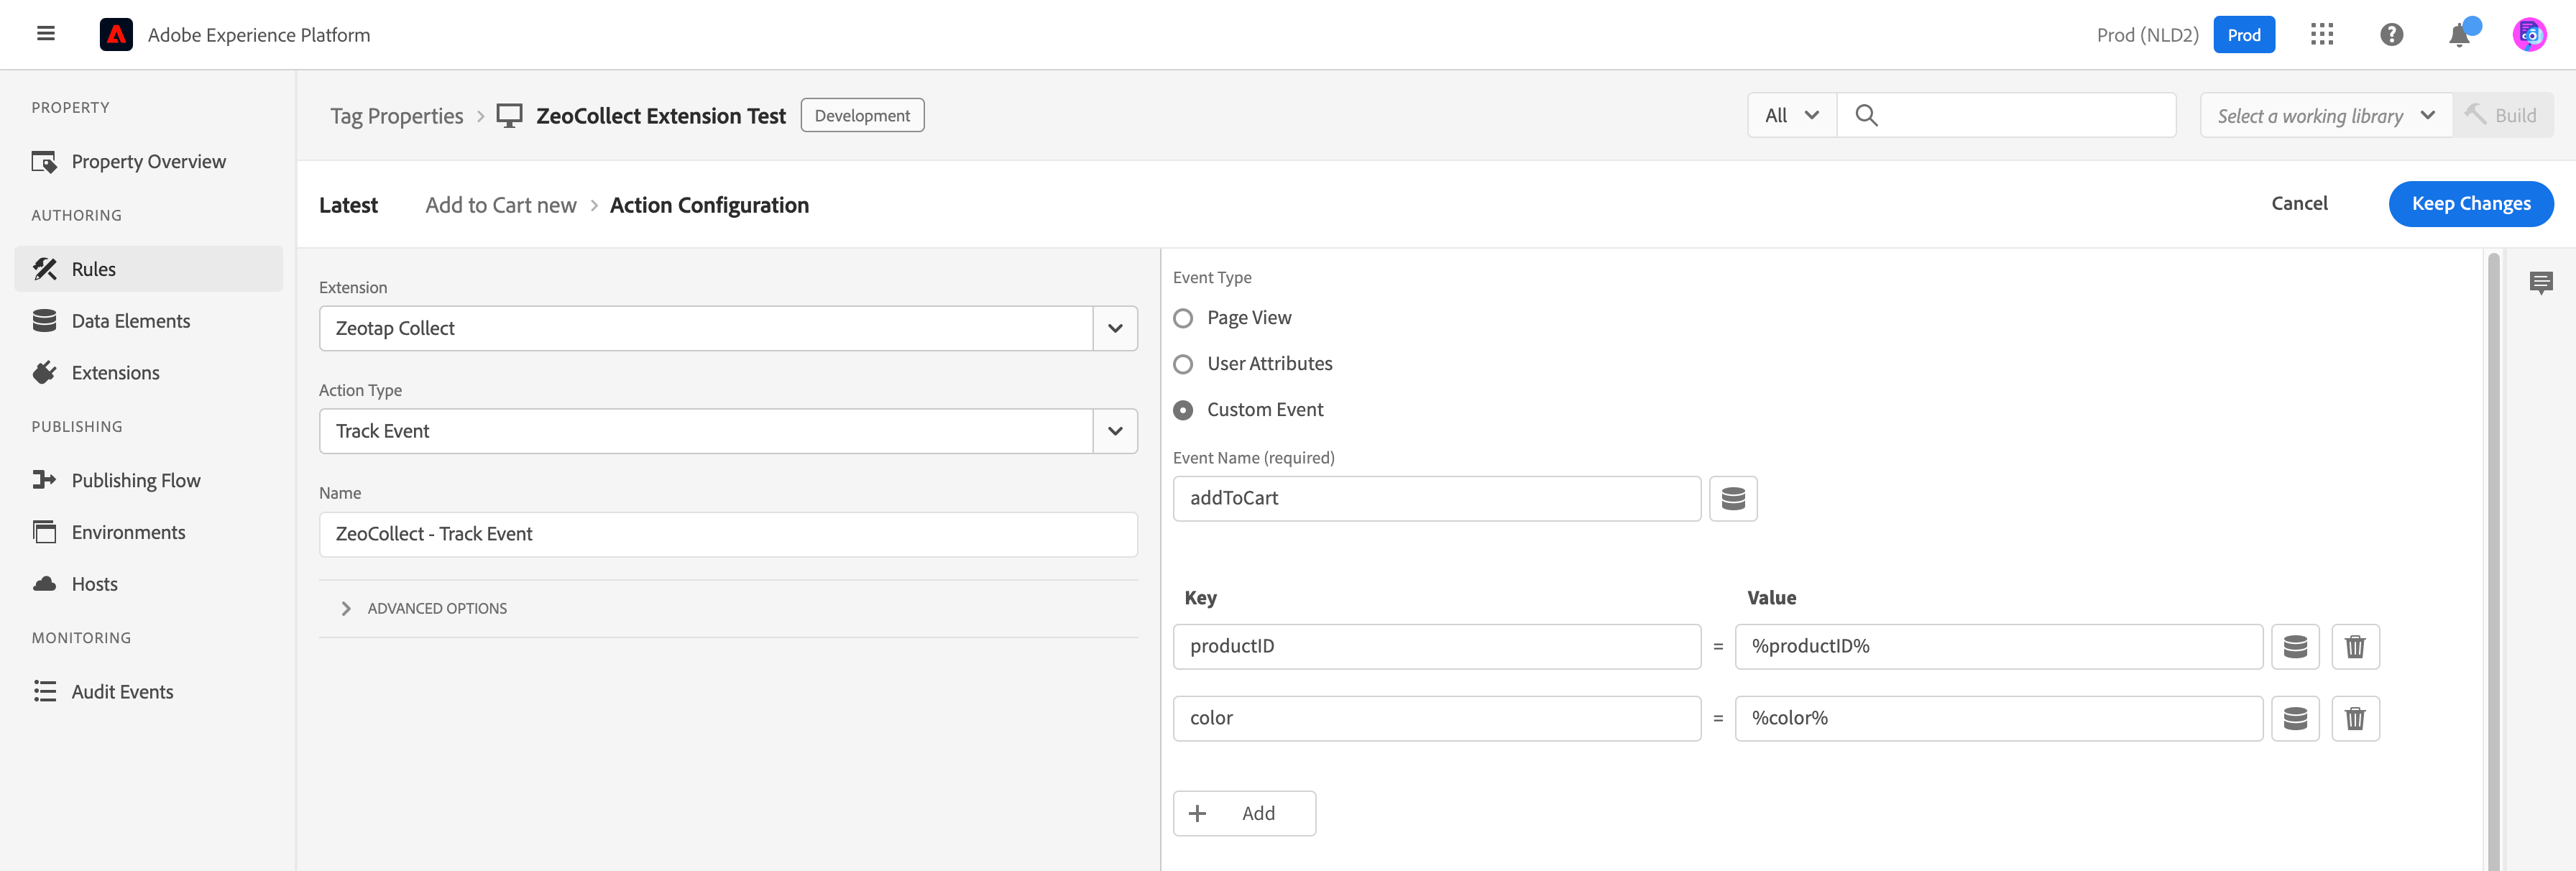
- Extension: Zeotap Collect
- Action Type: Track Event
- Event Type: Custom Event (the key-value pair is set based on the data tracking requirement)
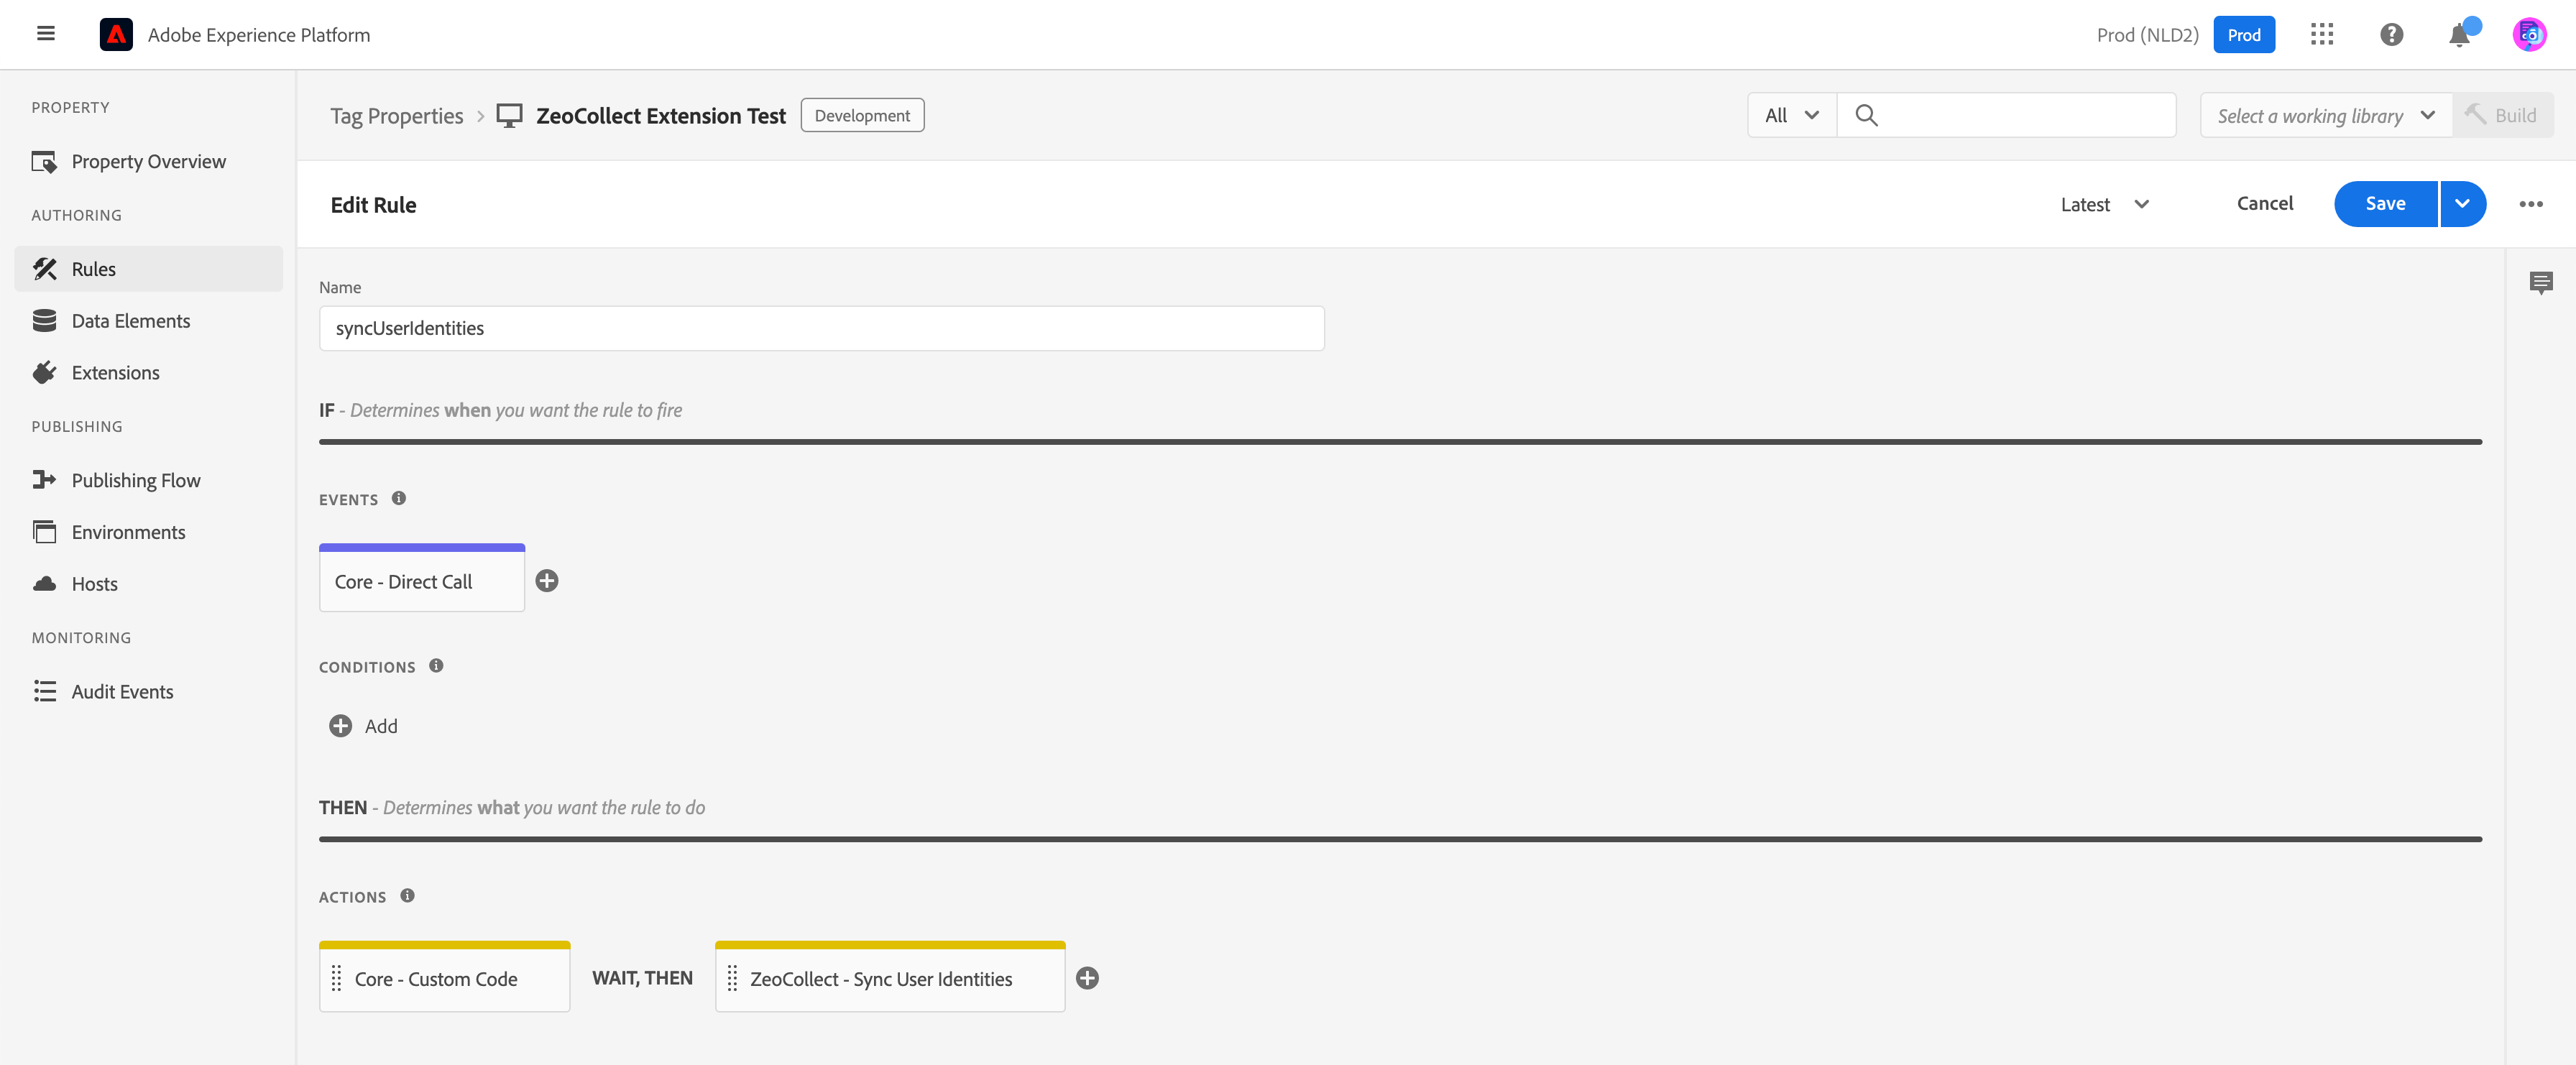
Use Case 2: Sync User Identities
The Sync User Identities event allows the client to share user PII or custom identities from their website to the Zeotap CDP to create unique user profiles. This use case explains how to configure the Sync User Identities event in the Adobe Experience Platform. After you have added and configured the Tag by providing the Write key, Consent method and PII hashing configuration, you must set the Rules for Sync User Identities by specifying that actions to occur if the condition is met.
Enter a name for the Rule, like syncUserIdentities. Configure the Events and Actions as mentioned in the section below. Note that based on the events configured, the actions occur.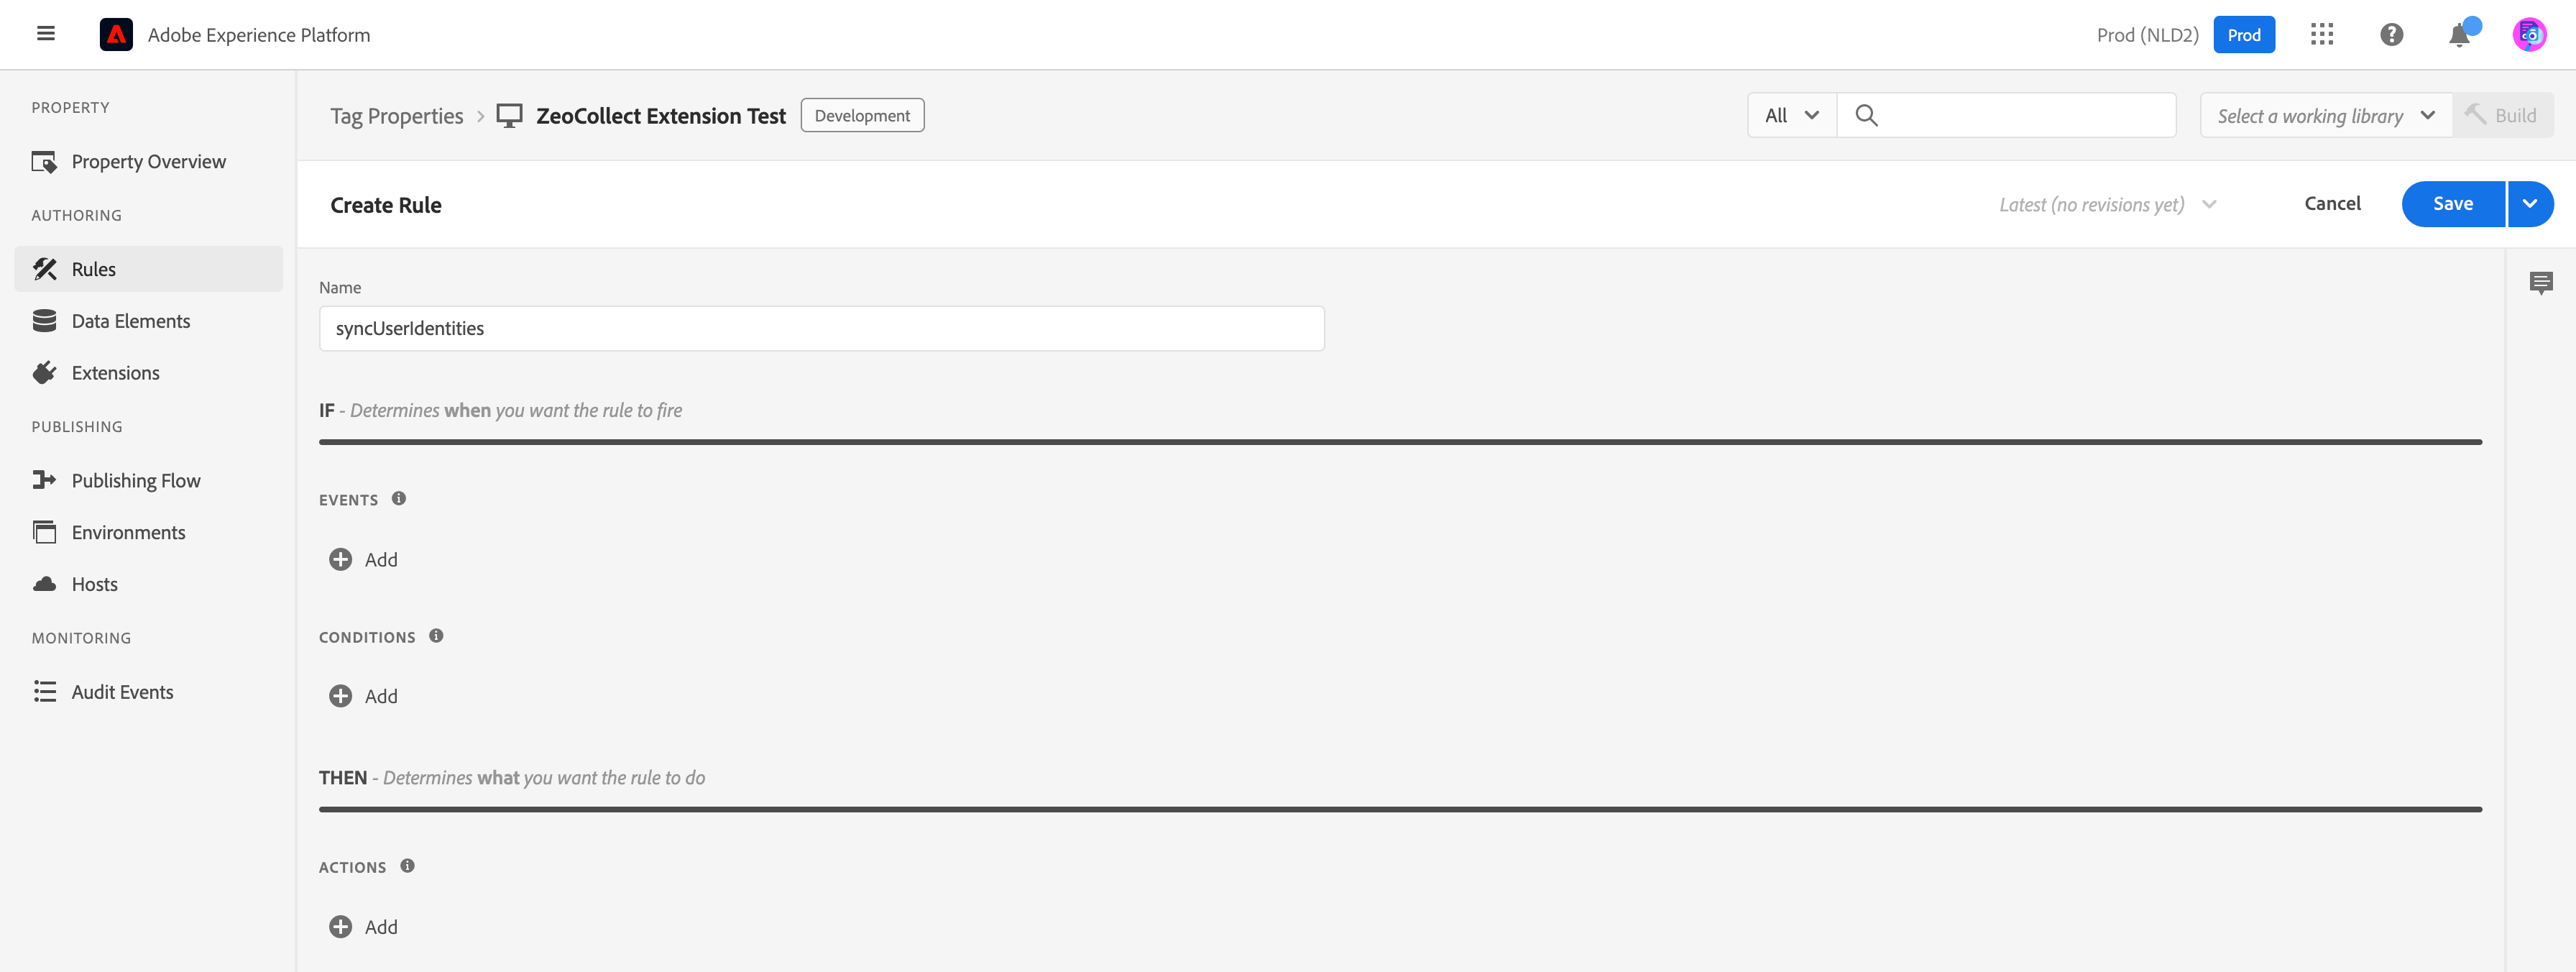
In the window that appears, make the following selections:a. Select Core as the Extension. Note that some default event types are available for each Extension.b. Select Direct Call as the Event Type. In the Identifier field that appears enter a string that is passed to 
_satellite.track( ) in the Direct Call, without any quotes(’). Here, syncUserIdentities is the string passed.c. The Name field is auto-populated based on the selected Extension and Event Type. Click Keep Changes to save the event configuration.To trigger the event, invoke the following from the website:
_satellite.track('syncUserIdentities', { ... event params })
Another Action to collect the user PII or custom identities is configured with the following attributes: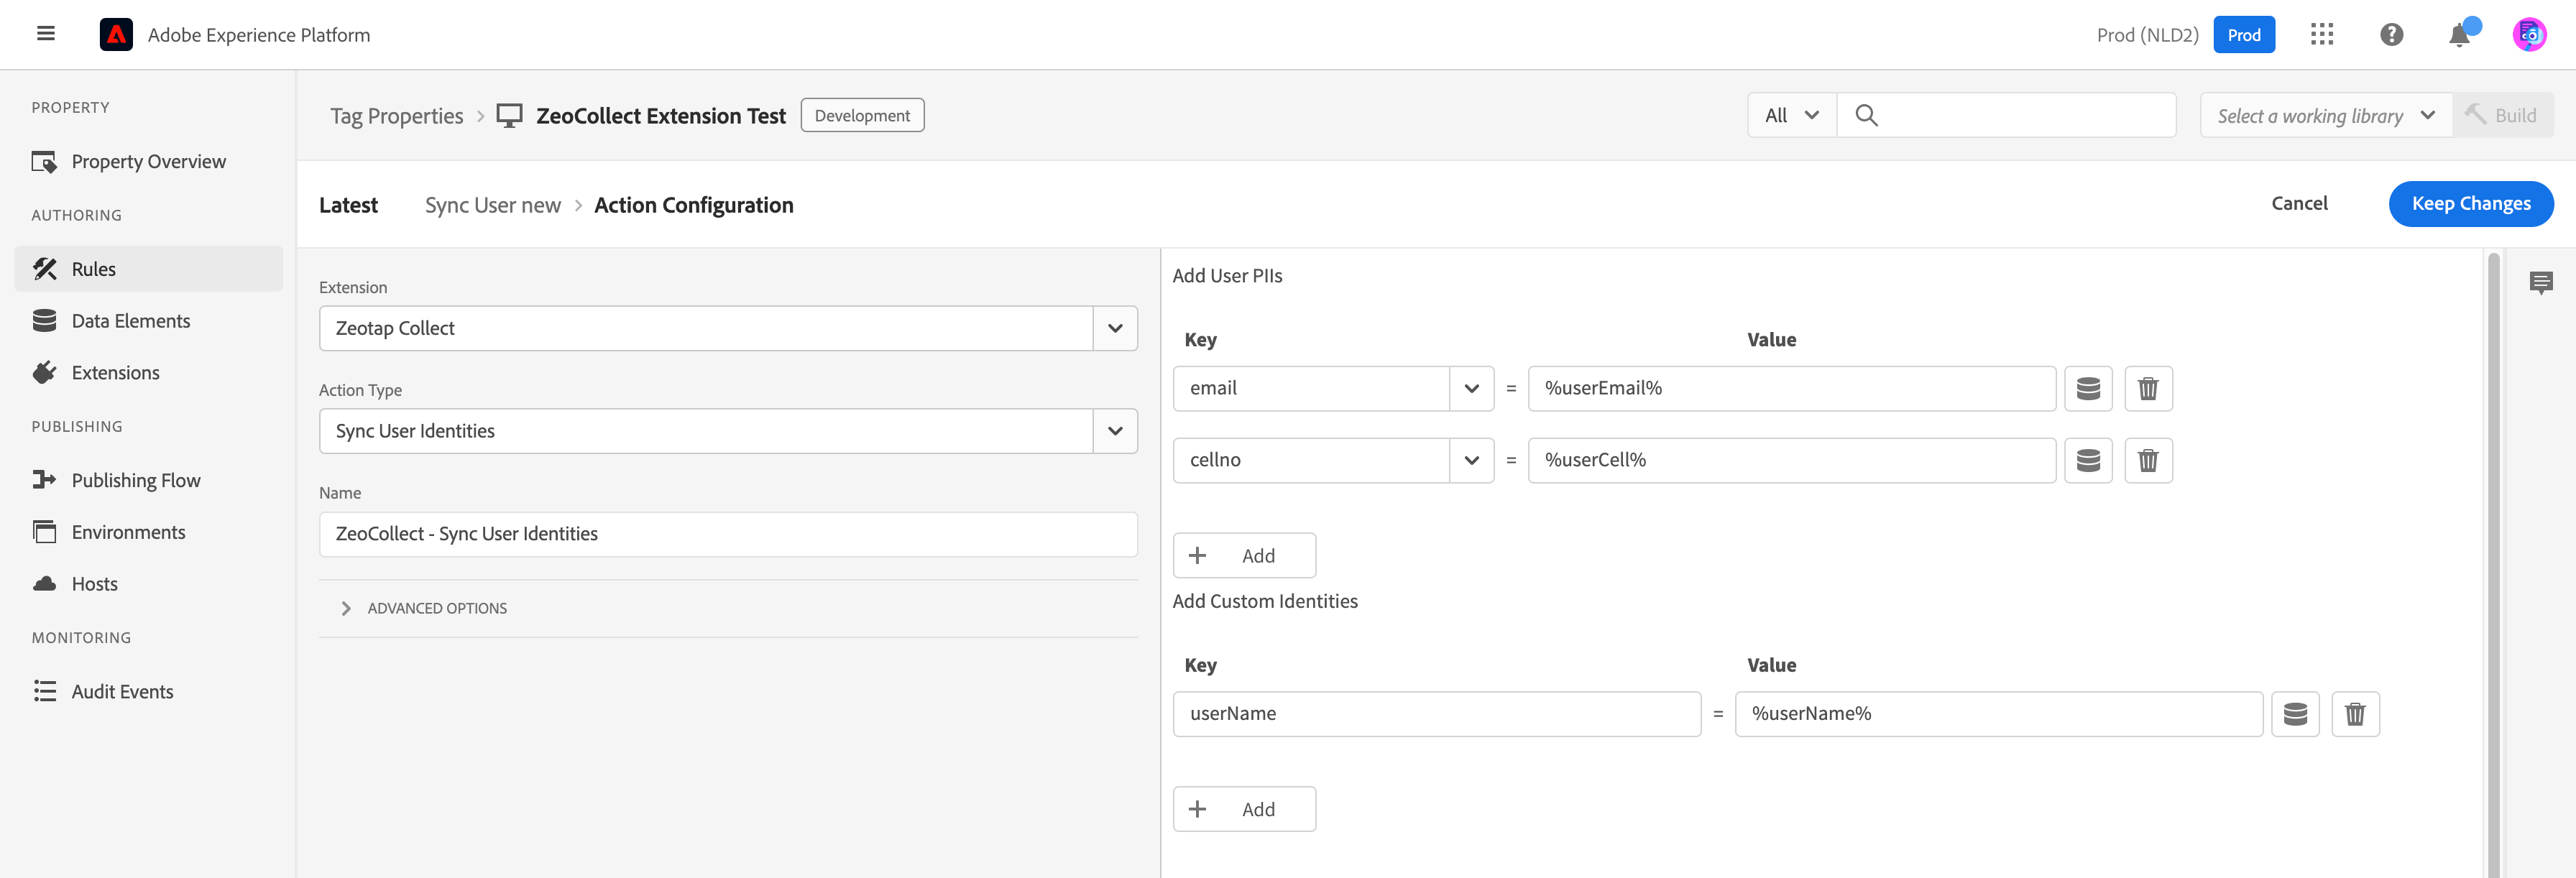
- Extension: Zeotap Collect
- Action Type: Sync User Identities
- In the RHS interface, set the key-value pair based on the data tracking requirement.