> ## Documentation Index
> Fetch the complete documentation index at: https://docs.zeotap.com/llms.txt
> Use this file to discover all available pages before exploring further.
# Salesforce CRM Real Time Integration
## Overview
Salesforce CRM is a top cloud-based platform that streamlines customer interactions. It centralizes customer data, allowing sales, service, and marketing teams to manage leads, track opportunities, and automate campaigns. This unified approach strengthens relationships, boosts satisfaction, and drives growth through tools for lead management, analytics, and personalized experiences. This integration with Zeotap enables you to send **Contact records or custom-object records** to Salesforce CRM in real time.
## Pre requisites
Before using this destination, you must have the following:
1. **Salesforce Organization**: Active Salesforce org (Developer, Sandbox, or Production).
a. The org's unique domain name can be found in **Setup > My Domain**.
2. **API User**: A Salesforce user with API access permissions and appropriate object-level **(Read, Create, Edit)** and field-level security. You log in as this user when connecting the destination.
3. **External ID Field**: The target sObject must have an **external ID field** configured for upsert operations.
a. This is a custom field you create on the target object. **Navigate to Setup > Object Manager > your object > Fields & Relationships > New**, create the field, and ensure the **"External ID"** attribute is checked. For custom objects, you enter this field's name in the mapping.
## Creating a Destination
Log into the **Zeotap CDP** App and go to the **DESTINATIONS** application.
Click **+ Create Destination**.
Under **All Destinations**, search for **Salesforce CRM : Journeys**.
Click on **Salesforce CRM : Journeys**. A screen appears displaying details about the particular destination towards the left. On the right-hand side of the screen, enter the required details:
a. Enter a name for the Destination.
b. Enter the **Domain Name** — your Salesforce domain, excluding the domain suffix. For example, for `zeotap6-dev-ed.develop.my.salesforce.com`, enter `zeotap6-dev-ed.develop`.
c. Enter the **Destination Instance**.
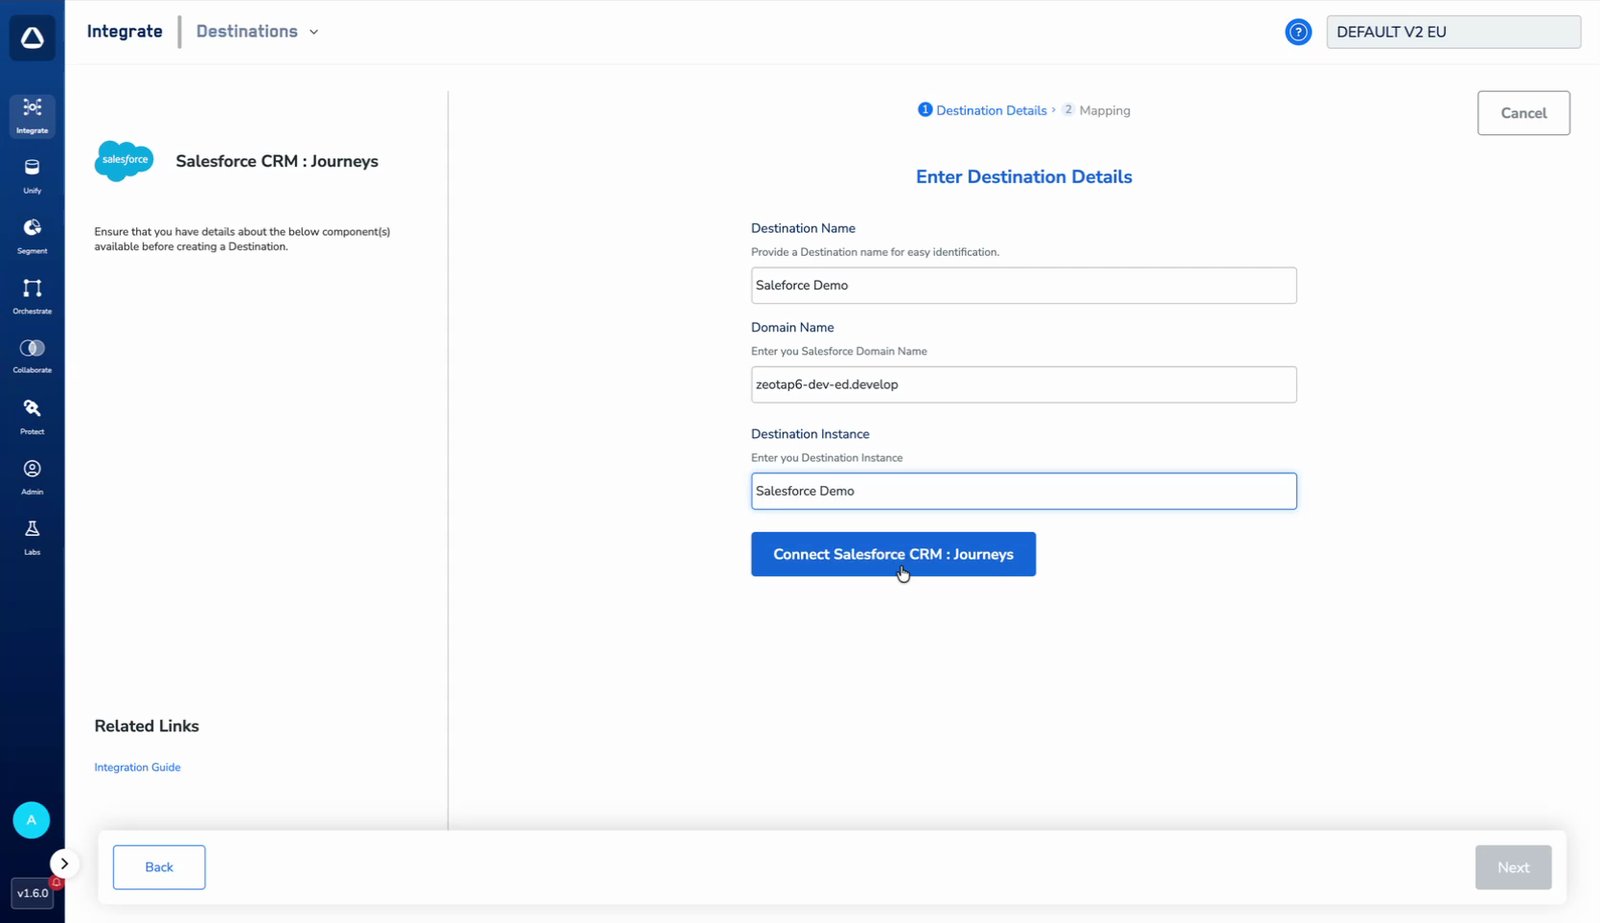 Click **Connect Salesforce CRM : Journeys** and log in with your Salesforce API user when prompted. Ensure this user has the necessary permissions (including API access) to read and update the records (e.g., Contacts, custom objects) used in this destination.
Once connected, the form confirms who established the connection, shows a note with the date on which the refresh token expires, and auto-fills the **Expires In** field. Reconnect the destination when the refresh token expires to keep the integration running.
Click **Connect Salesforce CRM : Journeys** and log in with your Salesforce API user when prompted. Ensure this user has the necessary permissions (including API access) to read and update the records (e.g., Contacts, custom objects) used in this destination.
Once connected, the form confirms who established the connection, shows a note with the date on which the refresh token expires, and auto-fills the **Expires In** field. Reconnect the destination when the refresh token expires to keep the integration running.
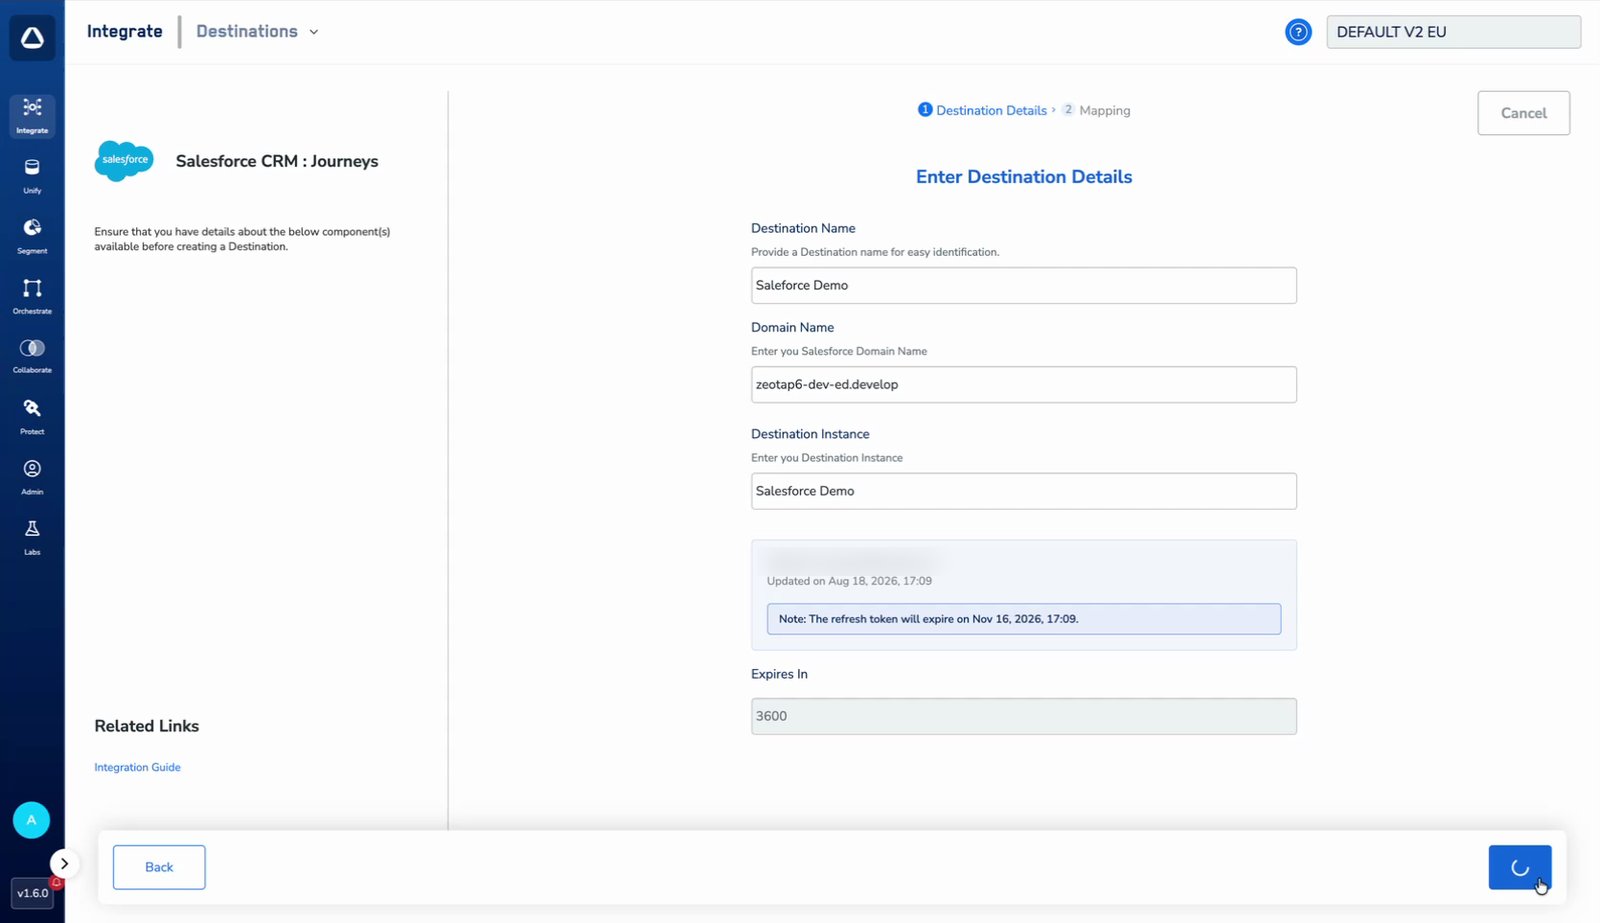 Click **Next** to proceed to the Mapping screen.
Under **Choose your Action**, select the action that matches what you want to send. This destination supports two actions:
Click **Next** to proceed to the Mapping screen.
Under **Choose your Action**, select the action that matches what you want to send. This destination supports two actions:
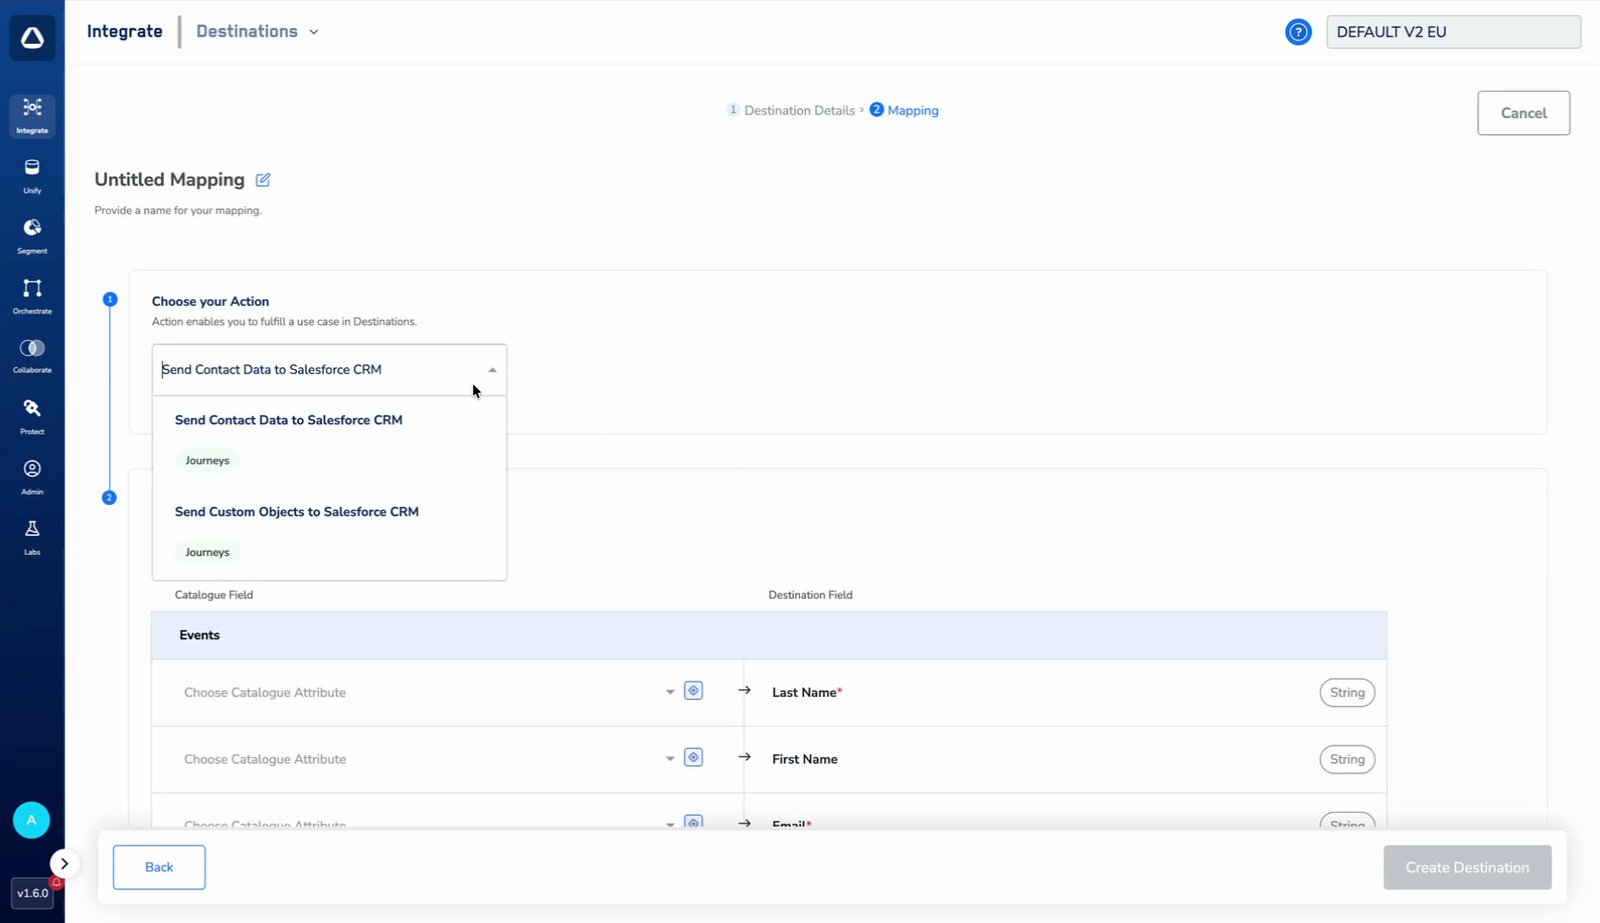 * **Send Contact Data to Salesforce CRM** — upserts Contact records.
* **Send Custom Objects to Salesforce CRM** — upserts records of any custom object in your org.
**If you chose Send Contact Data to Salesforce CRM**, map the fields to send under **Map the Fields**:
a. By default, the fields accepted by the platform, such as **Last Name, First Name, Email and Phone**, are displayed. However, you can edit, add, or remove a field from the list.
* **Send Contact Data to Salesforce CRM** — upserts Contact records.
* **Send Custom Objects to Salesforce CRM** — upserts records of any custom object in your org.
**If you chose Send Contact Data to Salesforce CRM**, map the fields to send under **Map the Fields**:
a. By default, the fields accepted by the platform, such as **Last Name, First Name, Email and Phone**, are displayed. However, you can edit, add, or remove a field from the list.
b. Mandatory Fields
1. **Last Name**
2. **Email**
c. Click **+Add Mapping Field** to include additional fields. For a complete reference, see the [List of Supported Fields](https://developer.salesforce.com/docs/atlas.en-us.sfFieldRef.meta/sfFieldRef/salesforce_field_reference_Contact.htm).
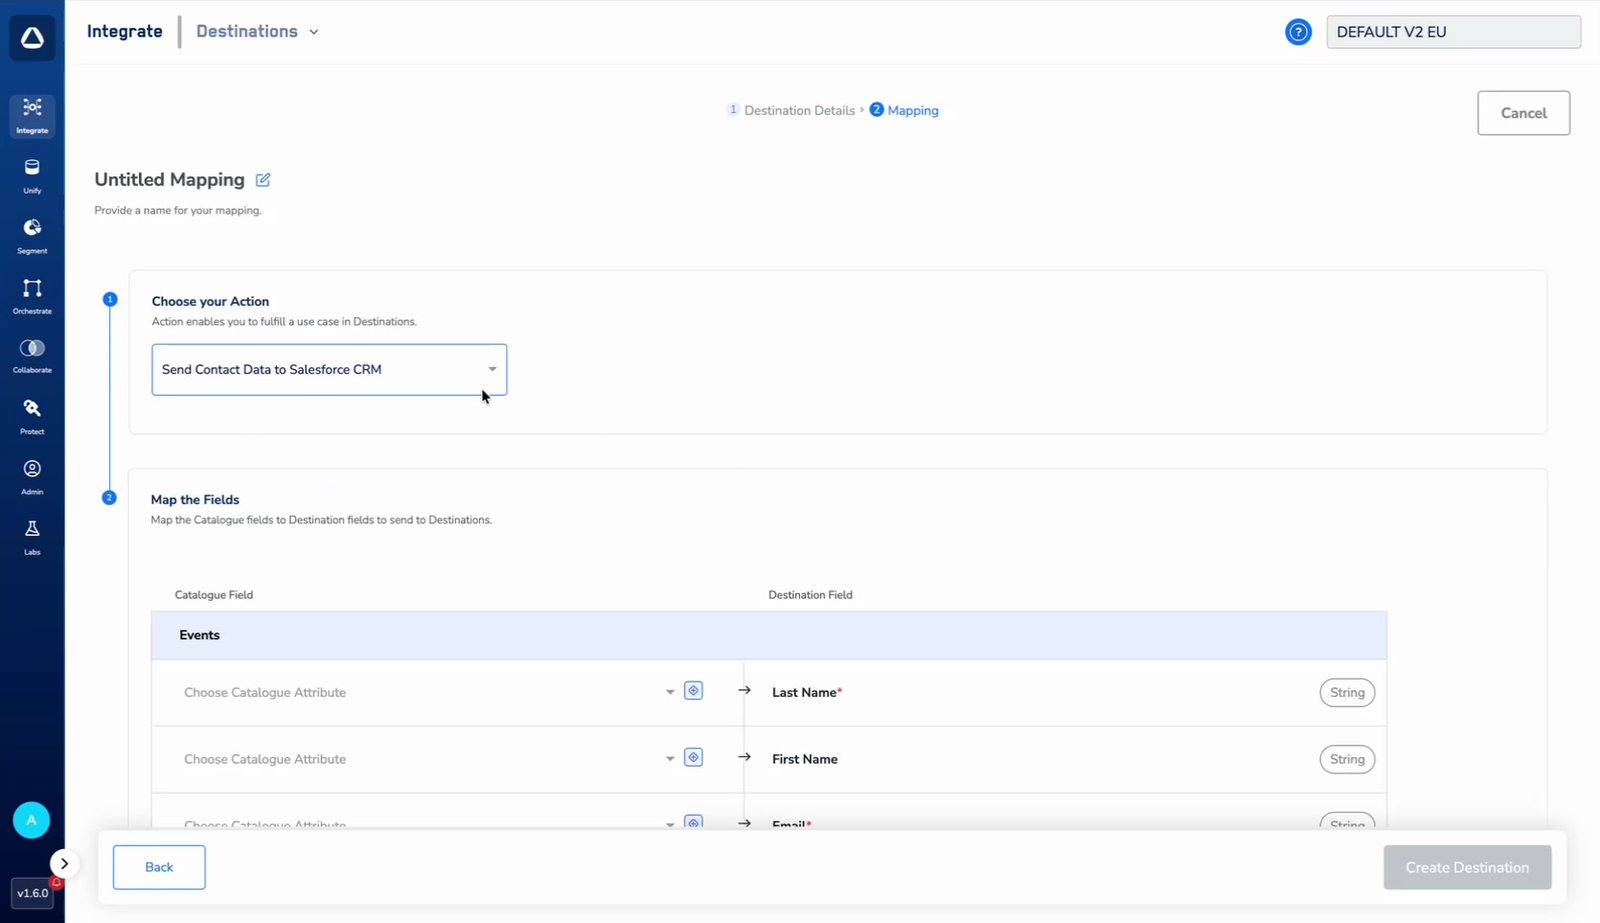 **If you chose Send Custom Objects to Salesforce CRM**, configure the mapping as follows:
a. Map a Catalogue attribute to **Unique ID**. This is mandatory — its value is matched against the external ID field on your custom object to upsert the record.
**If you chose Send Custom Objects to Salesforce CRM**, configure the mapping as follows:
a. Map a Catalogue attribute to **Unique ID**. This is mandatory — its value is matched against the external ID field on your custom object to upsert the record.
b. Click **+Add Mapping Field** to add each field you want to send, entering the field's name on the destination side and mapping a Catalogue attribute to it.
c. Under **Additional Settings**, enter the **Custom Object Name** — the object's API name (e.g., `Loyalty_Event__c`) — and the **External ID Field** — the API name of the external ID field on that object.
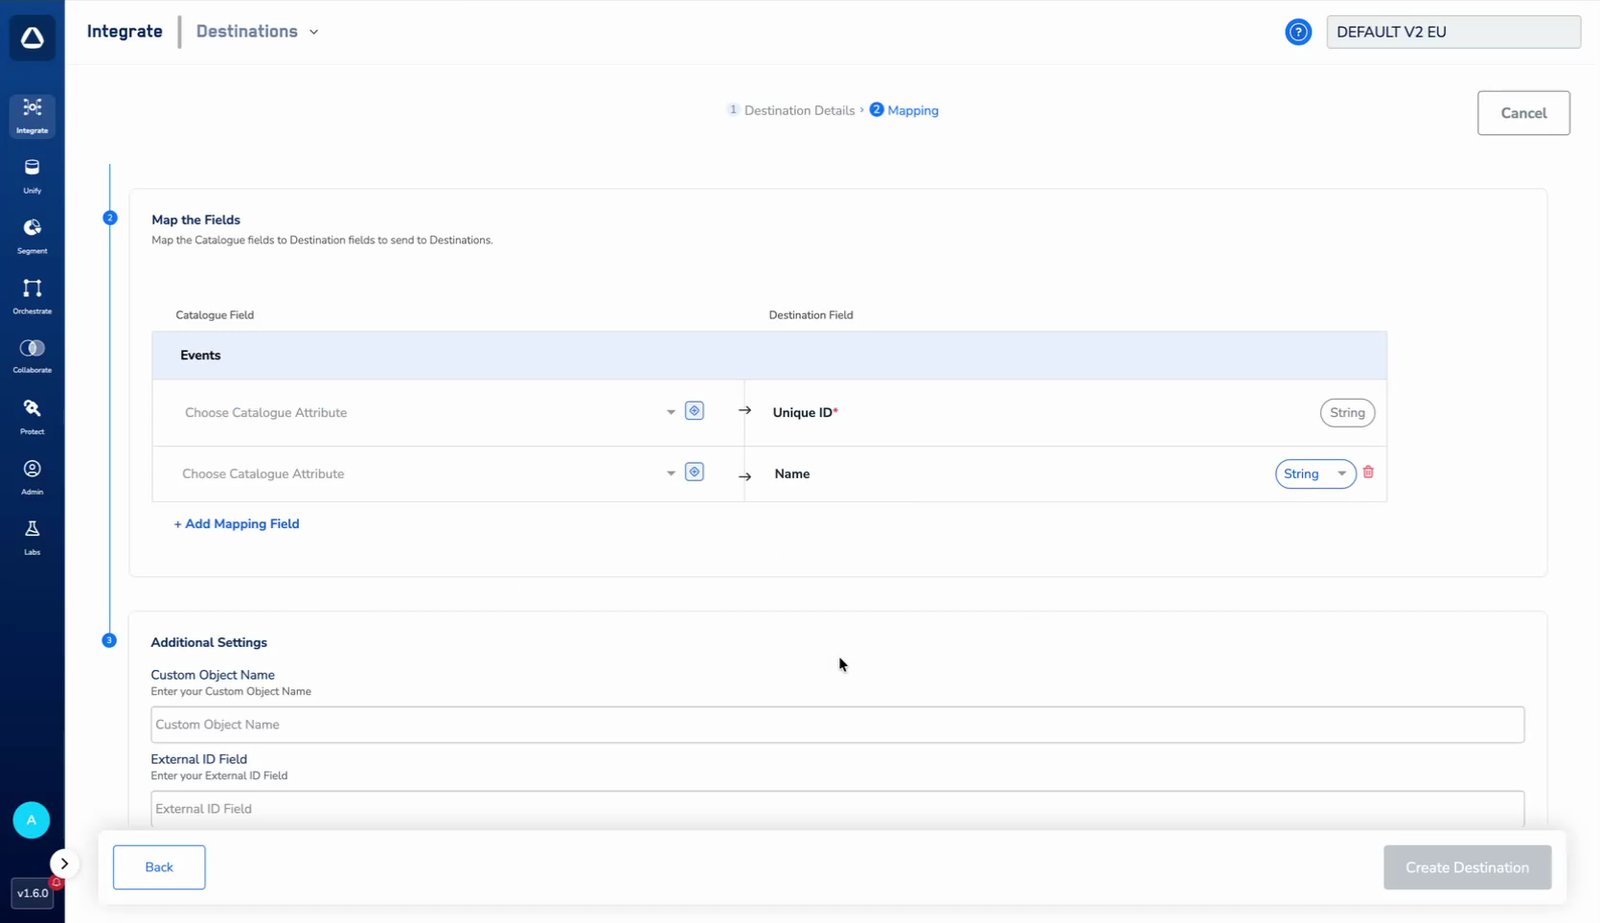 Both values in **Additional Settings** come from Salesforce: find the object's API name in **Setup > Object Manager**, and the external ID field's API name under that object's **Fields & Relationships**.
Click **Save Mapping.**
## Activate the Destination on Journeys
After creating a destination, next, you need to link it in the Send to Destination node within the workflow, as explained below.
In the workflow, **click + and choose Send to Destinations.**
Both values in **Additional Settings** come from Salesforce: find the object's API name in **Setup > Object Manager**, and the external ID field's API name under that object's **Fields & Relationships**.
Click **Save Mapping.**
## Activate the Destination on Journeys
After creating a destination, next, you need to link it in the Send to Destination node within the workflow, as explained below.
In the workflow, **click + and choose Send to Destinations.**
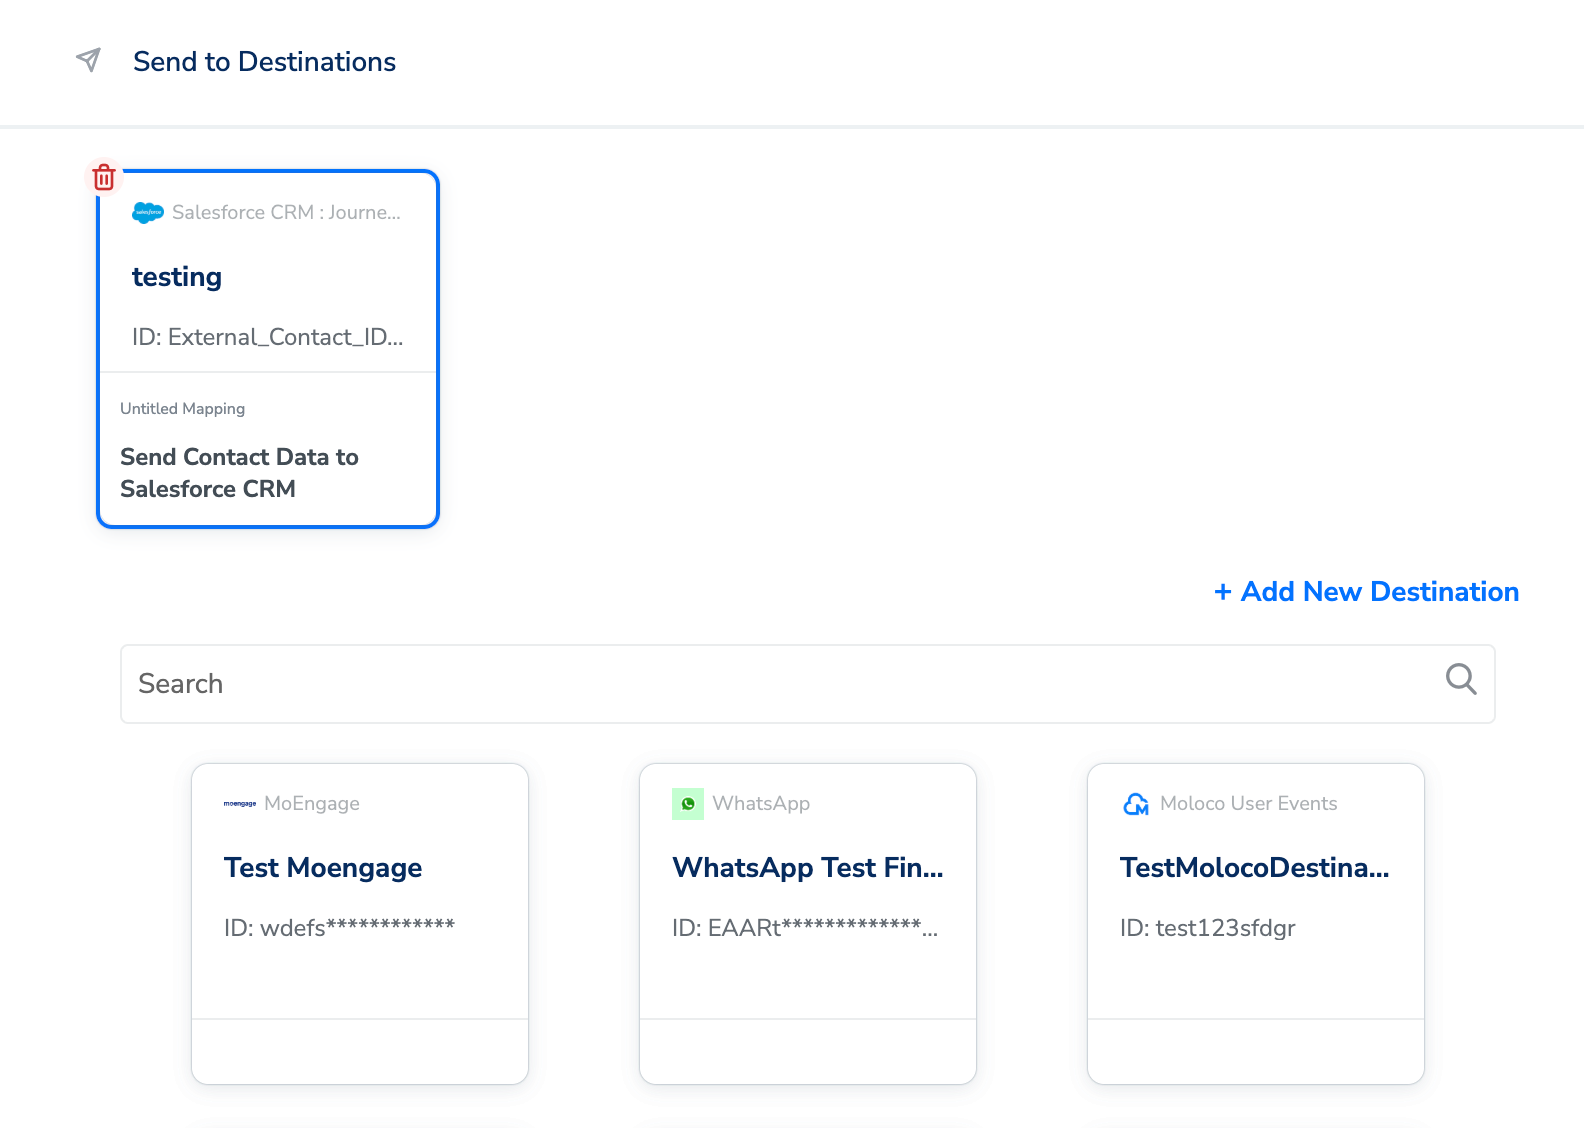
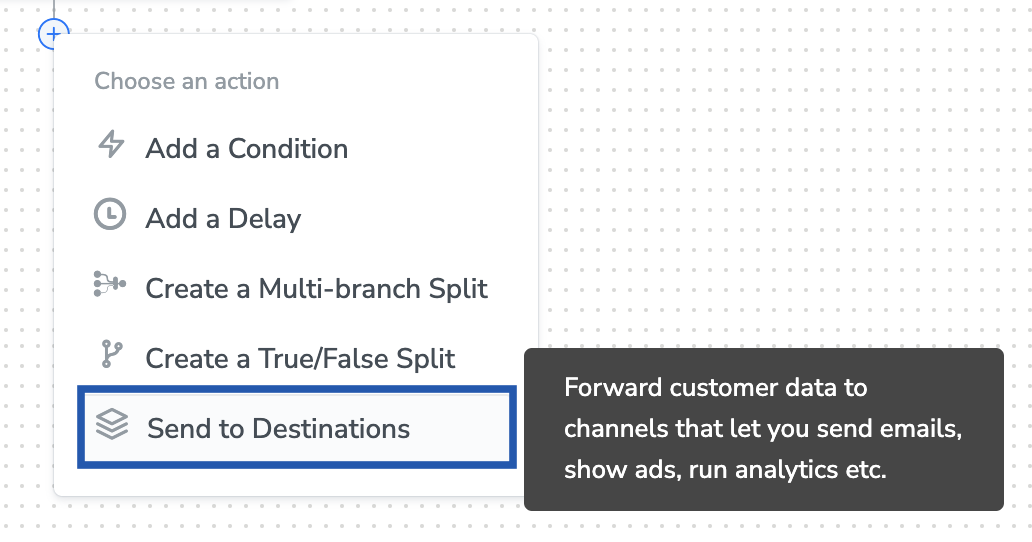 Choose the destination from the list of available destinations by using the search feature.
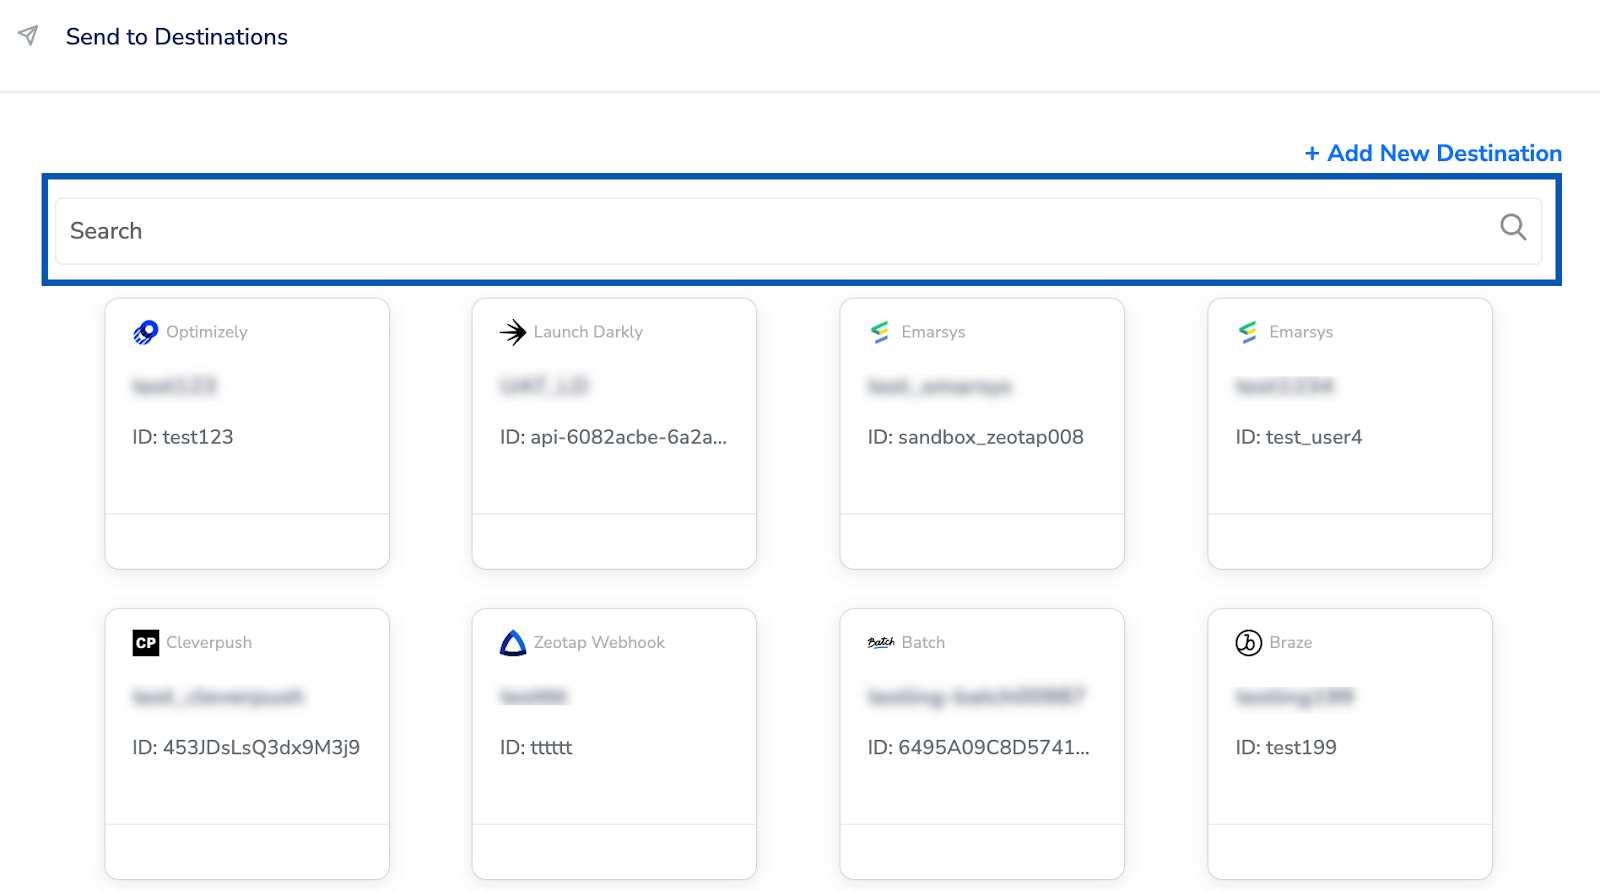 Under the Destination Details tab, the connection details you entered while creating the destination are **automatically populated**.
Under the Destination Settings tab, **choose the Action and mapping** as per your requirement.
Upon clicking **Save Destination**. The destination is attached as shown in the image below.
Under the Destination Details tab, the connection details you entered while creating the destination are **automatically populated**.
Under the Destination Settings tab, **choose the Action and mapping** as per your requirement.
Upon clicking **Save Destination**. The destination is attached as shown in the image below.